Monday, April 11, 2016

Stream DVD to Apple TV 4/3/2 from Mac/PC

Apple TV equipped with full HD 1080p output playback as well as AirPlay functionality, offers users a great viewing and listening experience. 

Many of Apple TV users may own a large collection of amazing DVD movies and want to use AirPlay to stream a DVD to Apple TV without any 3rd-party program. The first thing that comes into your mind is probably using the Apple’s DVD Player Software that usually opens when you insert a DVD. But this won’t work, actually, Apple's DVD player software doesn't support Airplay Mirroring and Apple TV only reads H.264 and MPEG-4 videos. You’ll finally get nothing but an error message “The viewer could not be moved to selected screen.” It seems like a copyright thing that it’s just not legally allowed and therefore suppressed by Apple.

Ripping: Getting the DVD Movies into Mac/PC

The best way to stream DVD to Apple TV 4/3/2 from Mac/PC is ripping the content from your physical DVDs into your Mac or PC with a third party software. There are two aspects you need to pay attention to:

1. Hardware

Take Mac as an example. You should use the fastest Mac, with the most storage capacity you can get (think a 1 TB or larger external hard drive), as ripping is the most time-and-space-consuming aspect of this project.

When planning on how much space you need, calculate how many movies you have, and times that by:
1 GB per DVD (on average). You'll also need to have at least 6 GB of overhead per DVD on your hard drive.

2. Software

Now, on to the software you'll need: iFastime Video Converter Ultimate for Mac. If you are a windows user, you are also provided with iFastime Video Converter Ultimate. This DVD ripping program is highlighting recommended to you for it does a great job in ripping DVDs to Apple TV friendly formats with the best possible lossless quality. It's pretty simple to use and straightforward, and available on both PC/Mac.

Thanks to the advanced technology, this DVD Ripper removes the copy protection from your DVD and convert to just about any movie type. It offers a wealth of tweaking options to get the best possible file as a result, and even has pre-configured profiles built in that make things easier for you to rip DVDs in the right format for Apple TV and other popular devices like iPadiPhonePS4Xbox 360. Plus, ripping Blu-ray/ISO files to Apple TV is also supported by this powerful DVD ripper. (Read review)

The DVD to Apple TV converter for Mac provides additional features including video enhancement and audio extraction capabilities. If you're on a PC and want to get DVD to play on Apple TV 4/3/2 please refer to DVD Ripper for Windows to handle the task.

Free Download or Purchase iFastime Video Converter Ultimate for Mac: 


Other Download: 


Now, we'll show you exactly how to get the DVD into the format you want for Apple TV 4/3/2 to playback on TV. — the fast and easy way even for a first time DVD ripping with a basic knowledge of computer.

Step 1: Select a source

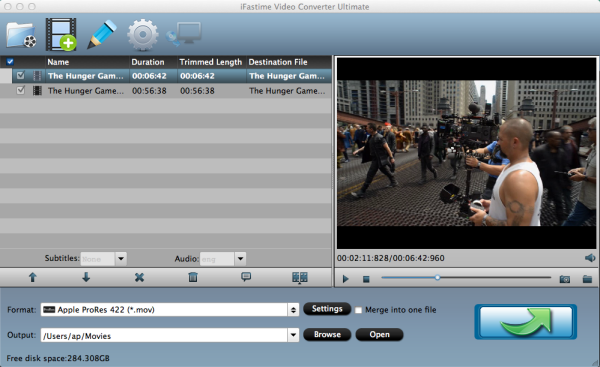
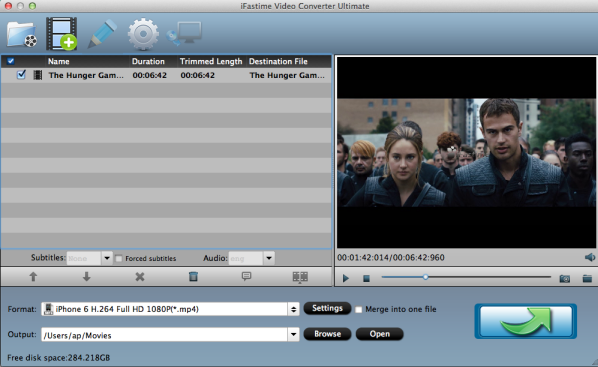
Insert your DVD from DVD drive, then launch DVD Ripper. Now head to “File > Load from disc” to  import the DVD file . Alternatively, Drag the DVD files and drop into the program window. Usually the longest title among many titles is the movie file.

Tips: After the files imported, you can click the title to play DVD movies, take a screen shot by clicking a camera-like button under the preview window. Whats more, all of the major functions are shown in front of you, including edit the files, add subtitles and preview the movie and several other options.


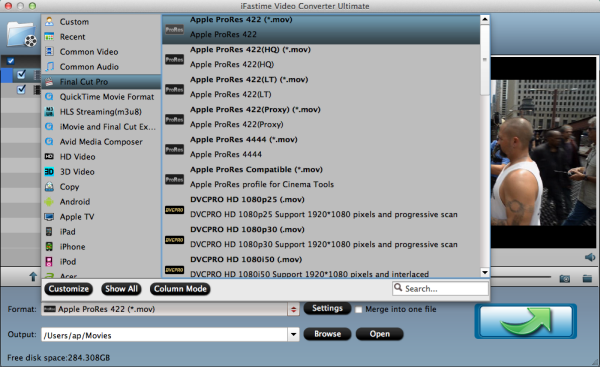
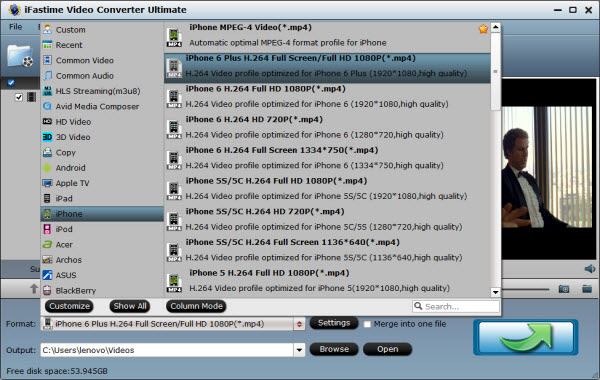
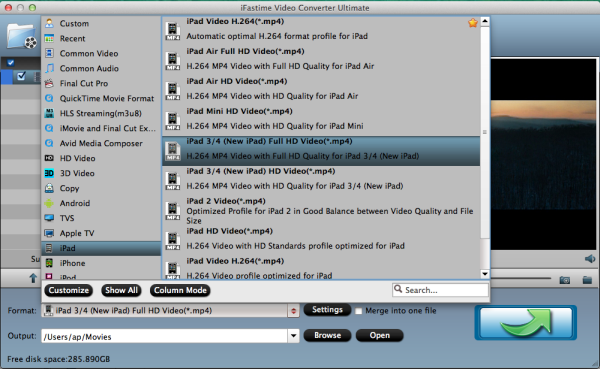
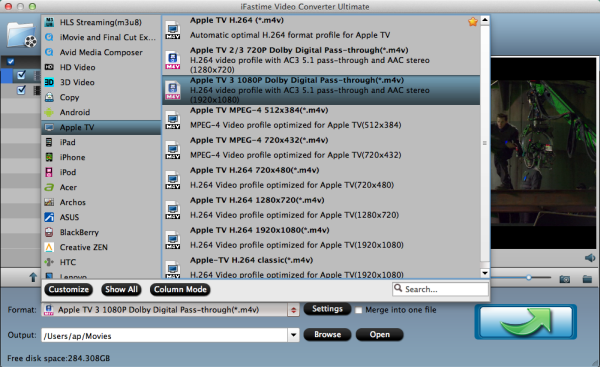
Step 2: Choose Apple TV2/3/4 Preset 

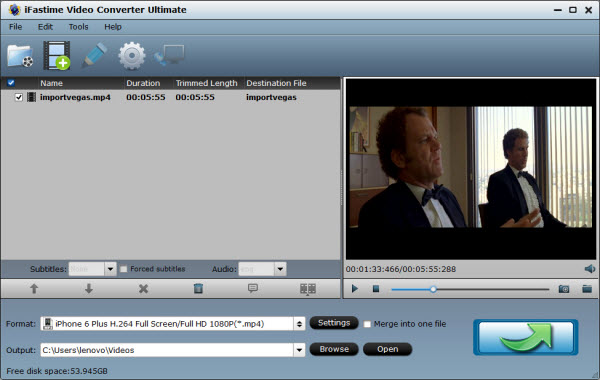
Next you need to decide what format the resulting file will be in. Click on the “format” drop down menu, it will bring up format panel. As we just want to convert DVD to Apple TV file exclusively, so we choose "Apple TV"catalog, you’ll then find several choice for you, just choose the most suitable one depending on your needs. Alternatively, you can set a specific format under "Video" column as output file. According to Apple TV's tech specifications, it will read .m4v, .mp4, and .mov file formats with h.264 / mpeg-4 codec, or .avi file format with Motion JPEG (M-JPEG) codec. So here you are able to pick the correct file format as you like.


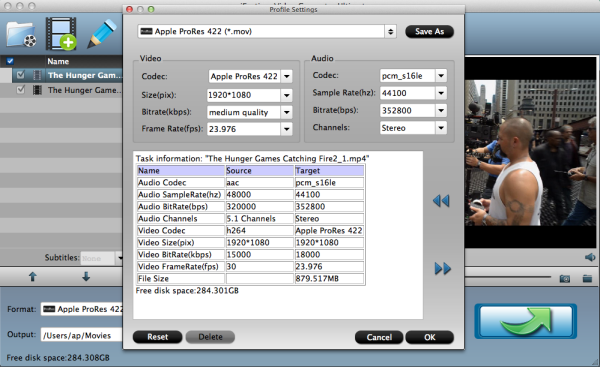
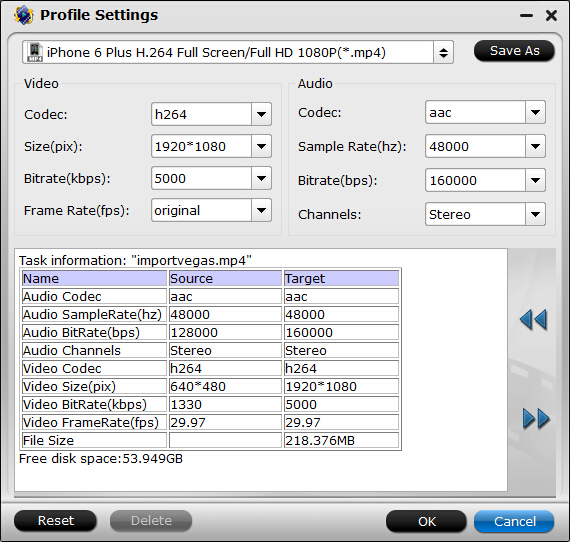
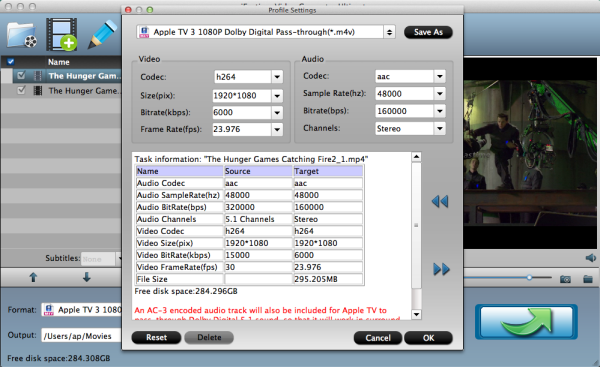
Step 3: Tweak video/audio settings

Then, you are allowed to adjust the output parameter settings to get better video/audio quality before the Mac DVD to Apple TV 2/3/4 process by clicking the “Settings” button. You can adjust video and audio parameters including codec, aspect ratio, bit rate, frame rate, sample rate, etc. For the most part you can leave this alone, the default optimized settings should be fine as is. Please keep in mind, the bitrate setting for any iOS devices can't be up to 160kps.


Step 4: Start Ripping DVD to Apple TV file


Now you can go ahead and rip that DVD. Simply hit the "Start conversion" button to begin ripping DVD movie to specialized Apple TV compatible format. This will take a while, depends on the encoding settings, hardware of your Mac computer and the length of the DVD file. If you don’t want bother to much time waiting, just click the blank before”Shut down computer after convertion”.

After the conversion done, click “Open output folder” to get the target movies.

Sharing converted DVD movies with Apple TV

Now that you have all your DVD movies ripped into your Mac/PC. congratulations! Go ahead and move on to getting them into Apple TV.

There are a few different ways to stream converted DVD to Apple TV:

Method one: AirPlay DVD to Apple TV 2/3/4

Step 1. Open iTunes and add the ripped DVD video to iTunes by File -> Add file to library 
Step 2. Connect your Mac and Apple TV 4 to the same Wi-Fi.
Step 3. Click AirPlay icon (besides volume slider) and select Apple TV to enable the DVD to Apple TV streaming. 
Step 4. And then you can watch DVD on Apple TV 4/3/2.
Note: DVD video to Apple TV 4 AirPlay requires iTunes 10.1 and superior, OS X Mountain Lion and later. Despite the fact it has HDMI 1.4 UHD video output on the back, Apple TV 4 does not allow 4K video streaming or AirPlay. For AirPlay DVD/4K video to Apple TV 4 on both Mac and Windows, give 5KPlayer a shot.

Method two: Mirror DVD to Apple TV 4

Step 1. Play DVD on Mac using an external DVD drive (if needed) and 3rd-party DVD player. 
* DVDs played back with default Apple players cannot be mirrored
Step 2. Open "Settings" on Apple TV to turn on AirPlay. Connect Mac and Apple TV to the same Wi-Fi.
Step 3. Check "AirPlay Display" settings in system preference on Mac. Make sure it is enabled. 
Step 4. Click AirPlay button and select Apple TV. 
Step 5. Tap the AirPlay button again and choose "Mirror Built-in Display". Then you will be able to watch DVD videos on Apple TV/4.
AirPlay and Mirror of course are impressive video streaming technologies for downloaded and locally stored movie files. But is Mirror the best way for playing DVD on Apple TV 4? Well, it depends. It may take you a while to realize that most DVDs cannot be played on Apple TV 4 via mirroring, due to copyright issues, making DVD rip to Apple TV 4 a necessary step.

That's all for the tutorial of how to stream DVD to Apple TV 4/3/2 from Mac/PC, hope it will be useful to you.

Have more questions about how to Stream DVD to Apple TV 4/3/2 from Mac/PC, please feel free to contact us>> or leave a message at Facebook.

More reading:


Friday, April 8, 2016

Edit Sony a6300 4K XAVC-S in FCP on Mac

A Sony a6300 camera can capture 4k (3840 x 2160) video in XAVC-S format, but this video format cannot be edit in FCP on Mac. Here are the FCP supported formats:

Video Formats: Apple Animation codec, Apple Intermediate codec, Apple ProRes(all versions), AVC-intra, AVCHD (including AVCCAM, AVCHD Lite, and NXCAM), DV (including DVCAM, DVCPRO, and DVCPRO50), DVCPRO HD, H.264, HDV, iFrame, Motion JPEG(OpenDML only), MPEG IMX(D-10), REDCODE RAW (R3D), Uncompressed 10-bit 4:2:2, Uncompressed 8-bit 4:2:2, XAVC, XDCAM HD/EX/HD422, QuickTime formats.
Audio Formats: AAC, AIFF, BWF, CAF, MP3, MP4, WAV
Container format: 3GP, AVI, MP4, MXF, QuickTime
Still-image formats: BMP, GIF, JPEG, PNG, PSD, RAW, TGA, TIFF

It is clear that 4K XAVC-S is not supported by FCP. The easiest way to make the 4K XAVC-S be edited by FCP is to transcode 4K XAVC-S file to a format which is compatible with FCP. Then the FCP can recognize the file and handle it well. Apple ProRes codec is the most friendly codec for FCP.

You need a professional video converter to do that job, iFastime Video Converter Ultimate for Mac is right the best choice for you. This video converter has specialized formats for Final Cut Pro. It can perfectly convert XAVC-S to:

1. MP4 to Apple ProRes 422/422HQ/422 LT/422 Proxy (*.mov); Apple ProRes 4444 (*.mov); Apple ProRes compatible (*.mov) for FCP X, FCP 7, FCP 6.
2. Apple InterMediate Codec MOV for Final Cut Express.
3. H.264 MOV/MPEG-2 MPG for Premiere.
4. Convert XAVC-S to AIC MOV for editing in Windows Movie Maker
5. Convert XAVC-S to WMV for Sony Vegas Pro and Windows Movie Maker

All above formats are with high lossless output quality within a very short time. What’s more, it can convert other video formats you get from Sony camera to the formats you want for different usage. Besides, as you are a Mac user, there are many formats specialized for iOS devices, anytime you find format problems, turn to iFastime Video Converter Ultimate for Mac for help. (Read review)

Free Download or Purchase iFastime Video Converter Ultimate:


Other Download: 

Follow the simple guide below, you can clear know how to convert Sony a6300 XAVC-S files for FCP.

Convert a6300 4K XAVC-S to FCP

Install and launch iFastime Video Converter Ultimate for Mac. Then the main interface will come up. The the specific steps are shown below.

Step 1. Add Sony a6300 XAVC-S files

Click “File” button, choose “Add Video/Audio ” to load Sony a6300 XAVC-S video to it. If you wanna load a number of video clips to do batch conversion, remember click the blank left beside Name sign before you start.


Step 2. Choose output format 

Click the drop-down menu besides the format, you can find a long list which are all iFastime supported devices and formats. Select Final Cut Pro catalogue on the left side, then you will find a list shown on the right side, Apple ProRes is the best suited editing codec for all the version of FCP, you are recommended to choose “Apple ProRes 422 (*.mov)” as output format for opening with FCP. You can also choose other Apple ProRes codecs, you can get a better understanding of different types and characteristics of Apple ProRes in this article, and it will be better for you to choose the right codecs for you.


Step 3. Adjust parameter (Optional)

If necessary, you can click “Settings” button and go to “Profiles Settings” panel to modify video and audio settings like video encoder, resolution, video bit rate, frame rate, aspect ratio, audio encoder, sample rate, audio bit rate, and audio channels. 


Step 4. Start conversion

Click “start conversion” button to start Sony a6300 XAVC-S to ProRes conversion. After finish the steps above, you can get converted Sony a6300 XAVC-S files in your output folder you have set before for transferring and editing in Final Cut Pro with optimum performance.

With the most advanced color corrector, DaVinci Resolve can help you creating beautiful videos with Hollywood style just as other professional directors do. While editing with DaVinci Resolve, many folks have high wishes for Resolve 11/12 to add support for 4K XAVC-Long GOP from Sony FS7. If you're in such a situation, you can read on to learn more. In this article, you will learn the reason why Resolve 11/12 has no ability to edit XAVC-L from FS7 and how to get a smooth Sony FS7 4K XAVC-L and DaVinci Resolve workflow.

Have more questions about how to Edit Sony a6300 4K XAVC-S in FCP on Mac, please feel free to contact us>> or leave a message at Facebook.

More reading


Thursday, April 7, 2016

Play MKV on iPad Pro 9.7/12.9-inch with Retina Display

The new member of iPad series iPad Pro is a tablet that comes in /9.712.9-inch. It features a 9.7/12.9-inch diagonal display with a resolution of 2732 x 2048 at 264 pixels per inch. So far, it is the highest-resolution display on any iOS device. This resolution is enough to play HD movies.  It would be much enjoyable to play MKV HD movies or TV shows you collected before on Apple new 9.7/12.9-inch iPad Pro with Retina Display. However, you found some problems just like other apple fans below:

“I got a spooky but interesting MKV file and try to import it to my new iPad Pro for watching it during my weekend. But my iPad Pro seems to have no response at all. Any suggestions? Thanks in advance”

It seems MKV movies cannot directly play on this amazing 9.7/12.9-inch screen.

Why MKV won’t play on 9.7/12.9-inch iPad Pro

MKV (Matroska) is a video container that can hold an almost unlimited number of audio, video, and subtitle tracks which compressed in a number of different audio and video codecs. However powerful MKV is, it is not a friendly format for 9.7/12.9-inch iPad Pro. The new iPad Pro has limited support for some digital file formats:

iPad Pro Supported Video and Audio Formats

Video: 

1. H.264 video up to 1080p, 60 frames per second, High Profile level 4.2 with AAC-LC audio up to 160 Kbps, 48kHz, stereo audio in .m4v, .mp4, and .mov file formats;
2. MPEG-4 video up to 2.5 Mbps, 640 by 480 pixels, 30 frames per second, Simple Profile with AAC-LC audio up to 160 Kbps per channel, 48kHz, stereo audio in .m4v, .mp4, and .mov file formats;
3. Motion JPEG (M-JPEG) up to 35 Mbps, 1280 by 720 pixels, 30 frames per second, audio in ulaw, PCM stereo audio in .avi file format.

Audio:

HE-AAC (V1), AAC (16 to 320 Kbps), Protected AAC (MP4 from iTunes Store), MP3 (16 to 320 Kbps), MP3 VBR, Audible (formats 2, 3, and 4), Apple Lossless, AIFF, WAV

How to make MKV playable for 9.7/12.9-inch?

Wanna make full use of 9.7/12.9-inch wide and clear screen of iPad Pro with Retina Display  to play MKV movies,Choose a powerful video converter to help you deal with MKV won’t play on 9.7/12.9-inch iPad Pro trouble. Here iFastime Video Converter Ultimate for Mac (Windows) is highly recommended to you. 

Why choose iFastime Video Converter Ultimate for Mac?(Windows version have the same functions as Mac version)

1. Several format solutions are specially designed for the new iPad Pro;
2. Video/Audio parameter settings are allowed; 
3. All matched in fast speed and zero quality loss. 
4. Other video formats are supported for playback on other popular devices that not compatible with MKV files like iPhone 6S(Plus)/5S,PS4,Samsung TVAmazon Fire TV ,etc. 
5. Be able to convert DVD/Blu-ray/ISO/VRO/Tivo to iPad Pro for viewing.
6. Support compress any 4K XAVC(S)/H.265 video to 1080p/720p for your usages. (read review)

Free Download or Purchase iFastime Video Converter Ultimate for Mac: 


Other Download: 


Step-by-step tutorial of converting MKV to 9.7/12.9-inch iPad Pro supported format

Step 1. Add Your MKV Files to the Program

Click “File>Add Video/Audio” to import MKV files. You can add as many MKV files as you need at one time for this MKV to iPad converter supports batch conversion. 


Step 2. Select the Output Format

Click “Format” drop-down list and you’ll find 1oo+ output solutions on the pop up window. As this software has specialized video format for iPad Pro, just let your mouse turn to “iPad” on the left side, and select the“iPad 3/4 (New iPad) Full HD Video(*.mp4)” as output video format.


Step 3. Coose output folder for MKV files

Click “Browse” bar and select the final location. 

Step 4. Adjust your MKV files 

You could also click the “Settings” button, you wills see a “Profile settings” window, you are able to adjust the video and audio parameters like Codec, Size, Bitrate, Frame Rate of output files.


Step 5. Start conversion

Simply click “Start conversion” button and the process will be start immediately. You can find the converted MKV files by hit the “Open output folder”If you don’t want bother too much time for waiting for the job done, just click the blank before “Shut down computer after conversion”.

Congratulations! Now you have all your MKV files converted to 9.7/12.9-inch iPad Pro most friendly video formats, you can just transfer them from your computer to 9.7/12.9-inch iPad Pro for exciting playback. 

Additional Tips: Best 5 iPad Pro video players

1. PlayerXtreme Media Player(Free)

When it comes to watching movies or playing music on your iPad, you need some extraordinary media players to deliver the best! And PlayerXtreme seems to be the one. Whether the file is in MKV format or MP4, it plays all the videos and music files on your iPad or iPhone. Most interestingly, the latest version of the app supports the streaming for files larger than 4GB too. It plays the files from your emails too. I haven’t observed this feature in any of the apps till date.

2. MoliPlayer(Free)

MoliPlayer is yet another free app which doesn’t display any kind of ads. The music and video streaming app supports almost all the files and also displays the subtitles which are embedded or files such as srt, ssa, .ass etc which are downloaded separately. In the new updated version, settings option is added to resume playback in last position. Now, it supports RTSP, RTMP, .LRC lyric etc kind of files.

3. Fast Tube HD Video Player(Free)

If you just depend on YouTube for videos and movies, Fast Tube HD video player is the perfect app for your iPhone, iPad or iPod touch. You can search any YouTube video within the app and watch the videos in HD. The app is safe to use and it responds pretty quickly for all the actions. Sharing the videos on social media platforms like Facebook, Twitter etc is easier than never before! Most interestingly, it doesn’t store any history, cookies or cache.

4. Joobik Player 9(Free)

Joobik player is available for both iPhone and iPad users. You can now easily sync your playlists, videos, music files from iTunes and play them instantly. Different play modes are available in the app to shuffle or repeat your favorite tracks. Most interestingly, it can play any non-DRM video on your iOS device. It requires iOS 7.0 or later to work on iPhone or iPad. With the latest version, you can now see the artist or album name, especially for the TV shows.

5. Infuse 3(Free)

Infuse is arguably the best video player around depending on who you talk to. Now up to version 3, this newly updated app supports DTS and DTS-HD audio for files that have it. The app is also probably the best looking video player in this list as well, which may or may not make a difference to you. Infuse 3 is free to download but comes with a bunch of in-app purchases if you want to unlock its full potential. The IAPs range from $2.99 to $9.99, but the free base version of the app will cover most bases in terms of video playback.

Have more questions about how to Play MKV on 9.7/12.9-inch iPad Pro, please feel free to contact us>> or leave a message at Facebook.


More reading:


Monday, March 28, 2016

Watch ISO files on iPhone SE

It been a case for a long time that you wanna watch ISO files on your iPhone With the wide screen and large capacity. So how about the newly released iPhone SE? Can iPhone support ISO files? Let’s take a look at iPhone SE Video formats supported: 

H.264 video up to 4K, 30 frames per second, High Profile level 4.2 with AAC‑LC audio up to 160 Kbps, 48kHz, stereo audio in .m4v, .mp4, and .mov file formats; MPEG‑4 video up to 2.5 Mbps, 640 by 480 pixels, 30 frames per second, Simple Profile with AAC‑LC audio up to 160 Kbps per channel, 48kHz, stereo audio in .m4v, .mp4, and .mov file formats; Motion JPEG (M‑JPEG) up to 35 Mbps, 1280 by 720 pixels, 30 frames per second, audio in ulaw, PCM stereo audio in .avi file format

Unfortunately, with time moving, ISO files are still not compatible with iPhone series. If you want to play ISO movie files on iPhone SE, an effective solution is to convert ISO files to iPhone SE friendly format such as MP4 with iFastime Video Converter Ultimate(Mac version is also supported). This professional ISO to iPhone SE converter is very easy to use and has especially designed video format for iPhone SE, which enables you to rip ISO file to iPhone SE for enjoying your movie anywhere anytime without any quality loss. In addition, you're able to shoot 4K video with iPhone SE, iFastime Video Converter Ultimate can also help you transfer 4K video with iTunes. What’s more, this ISO to iPhone SE ripper also supports to convert 200+ format like AVI, MP4, WMV, FLV, MOV, 3GP, ASF, DIVX, DV, M2P,M2TS,M2V,MPEG, etc for playback on iPhoneiPadiPod, etc. Beside, simple but powerful edit functions like Trim/Crop/Watermark/Add Subtitles are also provided.


Free Download or Purchase iFastime Video Converter Ultimate:


Other Download: 


Convert ISO Image to iPhone SE 

You can follow the specific steps to enable iPhone SE play ISO files.

Step 1. Load ISO Files to iPhone SE
After free download and run this ISO to iPhone converter on your computer, click "Load IFO/ISO" to import it on your computer.


Step 2. Choose Output Format for iPhone SE

Select the output format as you want. If you want to rip ISO to iPhone SE on Mac, this app contains an optimized presetting for iPhone SE. You can choose iPhone catalog as your output format. You just need to go to Format -> iPhone -> iPhone 6 Plus H.264 Full Screen/Full HD 1080P(*.mp4) which is also suitable for iPhone SE, or select “iPhone 6 H.264 Full HD 1080P(*.mp4)” which is also OK for your iPhone SE. What's more, as MP4 is iPhone friendly format, you can also rip ISO to MP4 on Mac.


Step 3. Adjust output video parameter

You can click Settings bottom to adjust the output parameters including video codec, size, bitrate, framerate and sample rate(Hz). You can also just keep video size as original.


Step 4. Select Output Folder
Specify output folder on your PC to save the output files. Click the "Browse" button to choose the path where you want to save the output files in.

Step 5. Start ISO to iPhone SE Conversion.
Click the "Start conversion" button to start ripping ISO to iPhone SE supported format. You can view the backup progress anytime. But you should notice that once the conversion started, you are not able to cancel it. You do not have to wait around for the conversion to complete, you can do your own work by checking ”Shut down computer after conversion” option on the window to leave the program running

After conversion, you can click “Open” button right beside “Browse” to quick location converted ISO images and sync them to iPhone SE via iTunes. Now on your long trip, you can kick back with your iPhone SE device and watch your favorite movies.

Tips:
 1. Syncing with iTunes on a Mac or PC requires:
              Mac: OS X v10.8.5 or later
              PC: Windows 7 or later

 2. there will be watermark on the the converted ISO videos if you convert with the free download trial version.


Additional Tips: How to sync videos to iPhone SE via iTunes

Step 1. Add the ripped 3D Blu-ray videos to iTunes. Then, go to iTunes "Preferences", choose Apple TV, and make sure "Look for Apple TVs" is selected.

Step 2. On your Apple TV, choose Settings "Computers" "Connect to iTunes" and note the passcode displayed; in iTunes, select the Apple TV (below Devices), and enter the passcode.

Step 3. Click the Summary button and select one of "Automatic Sync" and "Custom Sync".

Have more questions about how to Watch ISO files on iPhone SE, please feel free to contact us>> or leave a message at Facebook.

Related Articles:


Thursday, March 24, 2016

Workflow for editing DJI Phantom 4 4K in Avid Media Composer on Mac

About DJI Phantom 4 and 4K videos it captured

DJI Phantom 4 is a slick, feature-packed drone that gives you the ability to capture DCI-spec 4K (4096 x 2160) at 24 or 25 fps and UHD 4K (3840 x 2160) at up to 30 fps whether for cinematography or just shooting for fun. The DJI Phantom 4 4K media is wrapped within a file extension of .mp4 or .mov using a codec called H.264. It uses a high compression algorithm to optimize video playback. Sorry to tell you Avid Media Composer still can't work with DJI Phantom 4 4K video formats. Read Avid Media Composer best compatible format and resolution first.

Best 4K video formats and resolution for editing with Avid Media Composer on Mac

Resolution: 1080P

The playback and editing work of Avid Media Composer and other majority editing software including Final Cut Pro, iMovie, Adobe Premiere, etc. is still been finished in 1080P In most cases.

Format: DNxHD codec

The H.264 codec is not good for video editing. Even with high computer Configuration with a hard disk array, you will encounter performance issues if your source 4K video is in H.264 codec. DNxHD is the most compatible format for Avid Media Composer

The best way to convert and downscale DJI Phantom 4 4K videos to Avid Media Composer

You need a professional video converter to help you convert the original l DJI Phantom 4 4K videos to DNxHD codec and downscale 4K videos to 1080P. iFastime Video Converter Ultimate for Mac is the best one recommended to you. iFastime 4K video converter has the specialized DNxHD video format that allow you to transcode DJI Phantom 4 4K videos Avid Media Composer without any quality loss. It also provides many 4K solutions to all format issues including 4K MOV, 4K XAVC/XAVC S, 4K MP4, 4K MXF, etc.

Moreover, it comes with hundreds of output format presets for other edit software like:

-Apple Inter Mediate Codec for iMovie
-MPEG-2 for Adobe Premiere

What’s more, this 4K converter is also available to Downscale DJI Phantom 4 4K video resolutions to smaller size like 1080p, 720p as you want for easy editing. (Read review)

In order to play or edit DJI Phantom 4 4K videos smoothly, use that is optimized video editing. This format is optimized for all Avid Media Composer versions and the highest resolution is 1080P.

Free Download or Purchase iFastime Video Converter Ultimate for Mac:


Other Download:
The specific DJI Phantom 4 to Avid Media Composer convert step-by-step guidance is as follow. For windows users, refer to the windows version here.

Step 1. Load 4K video 

First, save your DJI Phantom 4 4K videos files on your computer. If they are already on your Mac, just navigate to the folder where they are stored. Locate the DJI Phantom 4 4K videos you want to convert and then drag them from the folder right onto the converter or click “File> Add Video/Audio” to import DJI Phantom 4 4K videos files. They'll then appear on the interface.


Step 2. Choose a proper output format 

Click drop-down menu besides format bar to choose output format. You are provided with two specialized format for Avid Media Composer : Avid DNxHD 720p(*.mov) and Avid DNxHD1080p(*.mov). Choose one of them according to your resolution request.


Step 3. Adjust video settings (Optional)

Click "Settings" button if you'd like to customize advanced audio and video parameters like Video Codec, aspect ratio, bit rate, frame rate, Audio codec, sample rate, audio channels. You’d better downscale DJI Phantom 4 4K to 1080P for easier editing. Of course, if you want to get original 4K resolution, just keep the video size as original. But the conversion time is much longer due to the large video size.


Step 4. Start conversion

As you have finished all settings, hit ”Start conversion” button to transcode DJI Phantom 4 4K video for Avid Media Composer on Mac. You can follow the conversion process from the pop-up windows. If you don’t want to wait for the entire conversion process, you can tick off “shut down computer when conversion completed” and go away to do other things.

After the conversion, you can freely import converted DJI Phantom 4 4K video into Avid Media Composer for natively editing then upload them to website for sharing.

How to import medias to Avid Media Composer

You can import media into your Media Composer so that you can work with images, video or audio clips stored on your computer. When you import any media clip into Media Composer, a new file is created in a folder called the Avid Media File, which is the Managed Media Files folder. This file will be according to the Media Creation settings you specify, and even if your original file gets deleted, you still have the imported copy in the Managed Media Files folder. Let's see how the import is done:

Step 1: Specify the Drive with the Media Creation Setting

Click on the Tools tab in the main menu on the top of your screen and choose Media Creation. Alternatively, you can pres Ctrl+5. This will open the Media Creation window, where you can choose the drive where you want to create the files which you are going to import. Click OK.

Step 2: Go to Project Window

Click on the Format tab in your project window and under Project Type, select the quality you want for your imported files. The highest quality possible is 1080p/23.976. This will again depend whether you are importing a video, audio or HD file. 

Step 3: Highlight and Right Click Import Bin

When you are working in Media Composer, you will have the Import bin window just below the Clips window, on the left of the Source Viewer panel. Click on the Import Bin to highlight it, and then right click inside the Import Bin. Choose Import from the drop down menu.

Step 4: Choose Location of Your Media File

The Import dialogue box will open and you can browse and select the file you want to import. There is a box at the bottom of the dialogue box named Video Drive/Audio Drive, where a particular drive is selected. Make sure that the drive appearing in this box is the same as you chose in Step 1. In the Video Resolution box, you can again choose a quality which you prefer for the imported file. You can ignore this if you are importing an audio file.

Step 5: Choose Options in Import Settings

Click on the Options button in the Import dialogue box, and it will open a window for Import Settings. There are different tabs here, and you may click on each tab to specify all the particular settings you want. These settings cover various areas as to how your image is sized and to what channel it is played on. You can experiment with these settings to get your file just the way you want it. Once you have chosen your settings, click on OK.

Step 6: Load Imported File

You will find your imported file in the Import bin, and it has also been created in the Manage Media Files location. You can load it into the Source Viewer by clicking on the file in the Import bin and dragging it into the monitor panel.

Additional Tips: 

Several elements will also effect editing DJI Phantom 4 4K videos workflow with Avid Media Composer on Mac:

1. The version of Avid Media Composer. In order to work within a 4K project, you must have Avid Media Composer 8.3 or higher

2. Computer Processing Power. High Computer Configuration is required

3. Bandwidth requirements (high speed disk arrays / solid state storage) 

4. Huge storage place. 4K videos are very large, you must make sure that you Mac has enough space for DJI Phantom 4 4K videos.

Check your Mac and find out whether you have such problems. 

Tuesday, March 1, 2016

How to Enjoy MP4 on iOS 9 iPad Pro/iPad Mini 4/iPad Air 2?

After upgrading their iPad Pro, iPad Air 2, iPad mini 4 to iOS 9, some people found they cannot add MP4 to iTunes thus cannot transfer to iPad; other people found MP4 format files can be imported to iTunes and transfer to iPad, but when playback on iOS 9 iPad Pro, iPad Air 2, iPad mini 4, audio and video out of sync issue occures (some people can only hear audio is played, but there is no video or image or picuture; some people can see the video, but no sound or audio is played.


Why can’t play MP4 on iOS 9 iPad Pro/iPad Mini 4/iPad Air 2?

As you know, MP4 is a common contain format which has different codecs. iOS 9 iPad Pro/iPad Mini 4/iPad Air 2 don’t support all MP4 codecs, that’s to say, some MP4 videos are not supported by iPad Pro/iPad Mini 4/iPad Air 2.

How to Make iPad Pro/iPad Mini 4/iPad Air 2 Play MP4 videos?

In order to make you successfully play MP4 files on iOS 9 iPad Pro, iPad Air 2, iPad mini 4, MP4 files shall meet the following requirements: H.264 video up to 720p, 30 frames per second, Main Profile level 3.1 with AAC-LC audio up to 160 Kbps, 48kHz, stereo audio; MPEG-4 video, up to 2.5 Mbps, 640 by 480 pixels, 30 frames per second, Simple Profile with AAC-LC audio up to 160 Kbps, 48kHz, stereo audio.

Your iOS 9 iPad will not recognize the MP4 files if they don’t match the above requirements. Let 
iFastime Video Converter Ultimate for Mac (Windows) to hepl you. This easy-to-use MP4 to iPad converter can encode any MP4 videos to iOS 9 iPad Pro/iPad Mini 4/iPad Air 2 supported H.264 MP4 for smooth playing. (read review)

Free download the best MP4 to iPad video converter for Mac:


Other Download: 

Steps to Transcode MP4 to iOS 9 iPad Pro/iPad Mini 4/iPad Air 2

STEP 1. Add MP4 videos

Run the best MP4 Video Converter program and click "Add video" button to select the MP4 video files you want to import. You can also directly drag the video files to the program for conversion.


STEP 2. Choose right format for iPad (Air 2/Mini 4/Pro)

Click Format bar and choose "iPad Air Full HD Video(*.mp4)" "iPad Mini HD Video(*.mp4)", or "iPad 3/4 (New iPad) Full HD Video(*.mp4)" from "iPad" as the target format. It is the most common video format for iPad Air 2/iPad Mini 4/iPad Pro.


Tips:. Advanced video/audio settings

Adjust the video and audio parameters, including the Bitrate of Video & Audio, Video Size, Sample Rate, Frame Rate, Audio Channels, etc., by clicking the "Settings" button on the main interface for getting the best quality.

STEP 3. Start MP4 to iPad conversion

After all necessary settings, click "Start conversion" to start the conversion. When the conversion completes, you can click Open button to get the output videos. Now sync the converted MP4 video files to your iPad (Air 2/Mini 4/Pro) for great enjoyment. Have a try.

Have more questions about how to play MP4 on iOS 9 iPad Pro/iPad Mini 4/iPad Air 2, please feel free to contact us>> or leave a message at Facebook.

More Topics:

Source: http://mp4gear.over-blog.com/2016/play-mp4-on-ios-9-ipad