Speaking 3D Blu-ray, maybe you are excited due to the 3D Blu-ray amazing playback. But many people are worrying 3D Blu-ray can’t putted into Apple TV 4. Good news is there is a powerful Blu-ray ripper can do it. It will be a piece of cake of streaming 3D Blu-ray through Apple TV 4 and playing on 3D TV with 3D effect. It is called iFastime Video Converter Ultimate for Mac. With it, you can easily and quickly convert 3D Blu-ray to Apple TV 4 and 3DTV supported videos on Mac or Windows. In this program, you only need three clicks on the mouse, and you can directly select the output format from 3D icon. Besides 3DTV, it also supports converting DVD/Blu-ray and various 2D/3D videos to various TV including Smart TV, Samsung TV, LG TV, Sony TV, 4K TV, and more TVs. (read review)Free download the top video converter for Mac:
 Other Download:
Three steps to rip 3D Blu-ray through Apple TV 4 on 3D TVStep 1. Load 3D Blu-ray movieClick "Load File(s)" button to load your source 3D Blu-ray to the software. You can preview your 3D Blu-ray movie in the right window.
Other Download:
Three steps to rip 3D Blu-ray through Apple TV 4 on 3D TVStep 1. Load 3D Blu-ray movieClick "Load File(s)" button to load your source 3D Blu-ray to the software. You can preview your 3D Blu-ray movie in the right window.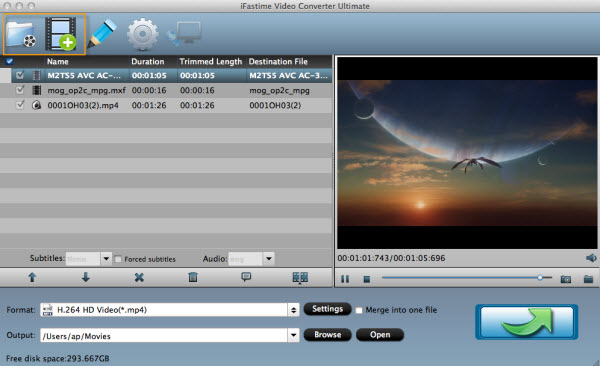 Step 2. Choose compatible video formatClick the Format bar to follow "3D Videos" and choose the 3D Side-by-Side MP4 format which is most compatible with 3D TV.
 Step 3. Start conversionHit the "Start conversion" button to rip your Blu-ray movies to SBS 3D MP4 video for 3D TV. When it finishes, click the "Open" option to locate the created 3D video and transfer your 3D Blu-ray movie to 3D TV via Apple TV for entertainment. Have more questions about how to stream 3D Blu-ray through Apple TV 4 on 3DTV, please feel free to contact us>> or leave a message at Facebook.More Topics:
Source: http://3dtv-sky.jimdo.com/2015/12/01/stream-3d-blu-ray-through-apple-tv-4-on-3d-tv/
Step 3. Start conversionHit the "Start conversion" button to rip your Blu-ray movies to SBS 3D MP4 video for 3D TV. When it finishes, click the "Open" option to locate the created 3D video and transfer your 3D Blu-ray movie to 3D TV via Apple TV for entertainment. Have more questions about how to stream 3D Blu-ray through Apple TV 4 on 3DTV, please feel free to contact us>> or leave a message at Facebook.More Topics:
Source: http://3dtv-sky.jimdo.com/2015/12/01/stream-3d-blu-ray-through-apple-tv-4-on-3d-tv/
The iPhone 7, expected to hold steady at 4.7- and 5.5-inches, could be in for a major resolution jump. A source told Digitimes in September that Apple will "most likely" switch to glass-on-glass displays, which opens up the possibility of a 4K or Ultra HD resolution. Whether the rumored features will come true is still unknown, but it is sure that you can play Blu-ray on iPhone 7 and also iPhone 7 Plus. It doesn't mean that the new iPhones will have Blu-ray slots. It is impossible. What I mean is you can apply a Blu-ray converter to convert Blu-ray to iPhone 7 playable formats. Thus, you don't need to juggle your Blu-ray discs and can watch the Blu-ray movies videos on iPhone 7 anytime anywhere.Hot search: iPhone 7/6S vs Samsung Galaxy S7 | iPhone 7 vs iPhone 6s A Helpful Tool to Help Play Blu-ray on iPhone 7As mentioned below, all you need is a Blu-ray converter to make Blu-ray playable on iPhone 7. So, the first thing you need to do is to download and install a suitable Blu-ray converter. There are too many choices in the market, but some may not satisfy your needs. Then, which one to download is a big problem. Fortunately there's a good option for those who want to play home-made Blu-ray and also commercial copy-protected Blu-ray on iPhone 7, namely iFastime Video Converter Ultimate for Mac (Windows).iFastime Video Converter Ultimate is a professional Blu-ray converter for iPhone 7. It is specially designed to rip any Blu-ray, be it unencrypted or locked by region codes and strict copy protection schemes, to popular devices like iPhone 7 (read iPhone 7 supported formats), iPhone 6/6S(Plus), iPad Air 3, iPad Pro, Apple TV 4, Android Samsung, Windows Phone and common formats like MP4, MOV and 3GP. Besides, it also can make you play any DVD, SD/HD/4K videos and downloaded videos on iPhone 7 and other devices easily.Thanks to the support for NVIDIA CUDA technology and AMD Accelerated Parallel Processing (APP), it can rip a Blu-ray to iPhone 7 in a matter of minutes. And High Quality Engine ensures that the output quality is distinct as the original. Ok, now follow me to learn how to quickly rip Blu-ray to iPhone 7 for smooth playing. Free download the best Blu-tay to iPhone 7 converter: Other Download:
How to Rip Blu-ray movies to iPhone 7 supported videos for playing?Step 1. Import Blu-ray moviesClick "Load file(s)" button to import Blu-ray movies to the app. All loaded videos can be previewed and you're free to take snapshots of your favorite movie scenes in the right window.
A Helpful Tool to Help Play Blu-ray on iPhone 7As mentioned below, all you need is a Blu-ray converter to make Blu-ray playable on iPhone 7. So, the first thing you need to do is to download and install a suitable Blu-ray converter. There are too many choices in the market, but some may not satisfy your needs. Then, which one to download is a big problem. Fortunately there's a good option for those who want to play home-made Blu-ray and also commercial copy-protected Blu-ray on iPhone 7, namely iFastime Video Converter Ultimate for Mac (Windows).iFastime Video Converter Ultimate is a professional Blu-ray converter for iPhone 7. It is specially designed to rip any Blu-ray, be it unencrypted or locked by region codes and strict copy protection schemes, to popular devices like iPhone 7 (read iPhone 7 supported formats), iPhone 6/6S(Plus), iPad Air 3, iPad Pro, Apple TV 4, Android Samsung, Windows Phone and common formats like MP4, MOV and 3GP. Besides, it also can make you play any DVD, SD/HD/4K videos and downloaded videos on iPhone 7 and other devices easily.Thanks to the support for NVIDIA CUDA technology and AMD Accelerated Parallel Processing (APP), it can rip a Blu-ray to iPhone 7 in a matter of minutes. And High Quality Engine ensures that the output quality is distinct as the original. Ok, now follow me to learn how to quickly rip Blu-ray to iPhone 7 for smooth playing. Free download the best Blu-tay to iPhone 7 converter: Other Download:
How to Rip Blu-ray movies to iPhone 7 supported videos for playing?Step 1. Import Blu-ray moviesClick "Load file(s)" button to import Blu-ray movies to the app. All loaded videos can be previewed and you're free to take snapshots of your favorite movie scenes in the right window.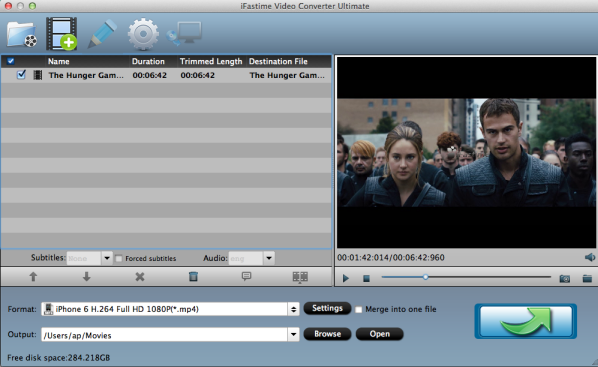 Step 2. Select an output format for your iPhone 7You can select iPhone 7 preset from "iPhone" as the export format. The output videos could fit all iPhone model with excellent quality. Of course, you can also set MP4, MOV or M4V from the "Common Video" drop-down list.
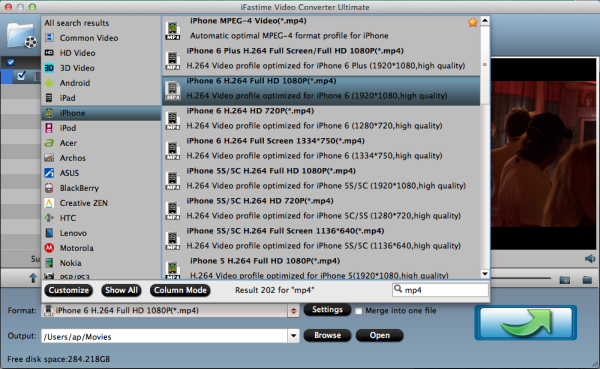 Tip: If you like, click on "Settings" and you could easily set bitrate, frame rate, codec, channels, sample rate, etc to adjust parameters that affect video quality and file size for the video you prefer. Keep in mind bitrate higher results in big file size, and lower visible quality loss, and vice versa.
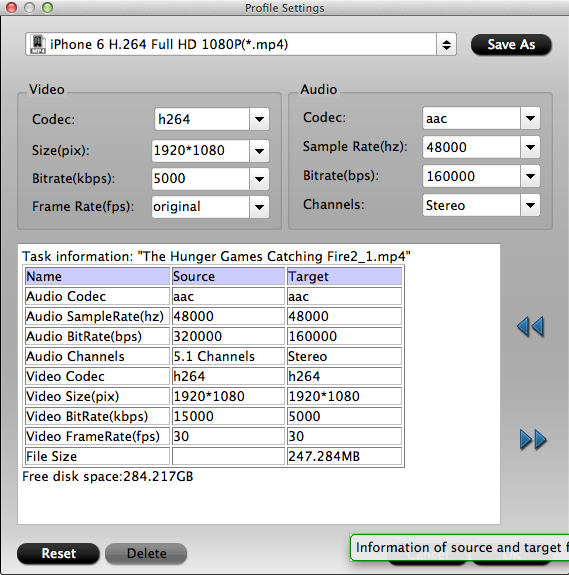 Step 3. Start ripping Blu-ray to iPhone 7 on MacThe last step is to click the "Start conversion" button at the bottom right corner to start ripping Blu-ray to iPhone 7 on Mac. When the conversion done, click "Open" to get the iPhone compatible videos. Have more questions about how to play Blu-ray on iPhone 7, please feel free to contact us>> or leave a message at Facebook.More Topics:
Let’s say you’ve recorded many TV shows with TiVo and want to transfer them to your iPad Pro for playback. No matter where you are, whenever it is, just take out the iPad Pro from your handbag and enjoy your favorite TV programs or football matches freely! Nice idea, isn’t it? This article discusses an easy way to watch Tivo files on iPad Pro by converting the TiVo files to iPad Pro supported video format.There are many kinds of video converter software on market, yet few do convert TiVo files because all TiVo files are DRM protected. One highly recommended program is iFastime Video Converter Ultimate for Mac (Windows), which will remove DRM automatically while converting TiVo files to iPad Pro supported video format with fast speed and excellent output quality. Besides, it also can convert Tivo files to various popular Apple devices like iPhone 6s, iPad Air 2, iPad mini 4, Apple TV 4, and more. (read how to remove protection and cut off commercials from TiVo recordings)Editor’s Note: I use iFastime Video Converter Ultimate for Mac for coverting TiVo videos for my iPad Pro. It works very well and I haven’t really had any problems. Conversion speed seems fine and the videos look good on the iPad Pro. I saw iFastime mentioned in the TiVo forums as a good way to convert for the iPad so I decided to try it. It’s much better than TiVo’s converter. TiVo’s converters for mobile devices are terrible.Free download the top video converter for Mac: Other Download:
How to Convert Tivo files to iPad Pro for watching?1. Click "Add video" button to choose video files from your hard drive for converting. Or directly drag the movies you want to convert to the left item bar. Before loading your Tivo files, iFastime TiVo Converter will ask you to input your Media Access Key. Simply enter your Media Access Key, and click "OK" to confirm.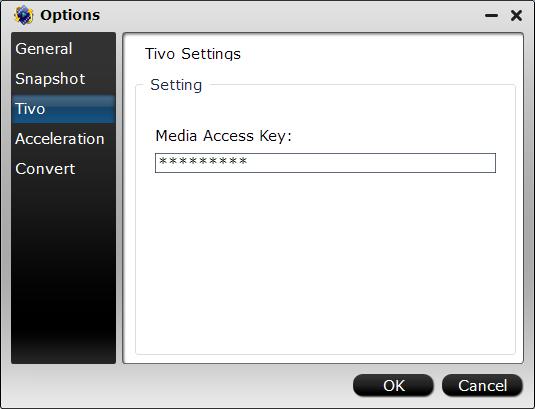 2. Click on the pull down menu of "Format" and then tap "iPad", after that, you will see three options optimized for iPad showing as below, including "iPad Video H.264(*.mp4)", "iPad Air Full HD Video(*.mp4)", "iPad Air HD Video(*.mp4)", "iPad Mini HD Video(*.mp4)", "iPad 3/4 (New iPad) Full HD Video(*.mp4)", "iPad 3/4 (New iPad) HD Video(*.mp4)", "iPad 2 Video(*.mp4)", "iPad HD Video(*.mp4)". You can select any one of them according to your own needs.
 The default settings may not satisfy you, and you can click the "Settings" button to change the settings by yourself including video resolution, bit rate, audio sample rate, audio channel etc. for full screen playback smoothly. Or keep no changes, which is also a good choice.3. Click the "Start conversion" button on the main interface and the software will start to convert to friendly video formats immediately. When the conversion finishes, click "Open" to find the converted video files. Then you can effortless transfer the video files to iPad Pro for playback on the go.Have more questions about how to watch Tivo files on iPad Pro, please feel free to contact us>> or leave a message at Facebook.More Topics:
With QuickTime installed, you may already have lots of QuickTime files stored on your Mac running Mac OS X 10.11 El Capitan, Mac OS X 10.10 Yosemite, 10.9 Mavericks, 10.8 Mountain Lion, 10.7 Lion, 10.6 Snow Leopard, 10.5 Leopard. And you can use QuickTime Player to publish your media to MobileMe without worrying about formats or resolutions. But sometimes there would be some hurdles to upload them to websites such as YouTube. There are two reasons for that. One is you sould make sure your QuickTime video is smaller than 2Gb in size and less than ten minutes in length. If your QuickTime file is larger than 2Gb, you will need to re-export your QuickTime video with the proper settings. Please allow several minutes for your video to upload to YouTube's server, and up to several hours for it to appear in YouTube's search engine. In this case, you can learn the method from the following method:Re-Exporting Your QuickTime Video (Over 2Gb in Size)Re-open your large QuickTime movie file in QuickTime Pro.
- Click "File" > "Export."
- Choose the "Movie to QuickTime Movie" option from the "Export" drop down menu.
- Click the "Options..." button, located on the right side of the screen.
- Make sure the "Video" and "Audio" tabs are checked off and click the "Prepare for Internet Streaming" box near the bottom of the page. Select the "Fast Start" option.
- Click "Save" and wait for your QuickTime video to save to your hard drive.
Another reason is MOV format specifies a multimedia container file that contains one or more tracks, each of which stores a particular type of data: audio, video, effects, or text (e.g. for subtitles). But YouTube is more compatible with MOV files with H.264 and AAC audio codec. Once your MOV file that you try to upload to YouTube is encoded with other video and audio codec, the case mentioned at the beginning will happen. Except the second QuickTime video codec reason is the main one. So in order to make you Upload QuickTime movies to YouTube without any problems, you can use iFastime Video Converter Ultimate for Mac (Windows) to help you. It not only can easily convert QuickTime videos to YouTube supported formats, but also can edit your videos including split, merge, trim, crop, add watermark, adjust video effect, edit audio and insert subtitles, ect.Hot search: DVD to YouTube | iPhone 6S 4K shot to Youtube | AVI to YouTube | YouTube to Dropbox | YouTube video to Samsung TVFree download the top video converter for Mac: Other Download:
How to convert QuickTime movies to YouTube supported formats for uploading?Step 1. With the QuickTime to YouTube Mac converter, you can go to "File" > "Load Files" and navigate to the files you want to add, or directly drag the source QuickTime files to the Mac app. Step 2. Set right output format. Click "Format" bar, and select .mp4 from "Common video" 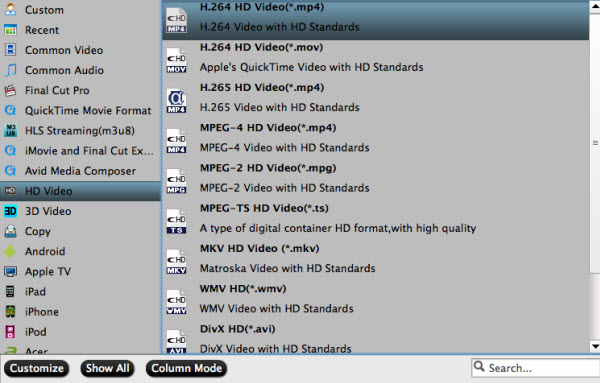 Step 3. Press the button of "start conversion" and let this smart Video Converter for Mac do the rest for you! This QuickTime to YouTube converter works on MacBook, MacBook Pro, MacBook Air and iMac with Mac OS X El Capitan, Yosemite, Mavericks, Mountain Lion, Lion, and Snow Leopard. When finished, the output folder will open automatically.How to Upload videos to YouTube?
- Launch your Web browser and visit YouTube.com. Click the "Upload" link at the top of the screen.
- Click the "Browse" button to open a pop-up search window revealing your computer's contents. Navigate to the desired QuickTime video, highlight its icon, and click "OK."
- Click the "Upload" button to begin uploading your video to YouTube's server. While it uploads, enter any pertinent information for your video (e.g. Title, Description, Category, etc).
- Press the "Save" button to save all your video's information. Wait for your video to upload completely.
Have more questions about how to upload QuickTime movies to YouTube, please feel free to contact us>> or leave a message at Facebook.More Topics: