Method 1: Copying an Unprotected DVD
1. Place the DVD you want to copy into your DVD drive. If it begins auto-playing, stop it.
2. Find out whether you have enough hard drive space to copy the DVD.
Select the DVD in the finder and then press Command+I to get info about the disc. Check out the used space to see how large the disc is.
Check your hard disc space. If you have 5 gigs more available space on your hard drive than used space on the DVD, you can continue ripping DVDs.
3. Open Disk Utility. You can find it in the Applications folder, located in the Utilities section.
4. Click on the name of your DVD. It should be in the white pane on the left-hand side.
5. Choose New Image in the disk utility toolbar. A "Save As" dialog box will appear.
- Name the new image.
- Choose a destination where you want to save to the DVD.
- Set the image format (at the bottom; not format) to DVD/CD Master.
- Set the encryption to None.
- Click Create and OSX will create your image file with a .cdr extension.
6. When the file is done saving, eject the DVD. You can watch the movie straight from your hard drive if desired, or convert it and burn a new disc.
7. Convert the file if you want to burn a new DVD. Once you've created your CD/DVD master as a .cdr file, it's a good idea to convert to .dmg by saving as a compressed format if you want to burn a copy. The .cdr is usually too large.
To convert the file, select convert in the top menu. Choose image format "Compressed" and "None" under Encryption. Add a .dmg extension on the file and you'll be ready to burn.
Method 2: Ripping a Copy-Protected DVD with MakeMKV
1. Download the appropriate software. Because nearly every DVD released has copy protection built-in, you cannot use Disk Utility to make a copy of it. You will need a third-party program that is made to remove the copy protection. The most popular tool is MakeMKV, which is currently available for free.
Removing the copy protection from DVDs that you do not own is illegal in most countries.
2. Insert the DVD you wish to copy. Run MakeMKV. Select your DVD drive from the Source pulldown menu in MakeMKV.
3. Select the content you want to copy. DVDs are often broken down into several "titles". These titles include things like previews, menus, bonus features, and the actual movie. Uncheck the boxes for any content that you don’t wish to copy.
Titles less than 2 minutes will be automatically unselected. This will remove most previews from your finished rip.
4. Select your output folder. This is where the finished file will appear after it is done being ripped.
5. Rip the DVD. Once you have selected all of the settings that you want, click the Make MKV button. This will begin the ripping process. The time that it takes is dependent on the speed of your DVD drive. The average time to rip a DVD movie is about 15-30 minutes.
6. Play the video. MakeMKV creates an MKV file that contains all of the video and audio information. This file will be as large as the DVD was. MKV files do not work in iTunes or Windows Media Player, but can be played using the free VLC Player.
MKV files are lossless files. This means that the image and audio quality is retained from the original source.
7. Convert the video file. If you want to add the video to your iTunes library, or play it on your iDevice, you will need to convert and compress it to MP4 format. You can do this using HandBrake, a free conversion program. Converting the video will also reduce the size, allowing you to store more videos on your hard drive. Converting will result in a loss of quality.
8. Burn it to DVD. Once the file has been converted to MP4, you can burn it to a DVD to watch anywhere. There are programs available online that will allow you to burn the MKV file to DVD as well.
Method 3: Ripping DVD with the best DVD copier and ripper
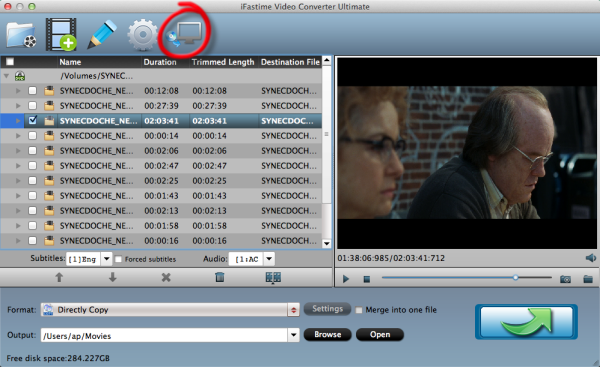
iFastime Video Converter Ultimate for Mac is a professional DVD ripper and copier. It has solved many DVD backup issues, Blu-ray included. This free Mac DVD ripper enables you to rip both homemade and protected DVDs by removing the Halloween DVD copy protections, such as CSS encryption, RCE region protections, ARccOS copy protection, even rip Disney encrypted DVDs for you to backup your legally-purchased DVDs on Mac computer, be it iMac 5K, Macbook Pro, Macbook Air, or 2015 Macbook. Within 3 steps, you can fulfill the 99-title DVD rip on Mac OS X 10.11 El Capitan.
As one of the best DVD copier and ripper for Mac, it supports 1:1 copy DVD/Blu-ray, directly copy DVD/Blu-ray, rip DVD to any popular video format, so that you can enjoy DVD movies by your iPhone, iPod, iPad, Mac computer, QuickTime, iTunes, Apple TV 4, even upload them to YouTube, FB for sharing with your friends. Flexible parameter settings and advanced functions will assist you to make stylish videos by clipping video segment, adding external subtitles, changing/reducing video size, etc.
3 Steps to 1:1 Backup Halloween DVD on Mac OS X 10.11 El Capitan


Step 1: Add Halloween DVD movies
After downloaded and installed this Mac DVD Ripper on Mac, click "Load files" to add DVD movies to the software to rip on Mac.
Step 2: 1:1 Backup Halloween DVD
Click quick button "Copy the entire disc" (1:1 copy) to starts copying the DVD disc to hard drive maintaining the original structure.
As soon as the copying task finished, you can click "Open" button to locate generated BD folder. Connect your hard drive to computer and transfer them into it or directly store it on your Mac computer. The final output files have the same structure as that on the original Blu-ray disc.
Tip: If you just wanna do movie only copy, you can choose "Copy" > "Directly Copy" or "Directly Copy For 3D Bluray" from the Format menu to copy the DVD movies. After that, do remember clicking "Start conversion " button to do Movie-only copy. When the copying work is done, you are able to click "Open" button to get the output files without any other extra contents.
Have more questions about how to 1:1 backup Halloween DVD on Mac OS X 10.11 El Capitan, please feel free to contact us>> or leave a message at Facebook.
More Topics:
No comments:
Post a Comment