Showing posts with label 4K. Show all posts

Tuesday, October 4, 2016

Blade Chroma 4K in FCP X with ProRes codec natively on Mac

The Blade Chroma 4K is a relatively compact camera drone that easily breaks down for travel. Includes an all-in-one controller with first-person-view screen and camera controls and can also be used with Yuneec’s ulracompact Wizard controller. This is the Ready-to-Fly(RTF)version of the Chroma Camera Drone from Blade, which includes the ST-10+ transmitter/personal ground station combination. It incorporates the CGO3-GB, a 3-axis ginbal-stabilized able to capture 4K video, 1080p video at up to 120 fps, and shoots photos at 12-megapixels. Photos can be captured in JPEG or DNG RAW and it is possible to snap photos while recording video. 

When you wanna import Blade Chroma 4K to Final Cut Pro X for further editing, you will probably got some issues like program crashed, black viewer screen, no audio track… So, what’s the right workflow for Blade Chroma 4K videos in Final Cut Pro X? Any suggestion? Yes, just read on to get the solution for importing and editing Blade Chroma 4K in FCP X. 

What you need to do is change Blade Chroma 4K to the ProRes codec which is the best codec for FCP X. Actually, it’s not as difficult as you imagine. What’s need is a just a common video converter like Pavtube HD Video Converter for Mac - The program works as the best Mac 4K to FCP X Video Converter. It helps you fast transcode Blade Chroma 4K footage to ProRes with fast encoding speed and without quality loss. What’s more, it’s the optimal tool for transcoding GoPro, Sony, Canon, Nikon, Panasonic, etc camera or camcorder videos to kinds of NLE programs Avid Media Composer, Adobe Premier Pro, DaVinci Resolve Lite, FCE and more. For Windows user, please turn to Pavtube HD Video Converter. Just download it and follow the simple guide to achieve your goal. 

Hot search: Canon C100 Mark II AVCHD to FCP X * Panasonic DMC-G7 4K MP4 to FCP X * Sony HDR-CX440 XAVC S to FCP X * Samsung NX500 4K H.265 in FCP 6/7 


Other Download: 

Start converting Blade Chroma 4K to ProRes codec for ediitng with FCP X 

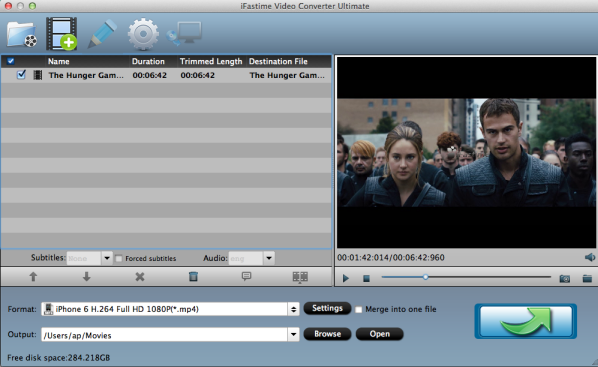
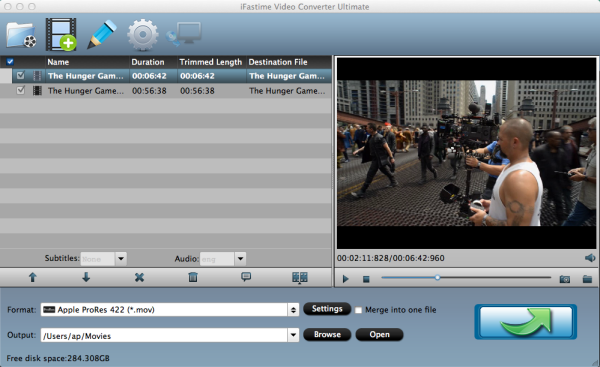
Step 1. Click “Add video” button to choose Blade Chroma 4K video files from your hard drive for converting. Or directly drag the Blade Chroma 4K videos you want to convert to the left item bar. 


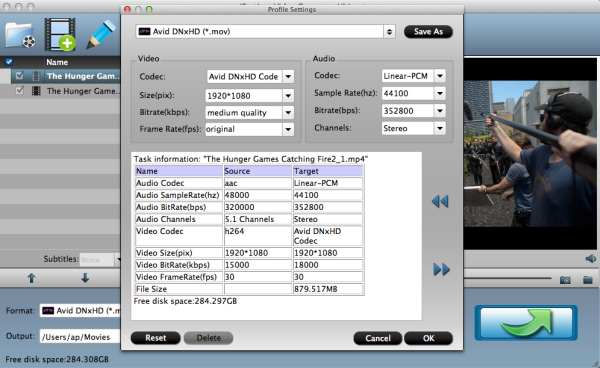
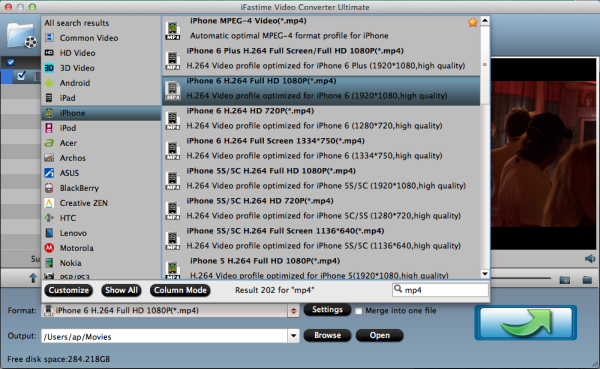
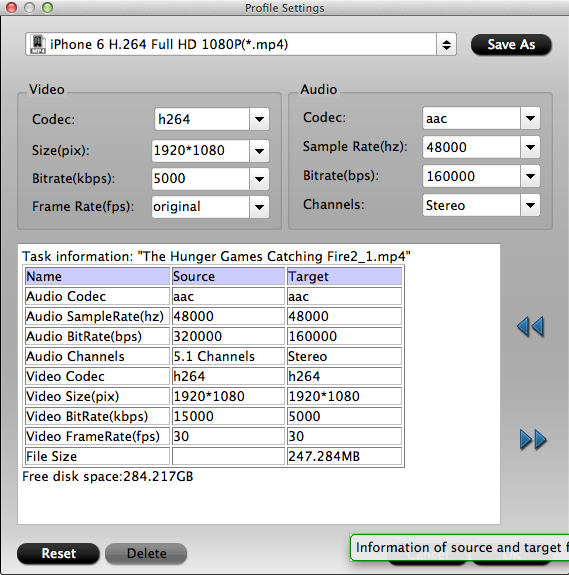
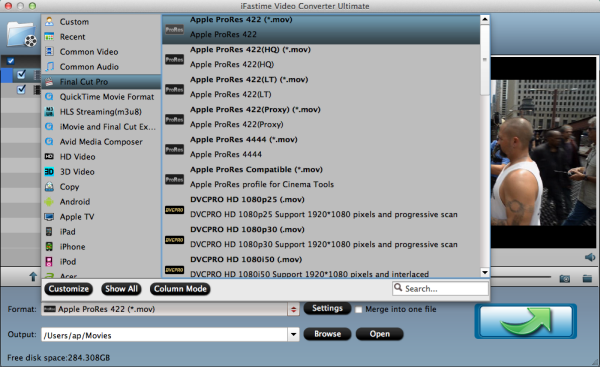
Step 2: Click the “Format” bar to get the drop-down menu and you can get “Final Cut Pro>>Apple ProRes codec”, including ProRes 422, ProRes 422 (HQ), ProRes 422 (LT), ProRes 422 (Proxy) and ProRes 4444. Choose the proper one you want. Here, we suggest you to choose Apple ProRes 422 .mov as the best output format. 


Step 3: Now, click “Convert” and let it go. The Blade Chroma 4K to FCP X Converter for Mac supports batch conversion. So if you have lots of Blade Chroma 4K videos to convert, check “Shut down computer after conversion” and you can go away without keeping an eye on it. 

Conclusion: Once the conversion process shows in 100%, click “Open” to get the output videos. Then import them to FCP X. Create a project and start editing Blade Chroma 4K videos in FCP X with light speed. 

Read More: 

Source:http://digitalmediasolution.altervista.org/blog/edit-blade-chroma-4k-in-fcp-x/

Thursday, March 24, 2016

Workflow for editing DJI Phantom 4 4K in Avid Media Composer on Mac

About DJI Phantom 4 and 4K videos it captured

DJI Phantom 4 is a slick, feature-packed drone that gives you the ability to capture DCI-spec 4K (4096 x 2160) at 24 or 25 fps and UHD 4K (3840 x 2160) at up to 30 fps whether for cinematography or just shooting for fun. The DJI Phantom 4 4K media is wrapped within a file extension of .mp4 or .mov using a codec called H.264. It uses a high compression algorithm to optimize video playback. Sorry to tell you Avid Media Composer still can't work with DJI Phantom 4 4K video formats. Read Avid Media Composer best compatible format and resolution first.

Best 4K video formats and resolution for editing with Avid Media Composer on Mac

Resolution: 1080P

The playback and editing work of Avid Media Composer and other majority editing software including Final Cut Pro, iMovie, Adobe Premiere, etc. is still been finished in 1080P In most cases.

Format: DNxHD codec

The H.264 codec is not good for video editing. Even with high computer Configuration with a hard disk array, you will encounter performance issues if your source 4K video is in H.264 codec. DNxHD is the most compatible format for Avid Media Composer

The best way to convert and downscale DJI Phantom 4 4K videos to Avid Media Composer

You need a professional video converter to help you convert the original l DJI Phantom 4 4K videos to DNxHD codec and downscale 4K videos to 1080P. iFastime Video Converter Ultimate for Mac is the best one recommended to you. iFastime 4K video converter has the specialized DNxHD video format that allow you to transcode DJI Phantom 4 4K videos Avid Media Composer without any quality loss. It also provides many 4K solutions to all format issues including 4K MOV, 4K XAVC/XAVC S, 4K MP4, 4K MXF, etc.

Moreover, it comes with hundreds of output format presets for other edit software like:

-Apple Inter Mediate Codec for iMovie
-MPEG-2 for Adobe Premiere

What’s more, this 4K converter is also available to Downscale DJI Phantom 4 4K video resolutions to smaller size like 1080p, 720p as you want for easy editing. (Read review)

In order to play or edit DJI Phantom 4 4K videos smoothly, use that is optimized video editing. This format is optimized for all Avid Media Composer versions and the highest resolution is 1080P.

Free Download or Purchase iFastime Video Converter Ultimate for Mac:


Other Download:
The specific DJI Phantom 4 to Avid Media Composer convert step-by-step guidance is as follow. For windows users, refer to the windows version here.

Step 1. Load 4K video 

First, save your DJI Phantom 4 4K videos files on your computer. If they are already on your Mac, just navigate to the folder where they are stored. Locate the DJI Phantom 4 4K videos you want to convert and then drag them from the folder right onto the converter or click “File> Add Video/Audio” to import DJI Phantom 4 4K videos files. They'll then appear on the interface.


Step 2. Choose a proper output format 

Click drop-down menu besides format bar to choose output format. You are provided with two specialized format for Avid Media Composer : Avid DNxHD 720p(*.mov) and Avid DNxHD1080p(*.mov). Choose one of them according to your resolution request.


Step 3. Adjust video settings (Optional)

Click "Settings" button if you'd like to customize advanced audio and video parameters like Video Codec, aspect ratio, bit rate, frame rate, Audio codec, sample rate, audio channels. You’d better downscale DJI Phantom 4 4K to 1080P for easier editing. Of course, if you want to get original 4K resolution, just keep the video size as original. But the conversion time is much longer due to the large video size.


Step 4. Start conversion

As you have finished all settings, hit ”Start conversion” button to transcode DJI Phantom 4 4K video for Avid Media Composer on Mac. You can follow the conversion process from the pop-up windows. If you don’t want to wait for the entire conversion process, you can tick off “shut down computer when conversion completed” and go away to do other things.

After the conversion, you can freely import converted DJI Phantom 4 4K video into Avid Media Composer for natively editing then upload them to website for sharing.

How to import medias to Avid Media Composer

You can import media into your Media Composer so that you can work with images, video or audio clips stored on your computer. When you import any media clip into Media Composer, a new file is created in a folder called the Avid Media File, which is the Managed Media Files folder. This file will be according to the Media Creation settings you specify, and even if your original file gets deleted, you still have the imported copy in the Managed Media Files folder. Let's see how the import is done:

Step 1: Specify the Drive with the Media Creation Setting

Click on the Tools tab in the main menu on the top of your screen and choose Media Creation. Alternatively, you can pres Ctrl+5. This will open the Media Creation window, where you can choose the drive where you want to create the files which you are going to import. Click OK.

Step 2: Go to Project Window

Click on the Format tab in your project window and under Project Type, select the quality you want for your imported files. The highest quality possible is 1080p/23.976. This will again depend whether you are importing a video, audio or HD file. 

Step 3: Highlight and Right Click Import Bin

When you are working in Media Composer, you will have the Import bin window just below the Clips window, on the left of the Source Viewer panel. Click on the Import Bin to highlight it, and then right click inside the Import Bin. Choose Import from the drop down menu.

Step 4: Choose Location of Your Media File

The Import dialogue box will open and you can browse and select the file you want to import. There is a box at the bottom of the dialogue box named Video Drive/Audio Drive, where a particular drive is selected. Make sure that the drive appearing in this box is the same as you chose in Step 1. In the Video Resolution box, you can again choose a quality which you prefer for the imported file. You can ignore this if you are importing an audio file.

Step 5: Choose Options in Import Settings

Click on the Options button in the Import dialogue box, and it will open a window for Import Settings. There are different tabs here, and you may click on each tab to specify all the particular settings you want. These settings cover various areas as to how your image is sized and to what channel it is played on. You can experiment with these settings to get your file just the way you want it. Once you have chosen your settings, click on OK.

Step 6: Load Imported File

You will find your imported file in the Import bin, and it has also been created in the Manage Media Files location. You can load it into the Source Viewer by clicking on the file in the Import bin and dragging it into the monitor panel.

Additional Tips: 

Several elements will also effect editing DJI Phantom 4 4K videos workflow with Avid Media Composer on Mac:

1. The version of Avid Media Composer. In order to work within a 4K project, you must have Avid Media Composer 8.3 or higher

2. Computer Processing Power. High Computer Configuration is required

3. Bandwidth requirements (high speed disk arrays / solid state storage) 

4. Huge storage place. 4K videos are very large, you must make sure that you Mac has enough space for DJI Phantom 4 4K videos.

Check your Mac and find out whether you have such problems. 

Wednesday, September 16, 2015

Play downloaded YouTube 4K UHD videos on iPhone 6S Plus

iPhone 6S Plus came to us on Sep 25, 2015. It is 5.5 inches with 1920x1080 resolution, which brings us a stunning visual feast experience. As we know, YouTube has tested Ultra High Def, Ultra Smooth video playback, there are some gorgeous 4K movies and videos available on YouTube now. But you should know YouTube 4K UHD videos 3840 X 2160 or 4096 x 2160, iPhone 6S Plus only supports above mentioned 1920 x 1080. If you would like to watch Youtube UHD 4K video on iPhone 6S Plus for offline enjoyment smoothly, you should to change the incompatible YouTube 4K UHD video to be iPhone 6S Plus friendly format. 

There are too many YouTube video converters toady, here I am happy to recommend a best one for your reference. iFastime Video Converter Ultimate for Mac has the ability to make you change your any YouTube Ultra HD 4K videos playable on your iPhone 6S Plus by easily converting them to iPhone 6S Plus supported formats like MP4, MOV, M4V, etc within a short time. What's more, this excellent iPhone 6S Plus video converter also works with other mainstream Apple, Android, Windows and Microsoft devices. (read review)

Hot search: Watch Movies on iPhone 6S/6S Plus | H.265 to iPhone 6S Plus | Upload 4K clips onto YouTube

Free Download or Purchase iFastime Video Converter Ultimate for Mac:


Other Download:

Convert YouTube 4K videos to iPhone 6S Plus with Ease

Step 1. Once installed, you can easily Add video files from browsing your local folders and a quick drag-and-drop


Step 2. This app respectively offers an optimized pre-setting for iPhone 6/6 Plus, iPhone 5S/5C/5, iPhone 4S/4, etc. Click Format bar, you can directly select "iPhone" > "iPhone 6 H.264 Full HD 1080P(*.mp4)".’


The preset could fit on iPhone 6S/6S Plus perfectly. And your best video settings for the iPhone 6S/6S Plus can be retrieved by clicking on the "Settings" button. You can keep the default size, no changes.


Step 3. The last step is to click "Start conversion" button to start the video conversion. This iPhone 6s Plus Video converter will convert the video files with top quality. If you do not remember the location of generated files, click "Open" button to find it quickly.

After finishing converting YouTube 4K UHD videoss to iPhone 6S Plus, sync them to your iPhone 6s Plus with iTunes, you can then watch any downloaded YouTube 4K UHD videos on your iPhone 6S Plus unlimitedly.

Have more questions about how to play downloaded YouTube 4K UHD videos on iPhone 6S Plus, please feel free to contact us>> or leave a message at Facebook.

More Topics:

Friday, August 21, 2015

How to Import Samsung NX500 4K H.265 to FCP X for editing on Mac?

According to Samsung NX500 product website, besides many useful features, Samsung NX500 has one oustanding advantage, record true 4K video* for 4X the resolution and details of Full HD, with H.265( HEVC) support, capture extreme details using half the storage space typically used for HD recording. Since excellent video quality(4K) and action-friendly performance, many travelers or families like to import recorded videos from Samsung NX500 camera to edit them in editing software like very popular FCP X.

But sometimes you will fail to import these 4K H.265 videos to FCP X, always get some erro messages as “unsupported by FCP X”. That’s because currently FCP X doesn’t support for the new codec- H.265, which is the mainly codec of Samsung NX500.

Plus: FCP X supported format

Video Formats: Apple Animation codec, Apple Intermediate codec, Apple ProRes(all versions), AVC-intra, AVCHD (including AVCCAM, AVCHD Lite, and NXCAM), DV (including DVCAM, DVCPRO, and DVCPRO50), DVCPRO HD, H.264, HDV, iFrame, Motion JPEG(OpenDML only), MPEG IMX(D-10), REDCODE RAW (R3D), Uncompressed 10-bit 4:2:2, Uncompressed 8-bit 4:2:2, XAVC, XDCAM HD/EX/HD422, QuickTime formats.

Audio Formats: AAC, AIFF, BWF, CAF, MP3, MP4, WAV

Container format: 3GP, AVI, MP4, MXF, QuickTime

Still-image formats: BMP, GIF, JPEG, PNG, PSD, RAW, TGA, TIFF 

To make you import and edit Samsung NX500 4K H.265 videos in FCP X on Mac, you just need third party converter to encode H.265 to best suitable codec for FCP X(FCP 7/FCP 6) like above listed Apple ProRes 422 before editing. With the help of  iFastime Video Converter Ultimate for Mac, the NX500 4K H.265 to Apple ProRes MOV conversion task can be done easily.

With it, you can also convert Samsung NX500 4K H.265 videos to H.265 MP4/MKV, M3U8, MKV, MP4, AVI, VOB, MPEG, WMV, MOV, FLV, SWF, 3GP as well as AIC for iMovie/FCE, MPEG-2 for Premiere, DNxHD for Avid Media Composer, etc. The steps are the same as Samsung NX500 4K H.265 videos to FCP X conversion, only change outformat in step 2.

Hot search: MP4 to FCP6/7 | AVI to FCP | MKV to FCP X | H.264 MP4 to H.265 MP4

Below is the detailed guide on transcoding H.265 to Final Cut Pro X supported Apple ProRes for editing.

Free download H.265 to FCP X Converter and launch it.


Other Download:
Cnet Download: http://download.cnet.com/iFastime-Video-Converter-Ultimate/3000-2194_4-76448683.html
Top 4 Download: http://www.top4download.com/ifastime-video-converter-ultimate-for-mac/hekvsosm.html

How to convert NX500 4K H.265 video to Apple ProRes 422 for FCP X?

Step 1. Add H.265 files to the program

Launch the program and click “Add” button to import the Samsung NX500 4K H.265 files to the program. Batch conversion is supported.


Step 2. Choose FCP X compatible format

Select “Apple ProRes 422 (*.mov)” as output format for opening with FCP X. From the “Format” list, move to “Final Cut Pro” catalogue, and select “Apple ProRes 422 (*.mov)” as target format. Apple ProRes is the best suited editing codec for FCP X.


Tips:

If necessary, you can click “Settings”button and go to “Profiles Settings” panel to modify video and audio settings like video encoder, resolution, video bit rate, frame rate, aspect ratio, audio encoder, sample rate, audio bit rate, and audio channels.


Step 3. Start converting 4K H.265 to FCP X

You should be ready to start conversion at this point. Just click on the green arrow button that can be found on the menu. Wait for a while and the video converter will do the trick. You will soon have your H.265 video into a format that's recognizable and editable by Final Cut Pro X– the MOV format.

After conversion, you only need to import the converted video files to FCP X. Now edit your converted videos in FCP X at ease. It is so simple, so quick to use this powerful converter, why not try?

Have more questions about how to import and edit Samsung NX500 4K H.265 in FCP X on Mac, please feel free to contact us>> or leave a message at Facebook.


More Topics: