Logic Pro 10.2 is a digital audio workstation and MIDI sequencer software application for the Mac OS X platform. Logic Pro 10.2, a new collection of features that enables you to manipulate timing and tempo quickly and intuitively. With the new Flex Tool you can push audio around with your mouse by clicking and dragging a waveform. You can use it to correct dodgy timing in an audio performance or 'quantize' the timing to a groove. If you need to import a DVD to Logic Pro to take the audio part for editing and mixing, you’ll really need one DVD to Logic Pro Converter to assist you.
Here we introduce iFastime Video Converter Ultimate, it can not only rip DVD to any video format, but also rip, extract DVD audio into Logic Pro 10.2 supported audio format like WAV, MP3,AAV, M4A, AC3 keeping the original quality. Besides Logic Pro 10.2, this powerful video and audio converter also supports MP4 to MP3, extract Lossless FLAC Audio from Blu-ray, all audio files to iPod Touch 6, and more.
If you are a Mac user, you can get iFastime Video Converter Ultimate for Mac, the step and method is same, just follow.
Free Download the top iFastime Video Converter Ultimate:

 Other Download:
How to Rip and Extract DVD to Logic Pro 10.2 track?
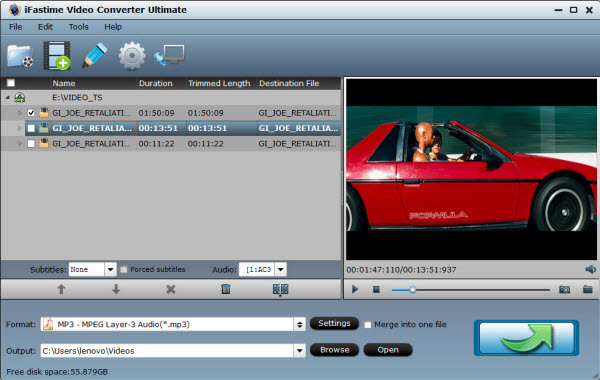
Step 1. Import DVD
Click "Load files" icon to import source audio/video files into this Pro 10.2 audio tool, or you can drag-and-drop the source to the app directly.
Other Download:
How to Rip and Extract DVD to Logic Pro 10.2 track?
Step 1. Import DVD
Click "Load files" icon to import source audio/video files into this Pro 10.2 audio tool, or you can drag-and-drop the source to the app directly.
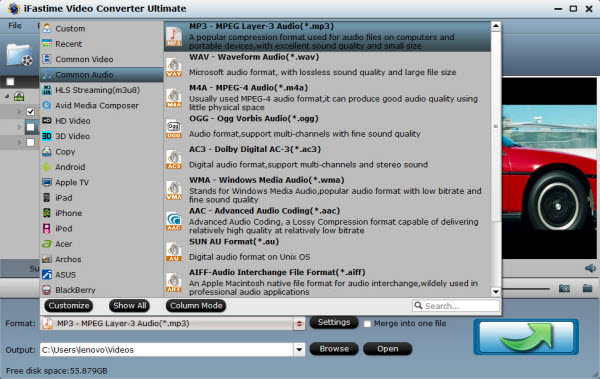
 Step 2: Pick Pro 10.2 supported format
Click "Format" bar, choose Pro 10.2 track supported audio formats from "Common Audio" > "MP3 - MPEG Layer-3 Audio (*.mp3)". You can also choose other audio formats on your own needs.
Step 2: Pick Pro 10.2 supported format
Click "Format" bar, choose Pro 10.2 track supported audio formats from "Common Audio" > "MP3 - MPEG Layer-3 Audio (*.mp3)". You can also choose other audio formats on your own needs.
 Tip: If you are not satisfied with the default audio quality, just click the "Settings" icon and choose wanted audio settings including sample rate, bitrate and audio channel.
Step 3. Start DVD to Pro 10.2 conversion
Back to the main interface and hit "Start conversion" to convert any audio files to Logic Pro 10.2 track supported format. It will start batch conversion automatically one by one. After the conversion process completed, click "Open output folder" to locate the converted audio file.
Finally, when you have successfully turned all the audio to Logic Pro 10.2 track, you can transfer them to Logic Pro 10.2 track, just enjoy and share.
Have more questions about how to extract DVD auido for Logic Pro 10.2 track, please feel free to contact us>> or leave a message at Facebook.
More Topics:
Tip: If you are not satisfied with the default audio quality, just click the "Settings" icon and choose wanted audio settings including sample rate, bitrate and audio channel.
Step 3. Start DVD to Pro 10.2 conversion
Back to the main interface and hit "Start conversion" to convert any audio files to Logic Pro 10.2 track supported format. It will start batch conversion automatically one by one. After the conversion process completed, click "Open output folder" to locate the converted audio file.
Finally, when you have successfully turned all the audio to Logic Pro 10.2 track, you can transfer them to Logic Pro 10.2 track, just enjoy and share.
Have more questions about how to extract DVD auido for Logic Pro 10.2 track, please feel free to contact us>> or leave a message at Facebook.
More Topics:
Watch Internet video, HD movie trailers, and personal media clips. Whether it’s on the web or on your desktop, QuickTime Player brings your digital media brilliantly to life. But currently QuickTime does not support DVD file, which has become a big trouble for DVD lovers. How to play various DVDs on QuickTime? Take it easy, this article will tell you the best method.Commercial DVDs are encrypted and only special DVD player software can open and display them. It's a pity that even your own (not encrypted) DVDs couldn't be played by QuickTime Player. Among QuickTime supported video formats, MOV is the most commonly used one. Therefore, faced with this problem, what you need to do is to convert DVD to QuickTime playable format first.iFastime Video Converter Ultimate for Mac here we're going to use is a simple piece of software that generally works the way you'd want it to. It allows you to remove protection easily and convert DVD to QuickTime friendly MOV format on Mac with good quality. DVD to MOV Converting speed is fast and the video & audio quality is amazing. Besides, the ultimate DVD ripper software capable of ripping the content of DVDs to a wide range of mainstream video formats, such as DVD to AVI, MP4, MPEG, WMV, MOV, FLV, AVC, TS, MTS, M4V, etc. Users can also painlessly rip DVD to iPhone 6/6 Plus/6S, iPad Pro / iPad Plus / iPad Air 3, iPod Touch 4/5/6, Android, Samsung Note 5, Samsung Galaxy Tab S2, Microsoft, Surface Tab, Xbox, Apple TV, Sony PSP, PS4, etc for better playing. You can read review to learn more.Free Download or Purcase iFastime Video Converter Ultimate for Mac:
 Other Download:
How to Make DVD videos playback on QuickTimeStep 1: Insert your DVD to your Mac DVD drive and click Load DVD button to load the movies from your DVD discs. You can also import ISO files, IFO, DVD Folders.
Other Download:
How to Make DVD videos playback on QuickTimeStep 1: Insert your DVD to your Mac DVD drive and click Load DVD button to load the movies from your DVD discs. You can also import ISO files, IFO, DVD Folders.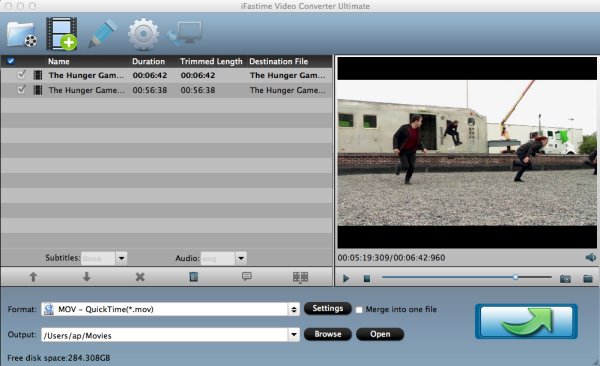 Step 2: Set output video format as MOV - QuickTime(*.mov) under Format > Common Video.
 Tip: Before conversion, you can click the Settings icon and adjust the video bitrate, codec, frame rate, audio sample rate, etc parameters.
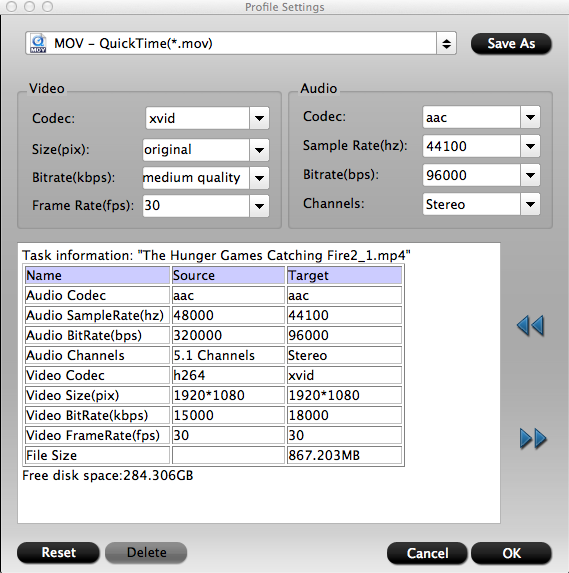 Step 3: Finally, tap the "Star conversion" button at the bottom right corner to start the DVD to QuickTime conversion. After the conversion, you can get the encoded files under "Open" panel. Import the converted MOV files to play in QuickTime.Now you can play DVD videos in QuickTime Player anytime anywhere without freely. So easy way, just have a try!Have more questions about how to play DVD on QuickTime, please feel free to contact us>>More Topics:
If you're ready to take the plunge into storing your Disney/Hollywood/ DVD movies, music DVDs, CDs and even Blu-ray movies in the cloud but need help deciding which service is right for your needs and wallet, Dropbox is the place for your all movies, videos, songs, photos, docs and other files. Storing your DVD collection in Dropbox has many advantages, including the ability to access your movie files anywhere you go, make your files safe, synced, and easy to share, and keeping a backup of those files away from your computer or phone, and bring your DVD movies anywhere and never lose a file again. It frees you from the troubles of disc loss or damage, and the space of physical hard disk, and lets you upload a personal DVD to Dropbox easily, so you can share it with your family or access your movies at home or on the road.
 To add and upload DVD to Dropbox for playing and sharing them with your family smoothly, what you need to do is rip DVD to Dropbox more friendly video format as MP4, MOV, etc.
For those who don’t konw how to rip DVD to Dropbox supported format, iFastime Video Converter Ultimate is specially prepared for you. This DVD ripping tool not only can rip any encrypted DVD and convert DVD to Dropbox readable MP4, MOV etc. formats, but also convert other popular formats such as MP4, Tivo, AVI, MKV, M3U8, H.265, WMV, MPG, FLV, SWF, M4V etc. on Windows (including Windows 10, 8.1 and 8) to play them on on Android, iPad, iPhone, iPod and other portable tablets or smartphones. Besides, it is a built-in video editor, you are allowed to edit the DVD movies by trimming, cropping, adjusting video effects, etc. to get the very wanted part and effects as you like. If you are a Mac user, please turn to iFastime Video Converter Ultimate for Mac, it supports Mac OS X 10.11 El Capitan, Mac OS X 10.10 Yosemite, 10.9 Mavericks, 10.8 Mountain Lion, 10.7 Lion, 10.6 Snow Leopard, 10.5 Leopard.
Now download the right version of the program and follow the guide below.
Other Download:
Just get it now and follow the steps below to copy DVD movies to Dropbox.
How to rip DVD to Dropbox friendly videos?
Step 1. Load DVD movies
Insert the DVD disc into your computer’s DVD drive and run DVD Ripper. You can click the “Load ISO/IFO”or “Load from folder”button to load the DVD files to the program.
To add and upload DVD to Dropbox for playing and sharing them with your family smoothly, what you need to do is rip DVD to Dropbox more friendly video format as MP4, MOV, etc.
For those who don’t konw how to rip DVD to Dropbox supported format, iFastime Video Converter Ultimate is specially prepared for you. This DVD ripping tool not only can rip any encrypted DVD and convert DVD to Dropbox readable MP4, MOV etc. formats, but also convert other popular formats such as MP4, Tivo, AVI, MKV, M3U8, H.265, WMV, MPG, FLV, SWF, M4V etc. on Windows (including Windows 10, 8.1 and 8) to play them on on Android, iPad, iPhone, iPod and other portable tablets or smartphones. Besides, it is a built-in video editor, you are allowed to edit the DVD movies by trimming, cropping, adjusting video effects, etc. to get the very wanted part and effects as you like. If you are a Mac user, please turn to iFastime Video Converter Ultimate for Mac, it supports Mac OS X 10.11 El Capitan, Mac OS X 10.10 Yosemite, 10.9 Mavericks, 10.8 Mountain Lion, 10.7 Lion, 10.6 Snow Leopard, 10.5 Leopard.
Now download the right version of the program and follow the guide below.
Other Download:
Just get it now and follow the steps below to copy DVD movies to Dropbox.
How to rip DVD to Dropbox friendly videos?
Step 1. Load DVD movies
Insert the DVD disc into your computer’s DVD drive and run DVD Ripper. You can click the “Load ISO/IFO”or “Load from folder”button to load the DVD files to the program.
 Step 2. Specify output format
As has been stated above, Dropbox supports MP4, etc video files. So you can just select "Common Video" > "H.264 Video(*.mp4)" as the output video format. Also you can transfer your DVD to media hub, Cloud Storage and External Hard Drive/Thumb Drive, Flash drive, Plex for storage and playback.
Step 2. Specify output format
As has been stated above, Dropbox supports MP4, etc video files. So you can just select "Common Video" > "H.264 Video(*.mp4)" as the output video format. Also you can transfer your DVD to media hub, Cloud Storage and External Hard Drive/Thumb Drive, Flash drive, Plex for storage and playback.
 Tip: You can click settings button to customize the output parameters, such as resolution, bitrate, etc, you can also skip this step.
 Step 3. Start converting DVD to Dropbox
When all these settings are ready, you can click the green arrow convert button to begin the DVD to Dropbox conversion. When the ripping is done, you can click on "Open" button to locate the ripped videos.
Now it’s easy to add files to Dropbox, just follow the simple steps to upload the ripped DVD movies to Dropbox.
How to upload the ripped DVD movies to Dropbox for storage?
1. Sign in to the Dropbox website.
2. Click the Upload button from the very top of the window. The upload button.
3. A window will appear. Click the Choose File button and then select the file on your computer that you’d like to add to your Dropbox.
4. Choose as many files as you like, and then click the Start Upload button.
5. The window will disappear, your files will start uploading, and you'll be shown a progress indicator. That’s it, you’ve added files to your Dropbox.
Just enjoy your videos anytime anywhere freely.
Have more questions about how to add and upload DVD to Dropbox , please feel free to contact us>>
More Topics:
Step 3. Start converting DVD to Dropbox
When all these settings are ready, you can click the green arrow convert button to begin the DVD to Dropbox conversion. When the ripping is done, you can click on "Open" button to locate the ripped videos.
Now it’s easy to add files to Dropbox, just follow the simple steps to upload the ripped DVD movies to Dropbox.
How to upload the ripped DVD movies to Dropbox for storage?
1. Sign in to the Dropbox website.
2. Click the Upload button from the very top of the window. The upload button.
3. A window will appear. Click the Choose File button and then select the file on your computer that you’d like to add to your Dropbox.
4. Choose as many files as you like, and then click the Start Upload button.
5. The window will disappear, your files will start uploading, and you'll be shown a progress indicator. That’s it, you’ve added files to your Dropbox.
Just enjoy your videos anytime anywhere freely.
Have more questions about how to add and upload DVD to Dropbox , please feel free to contact us>>
More Topics: