Tuesday, August 18, 2015

How to import MKV to FCP X on Mac?

Do you have some videos in .mkv extension? Would you like to edit them in FCP X for sharing with your friends on YouTube or Facebook? Is this possible? 


Yes, but you should know sometimes Final Cut Pro can't import MKV directly due to MKV specific codec. In order to import MKV files to Final Cut Pro X, you can convert MKV to FCP more accepeted format like MOV. Take it easy, prior to this, I list FCP X supported formats for you:

Video Formats: Apple Animation codec, Apple Intermediate codec, Apple ProRes(all versions), AVC-intra, AVCHD (including AVCCAM, AVCHD Lite, and NXCAM), DV (including DVCAM, DVCPRO, and DVCPRO50), DVCPRO HD, H.264, HDV, iFrame, Motion JPEG(OpenDML only), MPEG IMX(D-10), REDCODE RAW (R3D), Uncompressed 10-bit 4:2:2, Uncompressed 8-bit 4:2:2, XAVC, XDCAM HD/EX/HD422, QuickTime formats.

Audio Formats: AAC, AIFF, BWF, CAF, MP3, MP4, WAV

Container format: 3GP, AVI, MP4, MXF, QuickTime

Still-image formats: BMP, GIF, JPEG, PNG, PSD, RAW, TGA, TIFF 

You can import any almost any above mentioned file formats, but for other formats like MKV, AVI, WMV, etc, you need a professional video converter to make some video conversion to ensure an unlimited video editing in FCP X successfully.

The process to convert MKV to MOV is fairly easy as long as you have such a tool like iFastime Video Converter Ultimate for Mac. Besides, this software also can convert any popular format such as MP4, AVI, H.265 video, XAVC, XAVCS, DVD, Blu-ray, etc to more non-linear editing systems such as Adobe Premiere Elements 13/12, Avid Media Composer, iPhoto, Kdenlive, Keynote and so on. Wha’s more, use it you can enhance and personalize your media files.

Before operation, free download this Final Cut Pro X converter here:


How to convert MKV to FCP X supported format for editing?

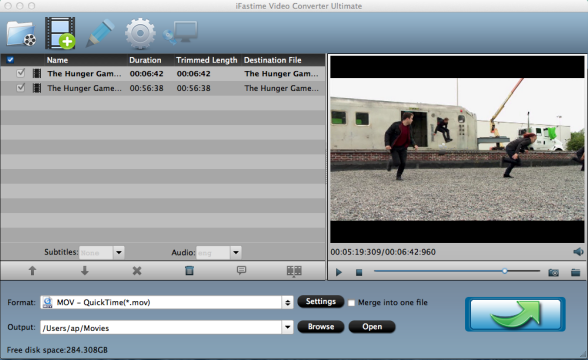
Step 1. Load MKV files to the program

Click the "Load File" to the top menu bar to import MP4 files to the program.You can choose several files into this program at the same time.


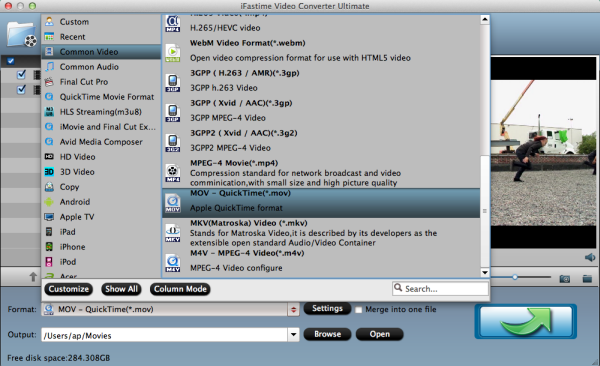
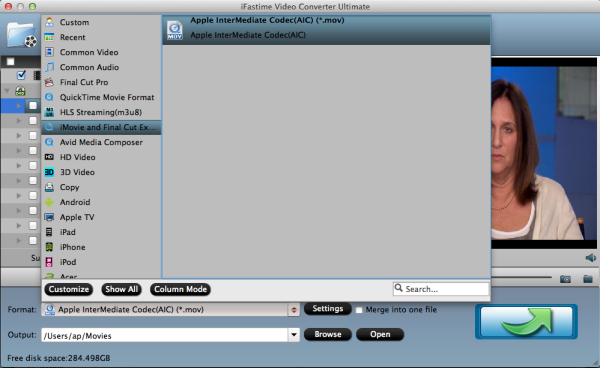
Step 2. Set Final Cut Pro X supported video format

Click “Format” > “Final Cut Pro” > “Apple ProRes 422(*.mov)”. You can select one as target format depending on your request in post production.


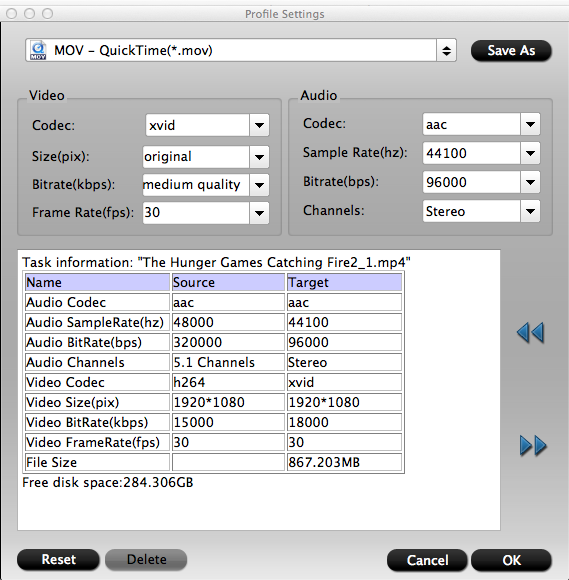
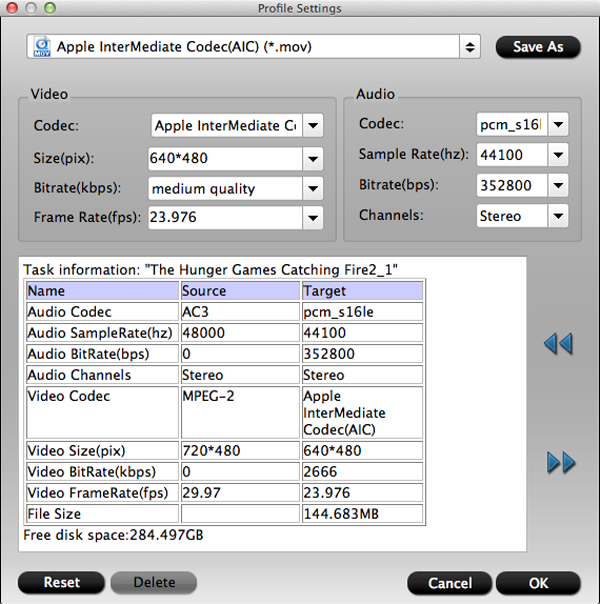
You can click “Settings” to custom Size, Brate, and so on ,depending on your needs.


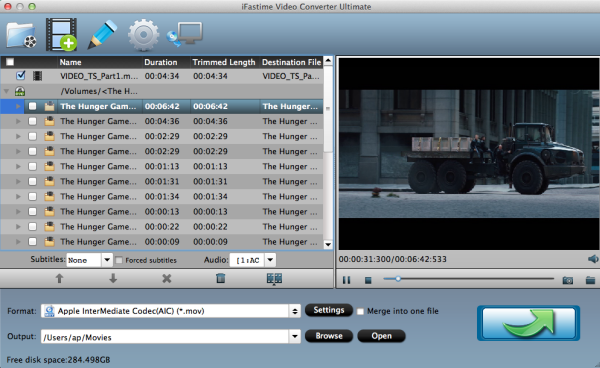
Step 3. Sart converting MKV to Final Cut Pro X supported video format

Click the lower right corner of the green arrow to start the conversion format. When the conversion is done, you need to import converted videos to FCP X

What a powerful converter! Now you can edit your videos in Final Cut Pro X/7/6 freely, just have a try!

Have more questions about how to import MKV to FCP X for editing, please feel free to contact us>>

More Topics:

Monday, August 17, 2015

How to backup ISO to NAS for iPad Air 2 watching?

If you have troubles in backuping ISO to NAS for iPad Air 2 watching, read this artical to get the answer.

Nowadays, NAS is an excellent file type for data storage and backup, which has been widely used to backup media like Blu-ray/DVD ISO. Maybe you have some ISO files and want to play them on your new iPad Air 2, but you should know you can’t backup ISO to NAS to watch videos on  iPad Air 2 directly, because iPad Air 2 doesn’t support ISO format syncing.

In that case, you should find an easy way to convert your ISO files to with NAS more friendly video playback format for iPad Air 2 watching. Take it easy, according to my own tests and client some feedbacks, iFastime Video Converter Ultimate for Mac is specially prepared for you. 

With this omnipotent tool, you can change ISO to MP4, MOV, M4V videos(which are more compatible with iPad Air 2) without losing any quality. Besides, it can help you to transcode ISO to almost all regular video formats, including AVI, MP4, MOV, M4V, WMV, MPG, 3GP, FLV, F4V and more formats to many popular devices including iMovie, Apple TV, Adobe After Effects CC, Apple Aperture 3, etc. In a word, you can enjoy your media files anywhere anytime with this universal tool. In addition, It ensures a perfect conversion performance and excellent output quality. Moreover, there is no malware, adware, spyware or virus which is absolutely clean and safe to use.

Now try the program and check out the guide below on how to convert ISO files to iPad Air 2 for streaming on your NAS step by step.

Download and install the program firstly.


Other Download:

If you are a Windows user, you can turn to iFastime Video Converter Ultimate and read Play MP4 on iPad Air, Air 2, Mini, Mini 2, Mini 3, etc..

How to convert ISO to NAS for iPad Air 2 watching on Mac?

Step 1. Add ISO files

Run the ISO to iPad Converter program and click DVD disc button to add the ISO files. As you can see, you can also load DVD Folders and IFO files to rip.


Step 2. Choose the output format for iPad Air 2

Click on “Format” box, a list will appear, you can easily find the “iPad” category, to enjoy ISO files on iPad Air 2 with 1080p image quality, you are suggested to choose “iPad > iPad Air Full HD Video(*.mp4)” format for output format.


Tips: If you need higher quality, click on “Settings” and set video bitrate to 2000kbps or above, this will bring better image quality and also bigger file size.


Step 3. Start ISO to iPad Air 2 conversion

Start the conversion by clicking on the green arrow button on the interface of this converter.

After it completes, click the “Open” button on program interface to locate the created MP4 file, and transfer the converted file to your new iPad Air 2, with iTunes.

How to transfer video files into iPad Air 2?

You can also copy a video by connecting your iPad to your computer and use the iTunes program.

1. Open iTunes if it doesn’t start up automatically.

2. Select your iPad Air 2 under Devices in the left column. If you don’t see Devices in the sidebar on the left, you need to turn it on.

3. Under the device, you have an option called Movies. Select this.

4. Drag and drop the video file you want to copy onto this Movies item. You should see a progress bar that will indicate how long it will take to copy the movie to the iPad Air 2.

Now enjoy your videos on your iPad Air 2 freely!

Have more questions about how to backup ISO to NAS for iPad Air 2 watching, please feel free to contact us>>

Main Topics:

Friday, August 14, 2015

How to open MP4 files produced OBS in Quicktime?

If you have a deeper understanding of Open Broadcaster Software, you should know some of the stringent requirements, encoding using H264 (x264) and AAC, which is one more important requirement. When you record MP4 videos with OBS, the MP4 videos should be encoded with H.264 . However, H.264 codec can’ t be accepted by Quicktime, so it is failing for you to play MP4 files produced OBS in Quicktime. In that case, when you open MP4 files created OBS in Quicktime, only get “the format of the video would be unknown”, “the sound plays fine, but the video doesn’t work”,“that the file is damaged”, and other situations.


To solve the above mentioned troubles effectively, you'd better transcode MP4 videos to MOV(which is the default format of Mac OS X and performs optimum compatibility with QuickTime).

If you're looking for the most useful and simplest MP4 to Quicktime Converter tool for Mac, iFastime Video Converter Ultimate for Mac is the perfect one for you. As the best program to change MP4 to QuickTime MOV on Mac OS X 10.11 El Capitan, 10.10 Yosemite, 10.9 Mavericks, etc. It also can convert other video formats such as DVD, Blue-ray, AVI, WMV, MKV, VOB, FLV, MPG, RMVB, MOV, 3GP to MOV to successfully play on QuickTime, iMovie, iTunes, iPhone 6 Plus, iPad Air 2, VLC, etc.

Here the detailed steps to change MP4 files to Quicktime friendly format on Mac are described. 

Just download and install this powerful software.


Other Download:

Note:

The way to complete the conversion in Windows (Windows 10, 8.7, 8) is almost the same. Please download fromiFastime Video Converter Ultimate.

How to change MP4 files to Quicktime friendly format for playing?

Step 1. Add MP4 files to this Mac MP4 to MOV converter

Go to "File" menu, select “Load Files”option to import the MP4 files. Or you can directly add MP4 videos to the program with drag and drop method.


Tips: This smart converter provides a video editor that lets you touch up your videos in clicks. Simply click the Edit button to open the video editing window, where you can crop videos, trim video, add watermarks, adjust video effects, etc. for getting better visual effect.

Step 2. Select “MOV” as the output format

In the “Format” tray, go to "Common video" tab and select "MOV- Quicktime" as output format. If you want to put the output file on your iPad, iPhone (iPhone 6S included), iPod, Apple TV or other popular portable devices, you can select an output format according to your device name! Audio formats is also supplied by the smart Mac MP4 to MOV converter.


Tips: click settings button to adjust the output video’s parameters, such as bitrate, size, frame rate,r etc.


Step 3. Start MP4 to MOV Mac conversion

When all the settings are done, click the green arrow convert button to start converting MP4 to MOV on Mac. The conversion time depends on your source MOV video. Generally, if the original videos are not too large, the conversion will finish soon.

Once the conversion to be done and then you'll get high quality MP4 videos. Now open the converted MP4 files with QuickTime Player by using the usual File --> Open menu item. To start the import process, just choose File --> Import.

After that, you can play them with QuickTime with no hassle. Have a try!


Thursday, August 13, 2015

How to Import MP4 files to Final Cut Express for editing?

Description: We are here to sharing the method to MP4 to Final Cut Express.The converter which we used here is top-ranking in quality. It can finish the MP4 to Final Cut Express conversion at fast speed.


Want to edit your MP4 files with Final Cut Express on Mac? But for some reason Final Cut Express did not let you import them. Why?

Technically, Final Cut Express does support MP4 format. But it only supports MP4 encoded with MPEG4/AAC or H.264/AAC data, not all kinds of MP4 formats. Some MP4 files from like Sony, GoPro camcorders and other sources cannot be accepted by FCE. Plus, FCE contains all the essential codecs to read MP4 files. Any different codecs included in audio and subtitle will cause the issue. In the circumstances, we still cannot successfully import MP4 files to FCE. That is to say, if you are unable to locate your MP4 files into FCE, you could adjust MP4 to FCE editable format: Apple Animation Codec, Apple Intermediate Codec, Apple ProRes, AVC-Intra, AVC-LongG, AVCHD, DV, DVCPRO HD, H.264, HDV, REDCODE RAW (R3D), XAVC, XDCAM HD/EX/HD422,QuickTime ,3GP, AVI, MOV (QuickTime), MP4, MTS/M2TS, MXF.

Now I will show you how to adjust MP4 to FCE editable formats on Mac step by step with a professional Video Converter Ultimate for Mac from iFastime (El Caption, Yosemite, Mavericks, Mountain Lion, Lion and Snow Leopard included). The application is outstanding in the features of easy-to-use, fast conversion speed and with no quality loss. It supports optimized preset for Final Cut Express which can work for iMovie too. With this feature, if you have no idea which target format you should choose for FCE, you can directly select “iMovie and Final Cut Express” as output.

Firstly, download the professional application on your Mac.


How to transcode MP4 files to Final Cut Express friendly format for editing?

Step 1. Load MP4 files

After install and launch the Converter, click “ File ” or drag the MP4files to the program directly.


Step 2. Choose Output Format

Click "Format" bar to choose “ iMovie and Final Cut Express ” > “ Apple InterMediate Codec (AIC)(*.mov) ” which is the most compatible with Final Cut Express as output format on the drop-down menu.


Tips: you can click “ Settings ”to adjust the video and audio parameters in the Settings profile, including Bitrate of Video and Audio, Video Size, Sample Rate, Frame Rate, Audio Channels, etc.


Step 3.Start MP4 to Final Cut Express Conversion on Mac

Tap the Green Arrow button on the main interface to start transcoding MP4 files to Final Cut Express supported AIC MOV.

Once the conversion is finished, click "Open" button to find the generated videos, and then you can transfer the converted MP4 files to Final Cut Express for editing without any problem.

Simply import the converted MP4 to just as you import other video files to Final Cut Express to successfully edit MP4 in Final Cut Express.

Additional Tips: Learn More About iFastime Video Converter Ultimate for Mac Features 

1. Support converting various video and audio format like H.265, M3U8, MP4, MPEG-2, MPEG-4, H.264, MOV, M4V, AVI, MKV, WMV, FLV, WTV, MVI, 3D MKV/AVI/MP4/MOV, etc. Video formats for using on HD media players, portable devices, smart TV, 3D Galsses, projectors, etc.

2. Support converting DVD, Blu-ray, ISO image files to FCE, FCP, iMovie, Avid Media Composer, Adobe Premiere, etc.

2. Edit video available. You can trim video, disable video or audio, or merge all videos into one.

3. Easy to use and batch conversion supported, allows you to convert multiple files at one time just one click.

4. Adjustable video and audio parameters settings, including Codec, Bit Rate, Sample Rate, Video Quality, etc.

Have more questions about how to import MP4 files to Final Cut Express for editing, please feel free to contact us>>

More Topics: