DJI Phantom 4 is a slick, feature-packed drone that gives you the ability to capture DCI-spec 4K (4096 x 2160) at 24 or 25 fps and UHD 4K (3840 x 2160) at up to 30 fps whether for cinematography or just shooting for fun. The DJI Phantom 4 4K media is wrapped within a file extension of .mp4 or .mov using a codec called H.264. It uses a high compression algorithm to optimize video playback. Sorry to tell you Avid Media Composer still can't work with DJI Phantom 4 4K video formats. Read Avid Media Composer best compatible format and resolution first.
Best 4K video formats and resolution for editing with Avid Media Composer on Mac
Resolution: 1080P
The playback and editing work of Avid Media Composer and other majority editing software including Final Cut Pro, iMovie, Adobe Premiere, etc. is still been finished in 1080P In most cases.
Format: DNxHD codec
The H.264 codec is not good for video editing. Even with high computer Configuration with a hard disk array, you will encounter performance issues if your source 4K video is in H.264 codec. DNxHD is the most compatible format for Avid Media Composer
The best way to convert and downscale DJI Phantom 4 4K videos to Avid Media Composer
You need a professional video converter to help you convert the original l DJI Phantom 4 4K videos to DNxHD codec and downscale 4K videos to 1080P. iFastime Video Converter Ultimate for Mac is the best one recommended to you. iFastime 4K video converter has the specialized DNxHD video format that allow you to transcode DJI Phantom 4 4K videos Avid Media Composer without any quality loss. It also provides many 4K solutions to all format issues including 4K MOV, 4K XAVC/XAVC S, 4K MP4, 4K MXF, etc.


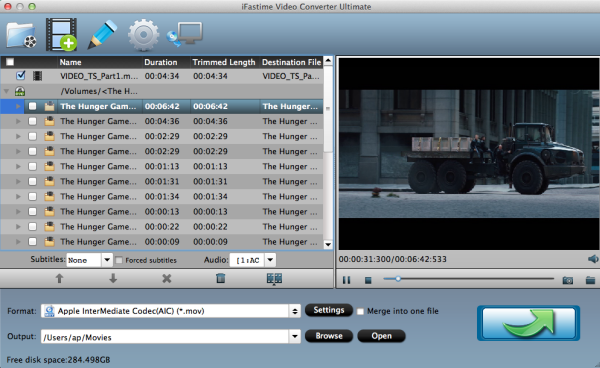
First, save your DJI Phantom 4 4K videos files on your computer. If they are already on your Mac, just navigate to the folder where they are stored. Locate the DJI Phantom 4 4K videos you want to convert and then drag them from the folder right onto the converter or click “File> Add Video/Audio” to import DJI Phantom 4 4K videos files. They'll then appear on the interface.

You need a professional video converter to help you convert the original l DJI Phantom 4 4K videos to DNxHD codec and downscale 4K videos to 1080P. iFastime Video Converter Ultimate for Mac is the best one recommended to you. iFastime 4K video converter has the specialized DNxHD video format that allow you to transcode DJI Phantom 4 4K videos Avid Media Composer without any quality loss. It also provides many 4K solutions to all format issues including 4K MOV, 4K XAVC/XAVC S, 4K MP4, 4K MXF, etc.
Moreover, it comes with hundreds of output format presets for other edit software like:
-Apple Inter Mediate Codec for iMovie
-MPEG-2 for Adobe Premiere
What’s more, this 4K converter is also available to Downscale DJI Phantom 4 4K video resolutions to smaller size like 1080p, 720p as you want for easy editing. (Read review)
In order to play or edit DJI Phantom 4 4K videos smoothly, use that is optimized video editing. This format is optimized for all Avid Media Composer versions and the highest resolution is 1080P.
Free Download or Purchase iFastime Video Converter Ultimate for Mac:
Other Download:
- Cnet Download: http://download.cnet.com/iFastime-Video-Converter-Ultimate/3000-2194_4-76448683.html
- Top 4 Download: http://www.top4download.com/ifastime-video-converter-ultimate-for-mac/hekvsosm.html
- WinSite Download: http://www.winsite.com/Multimedia/Video/IFastime-Video-Converter-Ultimate-for-Mac/
- Softonic Download: http://ifastime-video-converter-ultimate-for-mac.en.softonic.com/mac
The specific DJI Phantom 4 to Avid Media Composer convert step-by-step guidance is as follow. For windows users, refer to the windows version here.
Step 1. Load 4K video
First, save your DJI Phantom 4 4K videos files on your computer. If they are already on your Mac, just navigate to the folder where they are stored. Locate the DJI Phantom 4 4K videos you want to convert and then drag them from the folder right onto the converter or click “File> Add Video/Audio” to import DJI Phantom 4 4K videos files. They'll then appear on the interface.
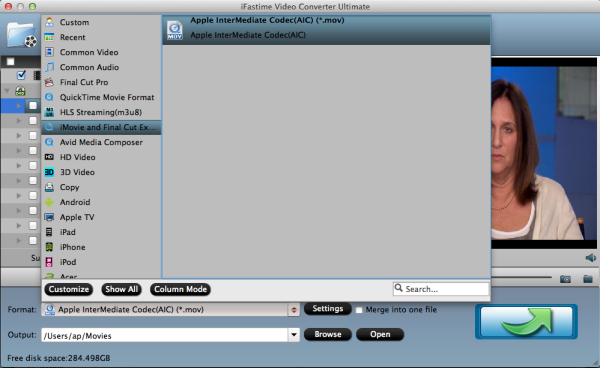
Step 2. Choose a proper output format
Click drop-down menu besides format bar to choose output format. You are provided with two specialized format for Avid Media Composer : Avid DNxHD 720p(*.mov) and Avid DNxHD1080p(*.mov). Choose one of them according to your resolution request.

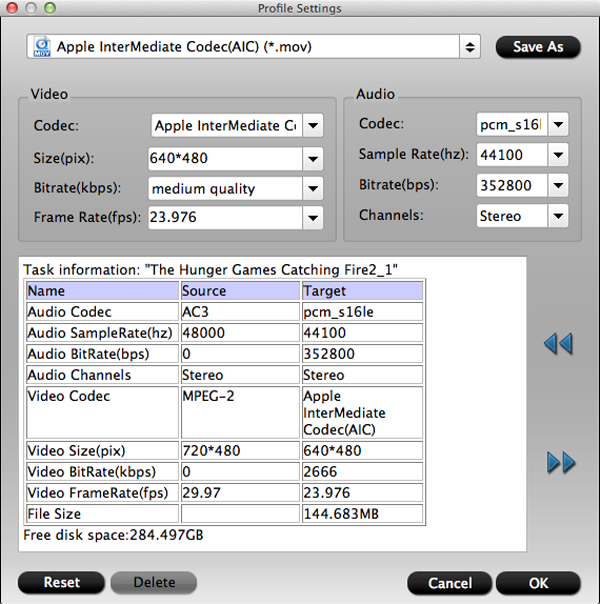
Step 3. Adjust video settings (Optional)
Click "Settings" button if you'd like to customize advanced audio and video parameters like Video Codec, aspect ratio, bit rate, frame rate, Audio codec, sample rate, audio channels. You’d better downscale DJI Phantom 4 4K to 1080P for easier editing. Of course, if you want to get original 4K resolution, just keep the video size as original. But the conversion time is much longer due to the large video size.

Step 4. Start conversion
As you have finished all settings, hit ”Start conversion” button to transcode DJI Phantom 4 4K video for Avid Media Composer on Mac. You can follow the conversion process from the pop-up windows. If you don’t want to wait for the entire conversion process, you can tick off “shut down computer when conversion completed” and go away to do other things.
After the conversion, you can freely import converted DJI Phantom 4 4K video into Avid Media Composer for natively editing then upload them to website for sharing.
How to import medias to Avid Media Composer
You can import media into your Media Composer so that you can work with images, video or audio clips stored on your computer. When you import any media clip into Media Composer, a new file is created in a folder called the Avid Media File, which is the Managed Media Files folder. This file will be according to the Media Creation settings you specify, and even if your original file gets deleted, you still have the imported copy in the Managed Media Files folder. Let's see how the import is done:
You can import media into your Media Composer so that you can work with images, video or audio clips stored on your computer. When you import any media clip into Media Composer, a new file is created in a folder called the Avid Media File, which is the Managed Media Files folder. This file will be according to the Media Creation settings you specify, and even if your original file gets deleted, you still have the imported copy in the Managed Media Files folder. Let's see how the import is done:
Step 1: Specify the Drive with the Media Creation Setting
Click on the Tools tab in the main menu on the top of your screen and choose Media Creation. Alternatively, you can pres Ctrl+5. This will open the Media Creation window, where you can choose the drive where you want to create the files which you are going to import. Click OK.
Step 2: Go to Project Window
Click on the Format tab in your project window and under Project Type, select the quality you want for your imported files. The highest quality possible is 1080p/23.976. This will again depend whether you are importing a video, audio or HD file.
Step 3: Highlight and Right Click Import Bin
When you are working in Media Composer, you will have the Import bin window just below the Clips window, on the left of the Source Viewer panel. Click on the Import Bin to highlight it, and then right click inside the Import Bin. Choose Import from the drop down menu.
Step 4: Choose Location of Your Media File
The Import dialogue box will open and you can browse and select the file you want to import. There is a box at the bottom of the dialogue box named Video Drive/Audio Drive, where a particular drive is selected. Make sure that the drive appearing in this box is the same as you chose in Step 1. In the Video Resolution box, you can again choose a quality which you prefer for the imported file. You can ignore this if you are importing an audio file.
Step 5: Choose Options in Import Settings
Click on the Options button in the Import dialogue box, and it will open a window for Import Settings. There are different tabs here, and you may click on each tab to specify all the particular settings you want. These settings cover various areas as to how your image is sized and to what channel it is played on. You can experiment with these settings to get your file just the way you want it. Once you have chosen your settings, click on OK.
Step 6: Load Imported File
You will find your imported file in the Import bin, and it has also been created in the Manage Media Files location. You can load it into the Source Viewer by clicking on the file in the Import bin and dragging it into the monitor panel.
Additional Tips:
Several elements will also effect editing DJI Phantom 4 4K videos workflow with Avid Media Composer on Mac:
1. The version of Avid Media Composer. In order to work within a 4K project, you must have Avid Media Composer 8.3 or higher
2. Computer Processing Power. High Computer Configuration is required
3. Bandwidth requirements (high speed disk arrays / solid state storage)
4. Huge storage place. 4K videos are very large, you must make sure that you Mac has enough space for DJI Phantom 4 4K videos.
Check your Mac and find out whether you have such problems.