Showing posts with label MP4. Show all posts

Thursday, January 12, 2017

Ripping Blu-ray to H.265/HEVC MP4 on PC

HEVC/H.265, the successor to AVC/H.264, more than triples the existing AVC intra-frame prediction modes to achieve significant bitrate savings, It is targeted to next-generation HDTV displays and content capture systems that feature progressive scanned frames and display resolutions from QVGA (320×240) up to 1080p and Ultra HDTV 4320p (7680×4320.) It is a codec that can offer up to 50% reduced bitrate at the same quality when compared to AVC/H.264. 


In this article, I will show how you can convert your Blu-ray to H.265/HEVC MP4 on PC to greatly reduce the output size in a simple and fast way. 

Then how can we do to compress the size of Blu-ray files so that we can bring them with our H.265/HEVC players for watching? Here Pavtube BDMagic is quite intuitive. Even though you have no experience on Blu-ray ripping, you can know the each next step according to the instructions on the main interface. You can rip Blu-ray and DVD to H.265/HEVC MP4 and MKV up to 30x times speed using Nvidia GPU hardware acceleration and convert Blu-ray and DVD to H.264 MP4, MKV, AVI, WMV, FLV, TS, MOV, M4V, etc by up to 500% speed with NVIDIA CUDA acceleration than the same action with no acceleration. 
Main features:
  • Powerful Blu-ray/DVD Ripper: Converts Blu-ray/DVD and ISO/IFO files to H.265 video filess rapidly in high quality.
  • Wide Selection of Formats Supported: Converts any video files to various video and audio formats and popular media players
  • Fast-Speed Blu-ray/DVD Converter: If your computer have Nvidia CUDA/ATI AMD ready graphics card, you can have GPU encoding and the conversion would be faster. Note this function only works when you choose H.264 Baseline Profile.
  • Lossless Conversion: Converts Blu-ray, DVD video files without the risk of losing its original quality.
  • Additional Features: Edit tool videos, can create 3D video, 1:1 disc backup, copy main BD/DVD movie and etc.
Guide: Rip and compress Blu-ray to H.265/HEVC MP4 on PC with best quality 

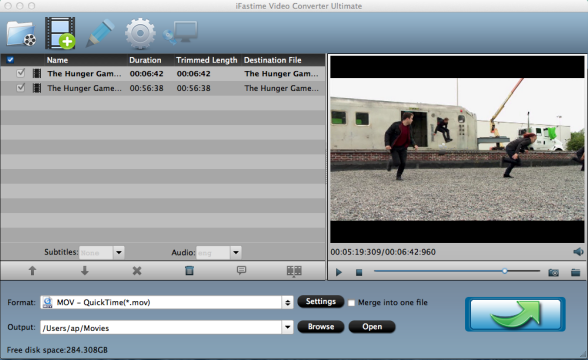
Step 1: Import Blu-ray movies to the best Blu-ray to H.265 Ripper 

Load your disc to the Blu-ray drive room, and launch the Blu-ray to H.265 Ripper; click the disc button to import your Blu-ray movies to the program. 


Tip: 

Click the main file of your Blu-ray to select the subtitles for Blu-ray movies in the “Subtitles” option. 

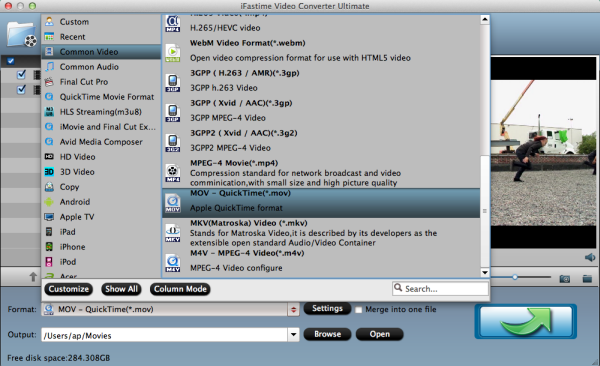
Step 2. Choose the suitable output format 

From format bar, just choose “Common Video >> H.265 Video(*.mp4)” as your output format. Or select “HD Video >> H.265 HD Video(*.mp4)” to get HD quality. 

To get H.264 video for output, just go to the ‘Common Video’ to select the ‘H.264 Baseline/Main/High profile (*.mp4)’ as your favorite. Or in the ‘HD Video’ item, ‘H.264 HD Video (*.mp4)’ is also available. 

You can also choose the preset output format for spacial devices such as iPad, Apple TV.etc 
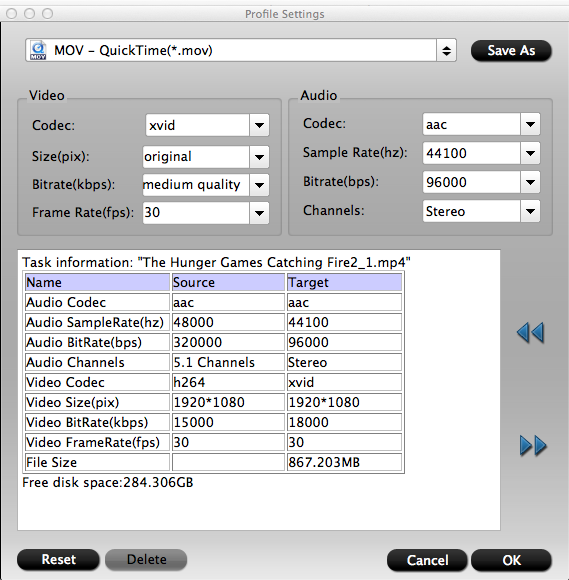
 

Tip: 

Before conversion, you can go to the “Settings” to set the parameters for your movie. To compress the file size, adjust the parameters to be smaller. 

PS: Some quality will be lost if you compress them to be much smaller. So Pls ensure the movie quality before adjust the parameters. 

Step 3. Rip BD to H.265/HEVC MP4 

Click the Convert button on the main interface to start compressing Blu-ray. Once the conversion finished, you can get the ripped video as you wanted by clicking “Open” button. Sharing your movies with families and friends on TV or H.265 media players is easy for you! 

Wanna do H.265 conversion? You can get this upgraded ultimate converter to decode H.265 video or encode your videos to H.265 MP4 for playback. 

Monday, December 12, 2016

Convert Video_TS Folder to MP4 with subtitles on Mac

Summary:This article will introduce what is VIDEO_TS folder and tells you how to convert a VIDEO_TS folder to MP4 for playing with subtitles on Mac OS X. 
 What's Video_TS folder? 

Video_TS folder contains three kinds of formats, IFO, BUP and VOB. IFO is information file, which is the main factor to operate video playback. With IFO files you can forward or backward the video at will. If IFO files are damaged or can’t be read, don’t worry. BUP is the backup of IFO and they have the totally same function. But if you happen to lose them all, you will have big trouble in controlling video play, so be careful. VOB means video objects, which is the container of video files. No need to say how important it is. 


How to play Vidoe_TS folder? 

Video_TS files are one of the main folders in a DVD's contents. Yeah, you can view the Video_TS files on your computer and DVD players. However, if you want to put your movies on portable MP4 players like iPhone, iPad, PSP, Xbox 360, Android tablets, etc., you will need to convert Video_TS to MP4 first. This article will shows you an easy way to convert Video_TS files to MP4 with subtitles for more convenient playing and sharing. 

Convert Video_TS to MP4 with subtitles 

To convert Video_TS to MP4 with subtitles, what you need is a third-party program that can accomplish the task. Here ByteCopy for Mac is highly recommended as the best DVD Video_TS to MP4 converter. With it, you can easily and quickly convert Video_TS files to MP4 videos while keeping the subtitles. And it can convert Video_TS folder to multiple video formats including MP4, AVI, FLV, WMV, MKV, MOV, WEBM, etc. and it also can turn 2D movies to 3D. If you are using a Windows PC, please turn to Pavtube ByteCopy

Convert DVD VIDEO_TS folder to playable MP4 file with subtitle? 

Step 1. Run the best VIDEO_TS Converter, click "Load from folder" and load DVD VIDEO_TS folder. Tip: All titles of the original Blu-ray movies could be seen on program left panel. And in every title, you can see various chapters. Just check the titles or chapters you want to rip. 

To convert DVD VIDEO_TS with subtitles contained, just simply click “Subtitles” and select the one you prefer. (And you can also choose the audio track as you like.) 

Tip: You can also choose to rip Video_TS with forced subtitles if you don’t want to have extra subtitles on screen for your native language. 


Step 2. Clicking the "Format" menu, here you are suggested to choose "Common Video > H.264 Video(*.mp4)". 


Step 3. If you like, modify profile settings such as video size, bitrate, frame rate, etc to get optimized video and audio playback. 


Step 4. Return back to VIDEO_TS video converter main interface, and hit the "Convert" button to start encoding VIDEO_TS to MP4 format. Once it finishes, open output folder, locate the created MP4 file and you can transfer DVD VIDEO_TS folder to your Android, Windows and iOS devices for watching. 

Related Articles: 
Source: http://formatplayable.jimdo.com/2014/10/18/convert-video-ts-folder-to-mp4/

Friday, August 14, 2015

How to open MP4 files produced OBS in Quicktime?

If you have a deeper understanding of Open Broadcaster Software, you should know some of the stringent requirements, encoding using H264 (x264) and AAC, which is one more important requirement. When you record MP4 videos with OBS, the MP4 videos should be encoded with H.264 . However, H.264 codec can’ t be accepted by Quicktime, so it is failing for you to play MP4 files produced OBS in Quicktime. In that case, when you open MP4 files created OBS in Quicktime, only get “the format of the video would be unknown”, “the sound plays fine, but the video doesn’t work”,“that the file is damaged”, and other situations.


To solve the above mentioned troubles effectively, you'd better transcode MP4 videos to MOV(which is the default format of Mac OS X and performs optimum compatibility with QuickTime).

If you're looking for the most useful and simplest MP4 to Quicktime Converter tool for Mac, iFastime Video Converter Ultimate for Mac is the perfect one for you. As the best program to change MP4 to QuickTime MOV on Mac OS X 10.11 El Capitan, 10.10 Yosemite, 10.9 Mavericks, etc. It also can convert other video formats such as DVD, Blue-ray, AVI, WMV, MKV, VOB, FLV, MPG, RMVB, MOV, 3GP to MOV to successfully play on QuickTime, iMovie, iTunes, iPhone 6 Plus, iPad Air 2, VLC, etc.

Here the detailed steps to change MP4 files to Quicktime friendly format on Mac are described. 

Just download and install this powerful software.


Other Download:

Note:

The way to complete the conversion in Windows (Windows 10, 8.7, 8) is almost the same. Please download fromiFastime Video Converter Ultimate.

How to change MP4 files to Quicktime friendly format for playing?

Step 1. Add MP4 files to this Mac MP4 to MOV converter

Go to "File" menu, select “Load Files”option to import the MP4 files. Or you can directly add MP4 videos to the program with drag and drop method.


Tips: This smart converter provides a video editor that lets you touch up your videos in clicks. Simply click the Edit button to open the video editing window, where you can crop videos, trim video, add watermarks, adjust video effects, etc. for getting better visual effect.

Step 2. Select “MOV” as the output format

In the “Format” tray, go to "Common video" tab and select "MOV- Quicktime" as output format. If you want to put the output file on your iPad, iPhone (iPhone 6S included), iPod, Apple TV or other popular portable devices, you can select an output format according to your device name! Audio formats is also supplied by the smart Mac MP4 to MOV converter.


Tips: click settings button to adjust the output video’s parameters, such as bitrate, size, frame rate,r etc.


Step 3. Start MP4 to MOV Mac conversion

When all the settings are done, click the green arrow convert button to start converting MP4 to MOV on Mac. The conversion time depends on your source MOV video. Generally, if the original videos are not too large, the conversion will finish soon.

Once the conversion to be done and then you'll get high quality MP4 videos. Now open the converted MP4 files with QuickTime Player by using the usual File --> Open menu item. To start the import process, just choose File --> Import.

After that, you can play them with QuickTime with no hassle. Have a try!