Monday, October 5, 2015

How to Insert SRT Subtitles to AVI File on Mac/PC?

About SRT Subtitles:

SubRip caption files are named with the extension .SRT. SRT is perhaps the most basic of all subtitle formats. This format is supported by most software video players and subtitle creation programs. SRT file does not contain any video data, it is a simple text file you can edit by any text editor (translate subtitles into another language). The purpose of srt subtitle file is to use it with desired movie file together to display subtitles when you play video file by any player supporting srt subtitles.

Can I Insert SRT Subtitles to AVI File?

“I want to attach SRT file to a AVI video. I don't want only to use the SRT file, but to make it part of the video. In this way I can watch the AVI video with the subtitles.”

Do you have the same trouble? Is this possible? The answe is yes. If your video doesn’t include any subtitles, you can add a .srt file to this video folder, then you will be able to get a video with subtitles by converting this video using one top iFastime Video Converter Ultimate for Mac. With it to add SRT subtitles, that is a piece of cake. Besides AVI, you can use it to attach (*.srt and *.ass, *.ssa) to MP4 Videos and more. If you are a Windows user, you can get iFastime Video Converter Ultimate.

How to Insert SRT Subtitles to AVI File easily and quickly?

Step 1. Download the top video converter and run it.


Other Download: 

Step 2. Import the AVI video file

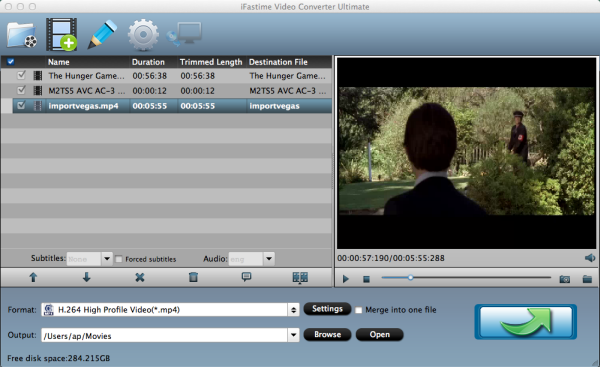
After installing and running the program, you can import the AVI files to the program by directly dragging or clicking "Add video" to add the .avi files.


Step 3. Embed subtitles into AVI video

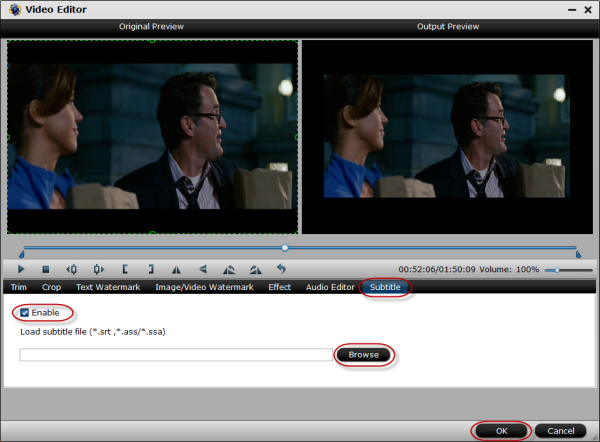
Click on "Edit" button, the video editor will pop up. Tap "Subtitle" option and check the "Enable" icon. Then, by clicking on "Browse" to import your *.srt, *.ass, *.ssa subtitle file you've downloaded. After that, you can have a preview of the subtitle effect to make sure all goes OK.


Step 4. Start adding subtitles(*.srt and *.ass, *.ssa) to .AVI

Before conversion, click the "Format" bar and keep the AVI format. Or, you can also directly choose a device to save AVI video with subtitles to play on the device (e.g. iPhone, iPad, Galaxy Tab, PS Vita, etc). And then click the "Start conversion" button and now you have finished all steps of attaching subtitle to AVI videos. After a few seconds, you can watch your favorite AVI movies with your preferred language track on your mobile devices as you like.

OK, so perfect, just try the excellent iFastime Video Converter Ultimate for Mac to insert SRT or other subtitles to AVI File on Mac/PC, enjoy.

Have more questions about how to insert SRT Subtitles to AVI File on Mac/PC, please feel free to contact us>> or leave a message at Facebook.

More Topics:

Friday, October 2, 2015

Downscale Typhoon Q500 4K to 1080p for Editing/Playback (Mac)

Typhoon Q500 camera can shoot up to 4K footages. It can create amazing 4K videos, dronie effects or just set up the Typhoon Q500 to follow you anywhere you go. With this high definition image ability showed to us, today Typhoon Q500 has attracted a lot of users.

However, for Mac users, it's always not so easy to play Typhoon Q500 4K videos in media player or edit them in NLEs on Mac OS X (E1 Capitan Included). Luckily, there is a smart and easy way to solve the problem. Since the majority of work is still being finished in 1080p, you can downsacle the Typhoon Q500 footage from 4K to 1080p, which is the best and quick way to work Typhoon Q500 4K videos smoothly on Mac.

Hot search: 
4K to FCP | 4K to 4K TV | 4K videos to QuickTime | 4K Movies to iPad Mini 4 | 4K AVI to Prores

To adjust the Typhoon Q500 4K to 1080p on Mac, an excellent 4K to 1080p converter is necessary. There are many programs out there that can convert and compress the4K videos in market, few of them can process at a fast speed. If you're looking for a stable, fast yet easy-to-use 4K video converter for Mac, you can try iFastime Video Converter Ultimate for Mac, which can help you achieve your goal easily and quickly. Besides, it also has the ability to convert all SD/HD/2K/4K video to your desired formats, devices and programs optimized file formats, encode and decode H.265/HEVC codec, output M3U8 for streaming with local HTTP server, create 3D effect movies from both 2D or 3D resources. You can read more  upgrade informations to help you.

If you want to convert 4K to 1080p in Windows PC, please turn to the Video Converter Ultimate version. 

OK, now download the right program and follow the guide below to learn how to resize Typhoon Q500 4K videos to 1080p with three clicks of mouse.


Other Download:

Guide on Downscaling Typhoon Q500 4K to 1080p on Mac

Step 1. Load the Typhoon Q500 4K files

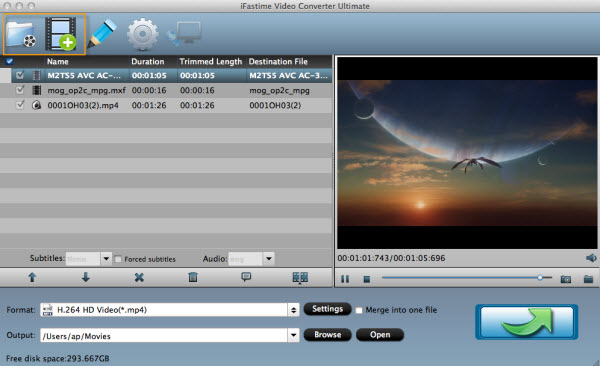
Click "Add Video" button to load your Typhoon Q500 4K files as soon as you get into the main interface. Or you can drag & drop the files to the software directly.


Step 2. Choose the output format

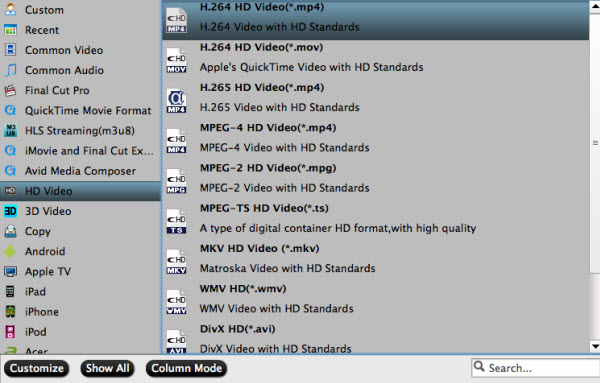
Click the "Format" drop down list to select a proper video foramt as you want. Here you can choose .mp4/HD .mp4 from common video/HD video as output format, which is better suitable for Typhoon Q500.


Step 3. Set Video Resolution at 1080p

Click "Settings" button; you can adjust video and audio settings, including codec, aspect ratio, bit rate, frame rate, sample rate, and audio channel. To down-convert ultra HD 4K to 1080p, do remember adjusting video size to 1920*1080. That is the exact 1080p.


Step 4. Start transcoding Typhoon Q500 4K to 1080p on Mac

When everything is done, hit "start conversion" button at the bottom of the main interface to let the 4K to 1080p conversion begin.

When the conversion finished, check the generated 1080p video, you will certainly be satisfied with its final video quality. It would be easier for you to playback and edit your Typhoon Q500 4K clips. Have a try.

Have more questions about how to downscale Typhoon Q500 4K to 1080p for editing/playback (Mac), please feel free to contact us>> or leave a message at Facebook.

More topics:

Wednesday, September 30, 2015

Extract DVD audio for Logic Pro 10.2 track

Logic Pro 10.2 is a digital audio workstation and MIDI sequencer software application for the Mac OS X platform. Logic Pro 10.2, a new collection of features that enables you to manipulate timing and tempo quickly and intuitively. With the new Flex Tool you can push audio around with your mouse by clicking and dragging a waveform. You can use it to correct dodgy timing in an audio performance or 'quantize' the timing to a groove. If you need to import a DVD to Logic Pro to take the audio part for editing and mixing, you’ll really need one DVD to Logic Pro Converter to assist you.

Here we introduce iFastime Video Converter Ultimate, it can not only rip DVD to any video format, but also rip, extract DVD audio into Logic Pro 10.2 supported audio format like WAV, MP3,AAV, M4A, AC3 keeping the original quality. Besides Logic Pro 10.2, this powerful video and audio converter also supports MP4 to MP3extract Lossless FLAC Audio from Blu-rayall audio files to iPod Touch 6, and more.

If you are a Mac user, you can get iFastime Video Converter Ultimate for Mac, the step and method is same, just follow.

Free Download the top iFastime Video Converter Ultimate:


Other Download:

How to Rip and Extract DVD to Logic Pro 10.2 track?

Step 1. Import DVD

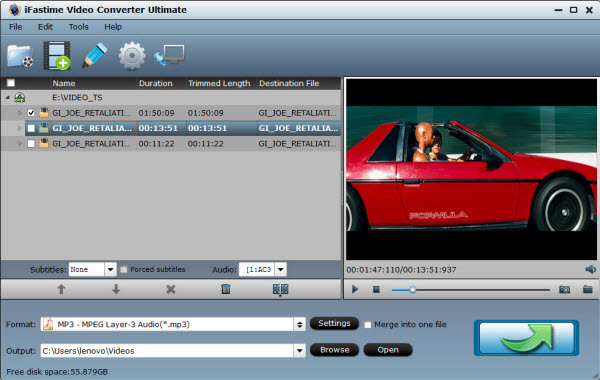
Click "Load files" icon to import source audio/video files into this Pro 10.2 audio tool, or you can drag-and-drop the source to the app directly.


Step 2: Pick Pro 10.2 supported format

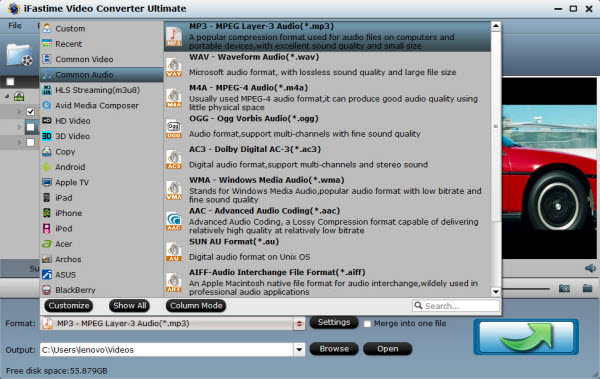
Click "Format" bar, choose Pro 10.2 track supported audio formats from "Common Audio" > "MP3 - MPEG Layer-3 Audio (*.mp3)". You can also choose other audio formats on your own needs.


Tip: If you are not satisfied with the default audio quality, just click the "Settings" icon and choose wanted audio settings including sample rate, bitrate and audio channel.

Step 3. Start DVD to Pro 10.2 conversion

Back to the main interface and hit "Start conversion" to convert any audio files to Logic Pro 10.2 track supported format. It will start batch conversion automatically one by one. After the conversion process completed, click "Open output folder" to locate the converted audio file.

Finally, when you have successfully turned all the audio to Logic Pro 10.2 track, you can transfer them to Logic Pro 10.2 track, just enjoy and share.

Have more questions about how to extract DVD auido for Logic Pro 10.2 track, please feel free to contact us>> or leave a message at Facebook.

More Topics:

Tuesday, September 29, 2015

2015 Top 5 Mac iPhone 6S Data Recovery Software

When do we need an iPhone Data Recovery program?

There are so many unexpected reasons will causing data losing, such as iPhone stolen, damaged or got lost, accidental deletion, factory reset, virus attack, jailbreak or even error operations. Data loss is a distressing and serious thing, especially when the lost or deleted data mean a lot for you. You may ask: Is there any effective way to recover lost vital infolike contacts, messages, precious photos, favorite songs and even some confidential business info in our iPhone from iPhone 6S/6S Plus/6/6 Plus/5S/5C/5/4S/4/3GS? The answer is "Yes". That's why you need the data recovery software to help you recover those deleted or lost data.

In this article, we list you top 5 iPhone data recovery software in 2015. Read the reviews and pick out the one you prefer.


2015 Top 5 Best iPhone Data Recovery Software

Top 1: Wondershare Dr.Fone for iOS

Wondershare Dr.Fone for iOS (Mac) enables you to recover data deleted from your iPhone/iPad/iPod touch with Recover from iOS Device and Recover from iTunes Backup. It supports all old and latest iOS devices. As one of top data recovery software, it helps you get lots of deleted or lost files back, like photos, contacts, text messages, notes, reminders, calendar, Safari bookmarks, app data and so on.

Main features:

1.Recover data from iOS devices, iCloud backup and iTunes backup file.
2.Available to recover messages, voicemail, contacts, notes, call history, calendars, Facebook Messenger, bookmarks, etc.
3.Recover App data like WhatsApp, Instagram, Flickr, iPhoto, iMovie, Kindle, etc.
4.Fully compatible with Windows 10, iTunes 12.2.1, iOS 9.
5.Supports iPhone 6s/6s plus/6/6 Plus/5s/5c/5/4s/4/3GS, iPad mini with Retina Display, all iPads and iPod touch.

Pros:

Intuitive user interface;
Fast data recovery speed;
Preview lost files before launching data recovery;
Desktop software has both Windows and Mac versions that support all iOS devices.

Cons:

Not all files can be previewed before recovery.
Can't recovery everything deleted
And the price is a bit high.

Software interface screenshot:


Download iPhone Data Recovery Software for Mac/Win:


Top 2: EaseUS MobiSaver

EaseUS MobiSaver is the best iPhone data recovery software that is totally free of charge. It supports iPhone data restore on both Windows and Mac caused by device damage, jailbreak, loss and iOS upgrade. Compatible with iPhone 6s, iPad Pro and iOS 9 compatible, this free iPhone data recovery app helps you recover photo, contact, SMS, call log, etc data for iPhone if you have iTunes backup.

Main features:

1.Recover up to 12 Types of Data including contacts, SMS, reminders, call log, photos, camera roll, etc.
2.Rescue iTunes encrypted backup.
3.Recover iPhone/iPad/iPod touch Data from Various Data Loss Circumstances.
4.iPhone 6s, iPad Pro and iOS 9 compatible.
5.Three recovery modes for you to restore your data back.

Pros:

Simple and easy to use for all
Totally Free Data Recovery Tool
This software has windows and Mac versions

Cons:

No iCloud backup support
Not always able to retrieve lost data
Difficult to connect to iPhone
Take a while to scan your iOS device
sometimes stuck in the process of connecting to iPhone.

Software interface screenshot:


Top 3: Tenorshare iPhone Data Recovery

Tenorshare iPhone Data Recovery, being the best iOS devices data recovery software, supports iPhone data recovery directly from iPhone with or without iTunes/iCloud backups. If you lost data after upgrade to iOS 8 or due to iOS crash, download this best iPhone data recovery software and you are allowed to enjoy a time-limited free trial to do the iPhone data recovery. Fully support iPhone 6s Plus/6s/6+/6/5s/5c/5/4s/4 iTunes 12.2 and iOS 9.

Main features:

1.Recover up to 20 types of data directly from iPhone without backup
2.Three recovery modes for you to recover iPhone data
3.It supports to sync recovered contacts, messages and notes directly to iPhone
4.Extract, restore, backup data from iTunes backup files to computer

Pros:

Neat and intuitive interface
Fast data scan and recovery speed
Retrieves almost any file from damaged, crashed, broken or smashed iPhone
Totally free trial for a limited time

Cons:

Too expensive ($ 139.95)
Found files are not sorted in "Folder"
You can only view them in "File Type"
It only supports iPhone

Software interface screenshot:


Top 4: iSkysoft iPhone Data Recovery

It is a one-stop data recovery solution to restore iPhone photos, contacts, messages and more in a few clicks. This iOS recovery software can extract and recover what you want from iCloud and iTunes backup, including photos, app photos, mesages, contacts, call history, voicemail, WhatsApp messages, Notes, Calendar, Reminder, Safari bookmarks, voice memo and app documents.

Main features:

1.Recover up to 9 types of data directly from newest iOS devices
2.Recover up to 17 types of data from iTunes/iCloud backup file
3.Can fix the "recovery mode loop" problem for your iOS devices
4.Support 3 kinds of data recovery mode
5.Fast, easy and powerful iOS recovery software

Pros:
It provides a free version
Easy to use interface
The ability to recover data selectively is a real boon
Capable of finding and restoring a number of file types
Repair the operating system of your iPhone, iPad and iPod touch

Cons:
Takes a while to scan devices completely
Very expensive, it costs $69.95

Software interface screenshot:


Top 5: WinAVI iPhone Data Recovery

WinAVI iPhone Data Recovery is a data recovery tool only for Windows and iPhone users, supporting data rescue on iPhone 4S, iPhone 4, iPhone 3GS and the previous. This data recovery software can auto-scan, index and search data on your iPhone. Beside, you will be able to preview and select video/photo/contact data for recovery.

Main features:

1.Auto-scanning, indexing and searching.
2.Preview enabled before restoring.
3.Files sorted by size and Contacts from A-Z.
4.Easy-to-operate and user-friendly interface.
5.Recover and export your iPhone contacts to vCard(.vcf) file.
6.Recover and Export lost or deleted call history from iPhone.

Pros:

Recover and Export lost or deleted iPhone Message to .xml file function added.

Cons:

Limited devices supported
Lack of continuous upgrade.
Very expensive, it costs $ 69.95
Supported OS: Windows XP/Vista/7/8 & iPhone 4S/4/3GS/3G
Only output Photos (.JPG), Contacts (.CSV, VCF), Messages (.XML)

Software interface screenshot:


Buy iPhone Data Recovery Software for Mac/Win now:


When you're looking for data recovery software to help you recover deleted or lost data on your iOS device, what other extraordinarily elements or features you will refer to? Or what do you extremely want it to do for you? If you have any opinions or other wonderful data recovery software for iOS recommendations, welcome to share with us in the Comment Section below.

Additional Tips:
What Can iPhone Data Recovery Software Do?

1. Restore iPhone Lost Data After Jailbreaking.

Is there a way to restore the content of my iPhone after jailbreaking? If you synchronize your iPhone with iTunes before doing the jailbreak, this won’t be a problem. You can use an iPhone data recovery to recover all of the content.

2. Unlock Your iPhone Screen without Forgotten Passcode.

If you unfortunately forget your iPhone screen lock password, the only way to solve the problem, besides from entering the code, is to restore it to its factory settings. After you restore your iPhone to factory settings, use an iPhone recovery software to help you recover your data.

3. Recover Data from iPhone After Restoring to Factory Settings.

Factory Setting causes all data loss of iPhone. What can we do to get all of them back? Undoubtedly, you need an excellent data extractor for your iPhone.

4. Retrieve iPhone Deleted Data Due to Misoperation.

If you delete your iPhone contacts or messages by mistake, the best way to recover these data is choose Cisdem iPhone Recovery to fully recover your deleted data.

5. Recover Data from Damaged/Crashed/Smashed iPhone.

An iPhone recovery software is always here to retrieve iOS data lost due to iOS upgrade, jailbreak, accidental deletion, virus attack, restoring to factory settings, etc.

6. Restore iPhone Data from iTunes Backup.

iPhone recovery tool can help you restore iPhone data from iTunes backup. It automatically categorize your files before you preview the contents. Check the information in detail and then selectively restore the desired files.

7. Retrieve iPhone Data Without iCloud Backup.

iPhone data recovery is a program that you can recover data from iPhone 6, ,6 plus, 5S, 5C, 5, iPhone 4S, iPod touch 5 or iPad mini without iCloud backup file. These best iPhone data recovery software will help you recover your iPhone data with no hassles.

Related Software

Wondershare TunesGo: Frees your music anywhere from iPhone, doing what iTunes can’t.
Wondershare Dr.Fone for Android: A quick way to recover your lost or deleted data from Android .
Wondershare MobileTrans: One-click phone transfer tool to let you transfer data between Android, iOS, and Symbian devices.
iFastime Video Converter Ultimate: Make all your Blu-ray, DVD collections and movie library compatible with iPhone.

Have more questions about this Top 5 Best iPhone Data Recovery Software review, please feel free to contact us>> or leave a message at Facebook.

More Topics:

Monday, September 28, 2015

Convert ISO image on OS X El Capitan 10.11

ISO is an archive file (you may also know it as dis image) of an optical disc. It covers all the data of files contained on the archived CD/DVD, or any other disc format. However, ISO is not supported by most players, tablets, phones and video editing softwares. So it becomes necessary to convert ISO image to .MP4, .AVI, .MOV, etc format for more convenient playback, sharing or other needs.

Under above case, an ISO to OS X El Capitan 10.11 converter will be necessary. Though it is difficult to find one excellent  ISO converter on OS X El Capitan 10.11, iFastime Video Converter Ultimate for Mac cannot be too good to share. It acts as the best ISO converter for Mac users to fulfill the needs without hardly a glitch. With it, you can effortlessly convert ISO/HD/4K files to MP4, MOV, WMV, AVI, MKV, FLV, VOB, etc. for using in any regular players, TVsvideo editorssmartphonestabs, online websites and more. 

What's more, it powerfully supports the latest Mac OS X 10.11 El Capitan, and Mac OS X 10.10 Yosemite, 10.9 Mavericks, 10.8 Mountain Lion, 10.7 Lion, 10.6 Snow Leopard, 10.5 Leopard. In addition, you can edit your ISO files by cropping, trimming, adding watermarks, etc. with the built-in free editor. 

Hot search: 
Good news is the powerful video converter has a Halloween special promotion, Only $36.76 Get Halloween Video Converter for Mac El Capitan, just read to get the surprise.

Free Download iFastime Video Converter Ultimate for Mac:


Other Download:
Convert ISO image on OS X El Capitan 10.11

Step 1: Add your ISO image files

Import source video to the El Capitan ISO videos converter. Alternatively, you can click "Load files" button to load the ISO image files. On the right windows, you can preview your videos  and take snapshots of your favorite scenes.


Step 2: Select output format

Here you can choose MP4, AVI, MOV, H.265 from "Common video" or "HD video", and more popular formats for your any devices, sutiable formats you can select depending on your devices. If you just want to play ISO on OS X El Capitan 10.11, here you can choose MP4, MOV, M4V.


Plus:

Tip:  If you like, click on "Settings" and you could easily set bitrate, frame rate, codec, channels, sample rate, etc to adjust parameters that affect video quality and file size for the video you prefer. Keep in mind bitrate higher results in big file size, and lower visible quality loss, and vice versa.

Step 3: Start conversion

Hit the " Start conversion" button at the bottom right corner to let this smart converter start the ISO video conversion on OS X El Capitan 10.11. When the conversion is done, you can find the converted file by clicking the open button. 

No worry about converting ISO images, with iFastime Video Converter Ultimate for Mac, it is so easy, just have a try.

Have more questions about how to convert ISO image on OS X El Capitan 10.11, please feel free to contact us>> or leave a message at Facebook.

More Topics:


Friday, September 25, 2015

Backup Blu-ray to Fire Kids Edition on Mac

Fire Kids Edition comes with an all-new Fire tablet, a year of Amazon FreeTime Unlimited, a kid-proof case, and a 2-year worry-free guarantee. Kids Edition now get access to over 20,000 age-appropriate websites and YouTube videos, kids can dive in to this content immediately with no set up or extra costs.Unlimited, free access to 10,000 kid-friendly books, movies, TV shows, educational apps, and games with 1 year of Amazon FreeTime Unlimited.

When got a new Fire Kids Edition for your kids, you probably would like put some Blu-rays onto it to let your children enjoy their favorite movies. However, you may be disappointed that you could not just transfer Blu-ray to New Fire Kids Edition directly without conversion, since there’s no Blu-ray drive there.

In order to backup and play Blu-ray movies smoothly on Mac, here we introduce you a top Blu-ray to Kindle Fire converter - iFastime Video Converter Ultimate for Mac to make it easier to watch Blu-ray movies with a enjoyment by ripping Blu-ray to new Fire Kids Edition supported formats (MP4 is a good choice). It features great ability to handle the latest Blu-ray releases without neither crashing issues nor importing errors. For more ? Just get it and rip Blu-ray movies to Kindle Fire supported videos for playback in just a few mouse clicks, let’s begin.

Hot search:

Free download the top Blu-ray to Fire Kids Edition Converter for Mac:


Other Download:

Enable New Fire Kids Edition to Play Blu-ray movies on Mac.

Step 1. Add Blu-ray movies

Launch the top Mac Blu-ray to Fire Kids Edition Converter, add your Blu-ray files by clicking the "Load file(s)" icon from Blu-ray drive. Keep the nework connected when ripping Blu-ray.


Step 2. Decide output video format

Click on the pull down menu of "Format", and select "Android -> Amazon Kindle Fire HD H.264 video (*.mp4 )" or "Amazon Kindle Fire(*.mp4)" as target format. The output videos could fit on Kindle Fire Kids Edition perfectly.


Step 3. Advanced Video, Audio Settings

The default settings may not satisfy you, and you can click the "Settings" button to change the settings by yourself including video resolution, bit rate, audio sample rate, audio channel etc. for full screen playback smoothly.

Step 4. Start video conversion for Fire Kids Edition 

Click Convert button to start encoding Blu-ray to new Kindle Fire Kids Edition tablet immediately. Once the process completes, just click "Open" to find the Fire Kids Edition playable MP4 videos after the conversion and transfer them to your device with ease.

Have more questions about how to backup Blu-ray to Fire Kids Edition on Mac, please feel free to contact us>> or leave a message at Facebook.

More Topics: