Friday, November 18, 2016

2016 Thanksgiving Deals: 50% OFF DVD/Video Converters

2016 Thanksgiving Day is coming. Some of you are probably planning the Thanksgiving menus for your family while some are ready for selecting the best Thanksgiving present for their parents. With great blessing and best wishes, Pavtube Studio also prepared a big gift for their consumer – Thanksgiving Promotion 2016 to celebrate Thanksgiving Day with our friends. Focusing on product quality and customer needs, Pavtube offers up to 50% discount for hot products to reward our customers. Now,let's see the promotion in detail.
Pavtube 2016 Thanksgiving Day Promotion

Index of Pavtube 2016 Thanksgiving Day Promotional Notices

BD/DVD/Video Package Tools | 50% off Video Tools | Bundle Software Big Deal

Pavtube Promote BD/DVD/Video Package Tools in 2016 Thanksgiving Day


Pavtube Video Converter Ultimate for Windows /Mac Pavtube DVD Video Converter Ultimate Pavtube BDMagic for Windows /Mac Pavtube DVDAid for Windows /Mac
Discount
HomePage
Reviews
How To
Guides
Purchase

Pavtube 50% off Video Tools in 2016 Thanksgiving Day


Pavtube MXF MultiMixer

  1. Preserve MXF multi tracks and channels
  2. Export MXF to MKV/MOV/MP4 with multi tracks
  3. Transcode MXF for Non-linear Editing Software
  4. Trim/Crop/Merge/Watermark/Deinterlace MXF video
Original Price: $45
Now: $22.5

Free Trial | Buy Now
Pavtube Media Magician for Windows /Mac

  1. Import/Backup/Manage camcorder video
  2. Lossless output AVCHD MTS to MTS or MKV
  3. Frame by frame edit Video on timeline
  4. Output Different formats from same source
  5. Directly Upload Video to YouTube
Original Price: $45
Now: $22.5

Buy Windows | Buy Mac
Pavtube MKV Converter for Windows / Mac

  1. Convert MKV with desired subtitle and tracks
  2. Bundled streaming server app
  3. Ouput MKV to popular video and audio formats
  4. Split/Merge/Crop/Watermark MKV
  5. 6X faster conversion speed
Original Price: $29
Now: $14.5

Buy Windows | Buy Mac
Pavtube FLV/F4V Converter for Windows / Mac

  1. Convert FLV/F4V for Device playback
  2. Design FLV/F4V video with editing tools
  3. Bundled streaming server app
  4. Perfect video audio sync technology
  5. 6X faster conversion speed
Original Price: $29
Now: $14.5

Buy Windows | Buy Mac

Pavtube 2016 Thanksgiving Day Promotion Software Bundles


ByteCopy + Video Converter Ultimate
Original Price: $107

Now: $79.9

Video Converter Ultimate + ChewTune

Original Price: $94

Now: $74.9

ByteCopy + ChewTune

Original Price: $71

Now: $54.9

Video Converter Ultimate + DVD Creator

Original Price: $100

Now: $64.9

BDMagic + DVD Creator

Original Price: $84

Now: $49.9

ByteCopy + DVD Creator

Original Price: $77

Now: $44.9

Pavtube 2016 Thanksgiving Video Software Promotion Bundles


MXF Video Converter for Mac + MTS/M2TS Converter for Mac

Original Price: $58

Now: $29.9

 
Pavtube iMixMXF + HD Video Converter for Mac
Original Price: $80

Now: $54.9

 
Src:http://mxfworld.jimdo.com/2016/11/18/pavtube-2016-dvd-video-converter/ 


Monday, November 14, 2016

Remove Audio from Video in MP4, MKV, AVI, MOV, WMV

Many people are skilled in dealing with video editing. But when it comes to audio, they have no idea. For example, someone record a video clip and want to remove the original audio so that he can replace it with background music; or some people just want to remove the audio track from their movie. When people come across this situation, many of them don’t know how to do it. there are very few applications on the market available to remove audio from all kinds of video like MP4, MKV, AVI, MOV, WMV. But, in this article, you will be introduced a ingenious audio remover which can easily remove audio from video in MP4, MKV, AVI, MOV, WMV.

This audio remover I want to introduce is Pavtube Video Converter Ultimate. Pavtube Video Converter Ultimate can remove audio from all kinds of video formats including MP4, AVI, DivX, Xvid, WMV, WTV, MOV, MKV, FLV, WebM, OGV, MVI, etc. It removes audio or audio tracks from video as well as keep the same video format and video quality. That is remove audio without encoding and conversion. It also can change one audio format to another audio such as MP3, M4A, AAC, FLAC, WAV, etc. It supports Windows 10/8.1/8/7 so you can operate audio removal process on the newest Windows system.

Besides Audio Remover, it also is a Blu-ray Ripper + DVD Ripper + Video Converter + Video Editor. It can deal with all kinds of video, like Blu-ray/DVD moves, TV Shows, Music Drama and Camcorder video to H.265, M3U8, MP4, AVI, MOV, M4V... And it also enables you to trim, crop , and edit video in built-in video editing tool. (Learn more functions in Review)

Free download and install 


Other Download:
- Pavtube old official address: http://www.pavtube.cn/blu-ray-video-converter-ultimate/
- Cnet Download: http://download.cnet.com/Pavtube-Video-Converter-Ultimate/3000-2194_4-75938564.html

How to remove audio from MP4, MKV, AVI, MOV, WMV video with Audio Remover?

Step 1: Add sources video to the software.

From "File" drop down menu, click the "File" icon to load source video movies from your local computer to the program.


Step 2: Define output file format.

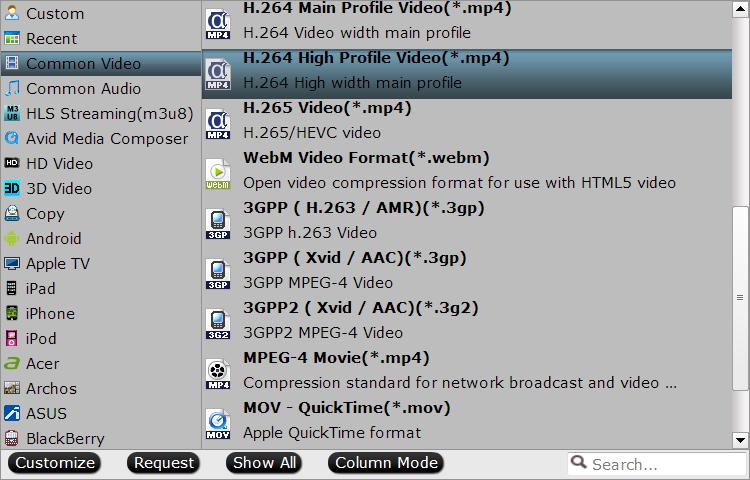
Click "Format" icon, and select what video format you want. Here, we choose "H.264 High Profile Video(*.mp4)" as the output file format from its drop-down options.


Step 3: Remove audio

Click “Edit” icon on the top menu, when video editor windows pop up, you can see “Audio Editor” choice, click ‘Enable’ and tick “Audio Remove” to remove audio from video.


Tip: Tick “Audio Replace”, you can replace the original audio of the video.

Step 4: Start remove audio from video

Press the right-bottom "Convert" button, you will start remove audio from MP4, AVI, MKV, M4V, MOV video process.

When the process is completed, it means that you have removed audio from video. Now, you can deal with this video as you want.

Related Articles: 
Source:http://2d-3d-movie-tips.blogspot.com/2015/07/remove-audio-from-video.html 

Friday, November 11, 2016

Ripping 3D Blu-ray Main Title in 3D Effect

Summary: 3D Blu-ray movies are getting more and more popular nowadays. That leads to oversell of 3D Blu-ray discs. Considering that 3D Blu-ray discs might get damaged due to frequent insert-and-eject in disc drive. 

Many seasoned computer 3D Blu-ray fans choose to copy their 3D Blu-ray movies to computer for safe storage and protection for 3D Blu-ray disc. But to Mac users, 3D Blu-ray backup in 3D effect on Mac has been having a long way to go, especially after the release of the newest Mac OS X 10.11 El Capitan. General 3D Blu-ray Rippers can’t be compatible with OS X El Capitan. So this takes more difficulty to copy 3D Blu-ray main title in 3D effect on Mac OS X El Capitan. We tests many 3D Blu-ray Ripper on Mac on the market, and finally find two excellent 3D Blu-ray Rippers that work well on Mac OS X El Capitan. One is Pavtube BDMagic for Mac and the other is ByteCopy for Mac.

Then, the following will show some simple steps of copying 3D Blu-ray on Mac OS X El Capitan with these two excellent 3D Blu-ray Rippers.

Using BDMagic to copy 3D Blu-ray main title in 3D effect on Mac OS X El Capitan

Pavtube BDMagic for Mac is a user-friendly and handy tool for Mac OS X El Capitan users to rip and copy 3D Blu-ray main title in 3D effect, 2D Blu-ray and convert Blu-ray ISO on Mac OS X El Capitan with simple operations keeping original video quality. It not only can copy 3D Blu-ray with perfect 3D effect, but also convert 2D Blu-ray, Blu-ray ISO file to 3D MP4/MKV/AVI, etc.

Free download and install: 


Other Download:
- Pavtube old official address: http://www.pavtube.cn/blu-ray-ripper-mac/
- Cnet Download: http://download.cnet.com/Pavtube-BDMagic/3000-7970_4-76177782.html

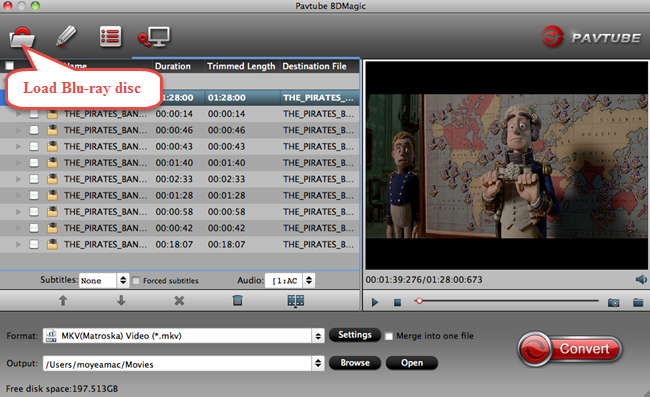
Step 1: Load 3D Blu-ray to 3D Blu-ray Ripper

Click the "Folder" icon on the top menu bar to load your 3D Blu-ray disc on Mac OS X El Capitan to the program.


Step 2: Choose the output format and file

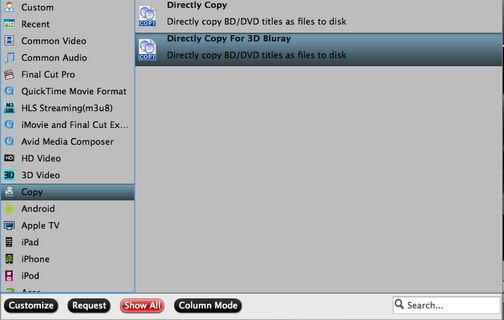
Move mouse down, tap” format” button and there is a bar in which you can hunt the choice of “copy”. There are two choices in “Copy”, just choose “Directly Copy For 3D Blu-ray” to copy your 3D Blu-ray main title in 3D effect on Mac OS X El Capitan.


Step 3: start the copy process

After all your settings, what you need to do in the end is to click the big red “convert” to get the copy process started.

This way of copying 3D Blu-ray main title in 3D effect on Mac OS X El Capitan guarantees 1:1 main movie copy in 3D effect without losing quality and it can provide complete and intact main content.


Using ByteCopy to backup 3D Blu-ray main title in 3D effect on Mac OS X El Capitan

Pavtube ByteCopy for Mac is an intuitive and insanely fast 3D Blu-ray main title in 3D effect copying tool on Mac OS X El Capitan. With it, you can effortlessly achieve all your multimedia demands on Mac and enjoy 3D Blu-ray movies anytime you like without worrying damage of 3D Blu-ray disc. You can keep original video quality and meanwhile convert the Blu-ray audio to Dolby Digital 5.1 audio. It provides Lossless MKV file for you from ripping 3D Blu-ray on OS X El Capitan and has wide range of output formats, like H.265, M3U8, MP4, AVI, MOV, M4V, etc.

Windows Free download and install: 


Other Download:
- Pavtube old official address: http://www.pavtube.cn/bytecopy/
- Cnet Download: http://download.cnet.com/Pavtube-ByteCopy/3000-7970_4-76158512.html

Step 1: Load 3D Blu-ray Disc.

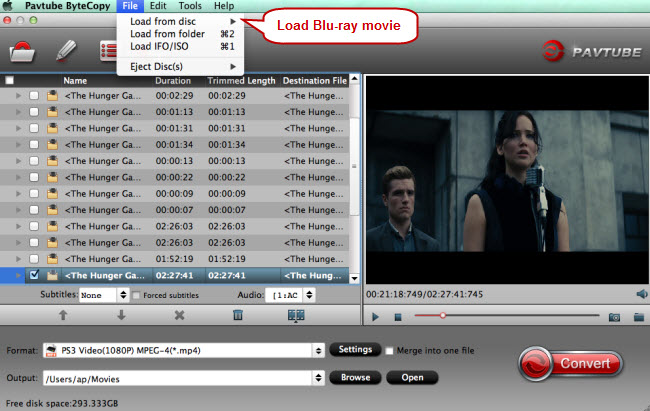
From "File" drop-down menu, select "Load from Disc" to import 3D Blu-ray disc on Mac OS X El Capitan from the optical drive.


Step 2: Define output file format.

From "Format" drop-down panel, you can specify "Copy" > "Directly Copy For 3D Blu-ray" to rip 3D Blu-ray on Mac OS X El Capitan preserving 3D effect.


Step 3: Start copy 3D Blu-ray main title in 3D effect to OS X El Capitan

After above all steps, Click the red button “Convert” on the main interface to start conversion.

Actually, ByteCopy is also a professional DVD Ripper on Mac OS X El Capitan. With it, you could backup DVD on Mac OS X El Capitan.

With these two excellent 3D Blu-ray Rippers on Mac OS X El Capitan, you can easily copy your 3D Blu-ray main title in 3D effect on Mac OS X El Capitan and don’t need to worry the problem of compatibility.

Related Articles: 
Source: http://movietopix.jimdo.com/2015/07/15/copy-3d-blu-ray-in-3d-on-el-capitan/ 

Monday, November 7, 2016

Watch MPEG Movies to iMovie on Mac with Smoothly

MPEG information: 

MPEG is actually a group, fully named as Moving Picture Experts Group, which is formed by ISO and IEC to set standards for audio and video compression and transmission. There are several different MPEG standards. Among those standards, MPEG-1, MPEG-2, MPEG-3 and MPEG-4 are very common ones. There are many different types, classes, and parts of the MPEG format. As a matter of fact, its development still continues until today. However, despite all such developments, MPEG-4 remains to be the most preferred video file format for movies that are stored on drives and played on discs. 

Have problem with importing MPEG videos from your camera into iMovie for further editing? Or may you have some MPEG files stored on your Mac and want to use them on iMovie? 

In fact, iMovie generally can recognize MPEG files. Take a loot at iMovie supported formats: 


However, if your MPEG files are muxed (multiplexed) MPEG-1 or MPEG-2 videos, iMovie won’t accept them because of the codec incompatibility. On this occasion, you need to convert MPEG format to iMovie compatible formats like MP4, MOV, M4V, etc. 

Best MPEG to iMovie workflow: 

As you see, iMovie only support some MPEG files. So you'd better convert your MPEG files to iMovie accepted files at first like MOV. If you temporarily have no idea about what to do, you can take the MPG to iMovie Mac conversion into consideration which is introduced in the following paragraphs. The conversion is darn easy to be finished with only three clicks without loss of video quality. 

Pavtube HD Video Converter for Mac, an easy-to-use yet powerful app which can effortlessly encode SD/HD/4K MP4 files to iMovie best editable format, which ensures best results when working with iMovie (11) on Mac(macOS Sierra included). The Mac video conversion tool can also create files compatible with other non-linear editing systems like Adobe Premiere Pro, Avid Media Composer, FCP, etc. Just download the program and follow the step-by-step guide to make your MPEG files compatible with iMovie (11).


Pavtube HD Video Converter for Mac
  • Best Tool to Convert MPG/MPEG to iMovie Compatible Formats for Editing.
  • Convert MPG/MPEG files to iMovie supported format within seconds.
  • Convert SD/HD/4K MP4, MKV, H.265, MOV, AVI, Tivo, MXF, MTS, M2TS, etc to iMovie format.
  • Support to convert MPG/MPEG to iMovie, FCE, FCP, Premiere Pro, Avid Media Composer formats.
  • Edit MPEG video including merge/crop/cut/trim/split/add Watermark/add subtitle to MPEG
  • Perfectly compatible with macOS Sierra, Mac OS X 10.11 El Capitan, Mac OS X 10.10 Yosemite, 10.9 Mavericks, 10.8 Mountain Lion, 10.7 Lion, 10.6 Snow Leopard, 10.5 Leopard.


Hot search: MXF to iMovie ǀ MP4 to iMovie ǀ H.264 to iMovie ǀ MKV to iMovie ǀ YouTube to iMovie ǀ iMovie to MP4

Easy solution to convert MPEG files to iMovie (11)

Step 1: Load MPEG files to the program

Launch the MPEG to iMovie Converter and click "Add video" button to locate the .MPEG file(s) you want to add. Check the "Merge into one file" box, you can join several .mp4 clips together if necessary.


Step 2: Choose iMovie preferred format

Click "Format" pull down list to select iMovie and Final Cut Express > Apple InterMediate Codec(AIC) (*.mov) as the best video format for iMovie (11).


Step 3: Edit the MPEG videos (Optional)

By clicking "Edit selected task" button, you can trim, crop the video, or add watermark, adjust effect, attaching subtitles for pre-editing your video files so that you can simplify your iMovie editing.


Trim – Choose to reserve the part you need. Just choose the chapter which you need to trim, to set "start time" or "end time", type the portion which you want to save.

Crop – Remove black edges of your video or just get the scale of this video you want.

Effect – Adjust the effects by adjusting the parameters, such as:

1) Deinterlacing – If there are some stripes on the picture, you can check this option to make a better picture effect. (Checked by default)

2) Under Effect tab, you can add special effects like Simple Gauss Blur, Flip Color, Invert, Aged Film to your source video. In Color Control section, you can correct color by adjusting brightness, contrast, and saturation.

Audio Editor – You can replace/remove original audio, and set audio fade in/out effects.

Subtitle – You can add *.srt or *.ass/*.ssa subtitles to the video as hard subtitles.

Step 4: Adjust the video, audio settings (Optional)

Click "Settings" to fix the frame rate, bitrate, video size, etc to your needs. To have a smooth editing with iMovie, you need create the files with the appropriate resolution and frame rate that matches your source footage.

Step 4: Start MPEG to iMovie conversion

Click "Start conversion" button at the bottom right corner to finish endocing MPEG to AIC .mov for iMovie (11) on Mac. After the conversion, click "Open" to locate the encoded videos and then launch iMovie,choose File > Import > Movies..., to import the converted MPEG video into iMovie; prepare for editing. You will find that it's just a piece of cake to edit MPEG files in iMovie (11).


Other Download:
Related Articles:  Source: http://file-editing-tips.over-blog.com/2016/09/import-mpeg-to-imovie