Tuesday, August 2, 2016

3D Videos and Movies On Gear VR

The Gear VR’s capabilities are demonstrated with a set of included videos and others available from the Oculus Store. It not only can be used to watch your own imported 2D and 3D movies, it can also be used to view content shot and compiled for 360-degree presentation thanks to head tracking capabilities built into in the the Oculus-powered platform.Now, you can follow the steps below to add your own 3D videos and movies to Gear VR for watching. 

To view your own 3D videos and movies on your Gear VR, follow these steps:
  • On your MicroSD card file directory, navigate to Oculus > Movies > Your Movies
  • Create a new folder within "Your Movies" and label it "3D"
  • Import or move your side-by-side 3D videos into your newly created "3D" folder
  • Once you have created your 3D content folder and imported compatible video files, insert your MicroSD card into your Galaxy Note 4 (if it isn't already), dock the phone in your Gear VR, and don the virtual reality headset.
Then:
  • Navigate to Oculus Cinema from the main menu
  • Navigate to "My Videos" from the Oculus Cinema content library menu
  • Select the 3D video you wish to view (if you followed the above steps it should have a "3D" label in the upper righthand corner)
  • Choose the cinema mode to begin playback
The software is coded to automatically convert any video in the "3D" folder for 3D playback. While the included documentation and tutorials don't make the process completely obvious, the answer is buried in the literature accompanying the Gear VR's Oculus Mobile SDK along with plenty of other tips on importing your own content for viewing on Samsung's virtual reality headset. 

For those who have a Gear VR but is still struggling to get top/bottom or side-by-side 3D to display correctly in Gear VR through Oculus Cinema, the following tips maybe can figure you out. 

Tip 1: You can download 3D movies for your Gear VR from 3D movies downloading site like forfree3d.com3dmoviesstreaming.com and 3D YouTube

Tip 2: Actually, you can make 3D movies for Gear VR by yourself out of 3D Blu-ray, 2D Blu-ray/DVD, even local 2D movie library with 3D Movie Creator like - Pavtube Video Converter Ultimate. This 3D movie maker can convert all 3D movies in whatever format such as 3D YouTube,3D Blu-ray to 3D MP4/MKV for Gear VR so that you can watch your own 3D movies on Gear VR. Besides 3D movies, it also can transcode 2D Blu-ray, DVDMKV video and other normal format videos to Gear VR with suitable 3D format. 

Mac users can use the Mac version, it can help you convert your own 3D videos and movies to Gear VR on Mac OS X El Capitan. 

Free Download Pavtube Video Converter Ultimate: 


Other Download: 

– Pavtube old official address: http://www.pavtube.cn/blu-ray-video-converter-ultimate/ 
– Cnet Download: http://download.cnet.com/Pavtube-Video-Converter-Ultimate/3000-2194_4-75938564.htmlHow to transcode your own 3D videos and movies for Gear VR? 

Step 1: Add 3D movies 

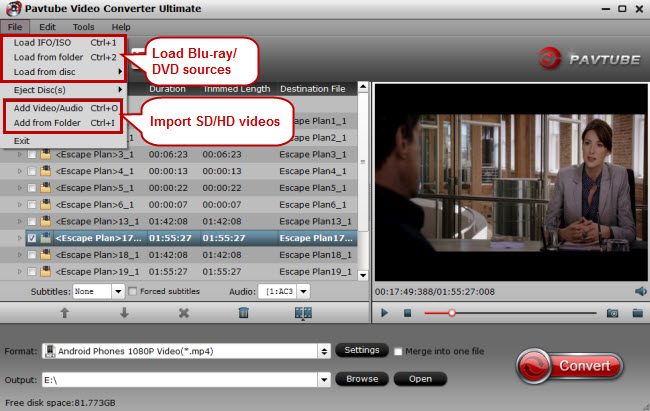
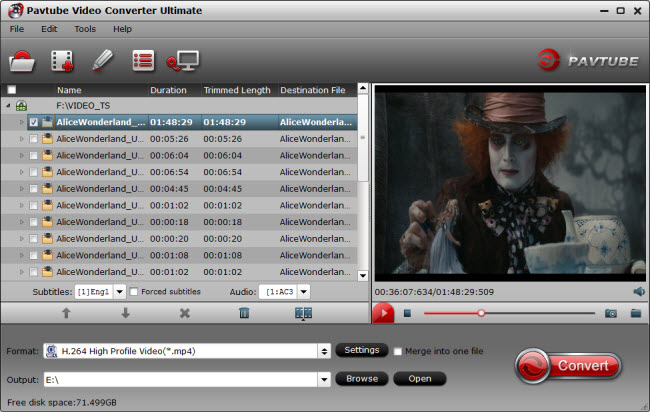
Launch 3D movies to Gear VR converter. Click "Add video" button to add local 3D movies. This software supports batch conversion so you can add more one 3D movies at the same time. 
 

Step 2: Choose right format 

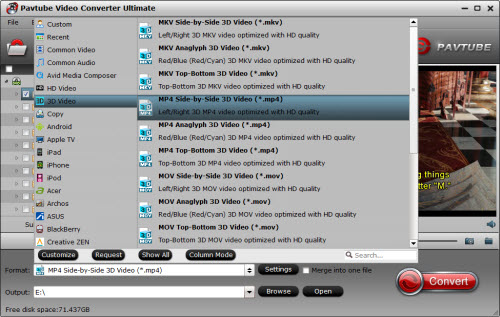
Gear VR supports MP4, MKVI, etc format. You can click the "Format" bar and choose "MP4 Side-by-Side 3D Video (*.mp4)" or "MKV Side-by-Side 3D Video (*.mkv)" from "3D Video" profile list for your Gear VR. 
 

Step 3: Start Transcoding process 

Click "Convert" button on the right to start transcoding local 3D videos and movies to Gear VR. After the process, just open the output folder to locate the created 3D movies. 

Now, you can play you created 3D videos and movies on Gear VR as the aforementioned steps via yourGalaxy Note 4 or Galaxy S6. Just put Gear VR on and enjoy your 3D movies! 

Related Articles:

Tuesday, July 19, 2016

Backup Rented Blu-ray from RedBox, NetFlix, Amazon

This guide is about how to rip and copy rental DVDs from Netflix, Redbox, Amazon to Hard Drive with copyright scheme using the best DVD rental copy software for your needs. 

Whether you are heading to trendy online DVD rentals or settle for going down the street for stereotyped movie rental stores, one thing is for sure: you attempt to borrow DVD as a rental at a relatively low price. However, an overwhelming trend now is to rip and copy rental DVD for permanent keeping or mobile watching since every borrowed DVD has a rental period. 


As a response to the uprising demands for DVD followers, we reveal the detailed guide on how to make a backup of DVD rented from RedBox, NetFlix, Amazon for watching without time limitation. 

Through a google search on the internet, I find Pavtube DVD copying program- Pavtube DVDAid which can give you the best approach to bypass copy protection or remove region code restriction from Netflix, Redbox, Amazon borrowed DVD. With it, you can 1:1 copy and convert rental DVD to virtually any regular formats MP4, MOV, MKV, FLV... to play anywhere with original quality. The mac version is Mac

Free download and install: 
  

Other Download: 
- Pavtube old official address: http://www.pavtube.cn/dvd_ripper/ 
- Cnet Download: http://download.cnet.com/Pavtube-DVDAid/3000-7970_4-76158510.html 


Rip, Convert and Backup DVD Rentals Effortlessly 

Step 1: Load Rental DVD movies into the program 

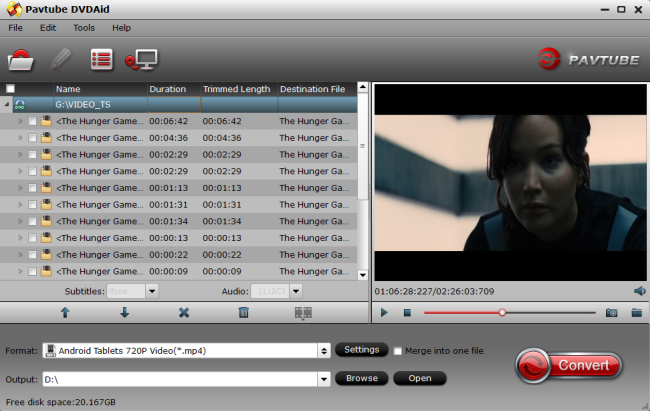
Once you run the Rental DVD Ripper, click BD disc button to load Rented DVD from RedBox, NetFlix, Amazon up into the Blu ray ripping program. 


Step 2. Decide DVD Copy Mode 


A. Full Disc Copy Mode: Copy Rental DVD Disc to a full DVD folder containing all the content in original BD. 

B. Directly Copy Mode: Backup Rental DVD Disc to a file with M2TS as filename extension. This mode enables copy movie only from DVD discs, compared with former mode, save time in copying protected DVD Disc and space to store the output M2TS file to make reasonable and practical use. 


Step 3: Choose an output video format 


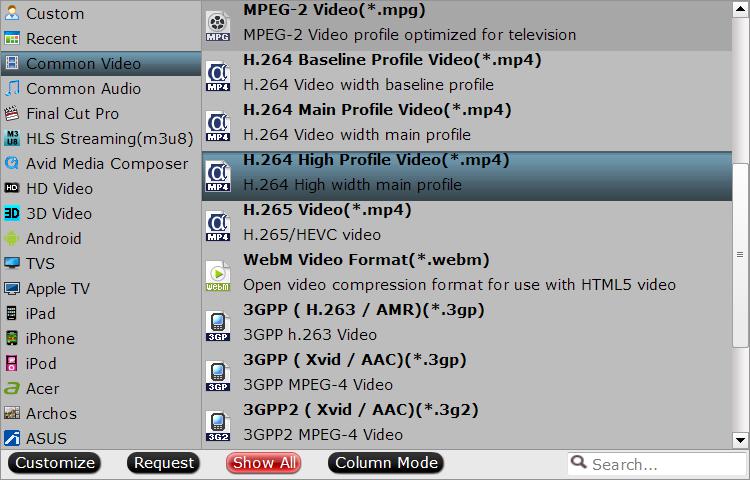
If you wanna rip Rental DVD to your needed file types, you need specify a format as output format. Click on the dropdown menu of "Format", and then choose your needed one from the multiple output format presets. You can rip DVD to MKV, MP4, MOV, WMV, or rip DVD for playback on iPad, iPhone, PS Vita, Nook HD, Galaxy Tab and more other portable devices you can think of. 


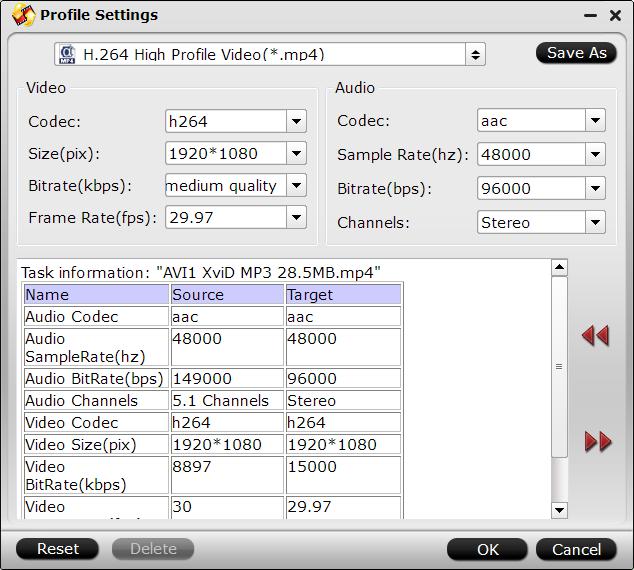
Tip: Click "Settings" button, then you are able to adjust all the settings in the following window to customize the output file quality, including codec, size, bit rate, frame rate, sample rate and audio channel. 

Step 4: Rip and copy Rented DVD from RedBox, NetFlix, Amazon 


Once the above mentioned steps are finished, you can click "Convert" button to copy Rental DVD movie to either the hard drive of your PC, or to your portable devices for enjoying on the go. 

When the copying/ripping task is completed, you can click "Open" button to get the ripped files of Rental DVD movie. Then, you can play, share Rental DVD with your families anywhere you want. 

Monday, July 11, 2016

How to Play AVI on Xbox One from HGST Touro S drive

Outline: Still have no idea to play AVI on Xbox One from HGST Touro S drive? This article will tell you how to get that done with the professional AVI to Xbox One converter. 


The vast majority of external hard drives utilize 5400RPM platters, and while that might be fine for backing up your files, it’s not ideal for tasks like photo editing, running applications, and expanding your game console’s storage. Luckily, the HGST Touro S ups the ante with a 7200RPM drive, which while not as speedy as an SSD, offers a noticeable improvement over its 5400RPM cousins. Many people use this exact drive to store games and videos on Xbox One, and reap the benefits in the form of shorter loading times. So if you have a HGST Touro S drive, you can transfer AVI videos to it for playing on Xbox One, but sometimes AVI videos are not played well by Xbox One. Take it easy, we will share you the method of solving it. 

Maybe you will say “Xbox One support the playback of AVI files”, it's hard to tell because the although this format is listed as one of the compatible video file formats, you may also come across the playback issue. It's highly recommended that yourself and any Xbox One's owners out there to use the media server to avoid any frustration. There is an easy way to help you do this job. You don't need to learn about the complicated codec and neither do you need to set various video or audio parameters. The Pavtube Video Converter Ultimate gives you the direct way to stream AVI files to the Xbox One supported formats and HGST Touro S drive supported videos, so you can quickly and easily enjoy your AVI files to ensure a smooth playback.( Mac

Free download the best AVI to Xbox One converter for Windows: 

Free download and install 
  

Other Download: 
- Pavtube old official address: http://www.pavtube.cn/blu-ray-video-converter-ultimate/ 
- Cnet Download: http://download.cnet.com/Pavtube-Video-Converter-Ultimate/3000-2194_4-75938564.html 

How to Encode AVI to Xbox One from HGST Touro S drive for playing? 


Step 1. Load AVI video 


After run Xbox One Video Converter software, you can drag AVI videos to the converter, or click the "Add video" button to browse to your media library and load the AVI video files from there. If you have multiple source video AVI files and want to merge them into one single output video file, make sure to tick the "Merge into one file" option. 


Step 2: Choose suitable format 

This software offers optimized preset for Xbox One. Open "Format" window, pull down profile list to navigate to "Zune/Xbox 360 Device". Here, you can choose "Xbox 360 HD Video(*.mp4)"format for Xbox One. 


For professionals and advanced users, the powerful video converter has the capacity to allow users to customize the output video files, such as quality, video encoder, video frame rate, resolution, bit rate and so on. 

Step 3: Start to encode AVI to Xbox One 


Just press on "Start Conversion" icon on the right below corner to start to convert AVI to Xbox One supported format. After the process, open the output folder to locate the generated video and then transfer the converted video files to HGST Touro S drive and then import them to Xbox One for enjoying. 


Related articles 

Friday, July 8, 2016

Make perfect copies of my DVD library to hard drive with lossless mkv format

If you are looking to make digital backups of your favorite Blu-ray/DVD movies, you can find few better tools than your Blu-ray Ripper which is quick and easy to use to copy BD/DVD to lossless MKV. 

Question: I understand the MKV container format supports this, but judging from the screenshots in the product description it appears that only one subtitle language and one audio track can be selected from the drop down boxes on the GUI. Is this correct? If so, when will it be possible to rip disks with all subtitle and audio tracks? I'd like to make perfect copies of my BD/DVD video library to my hard drive. I have a Bluray Ripper product but it doesn't have this function. Any suggestions? Thanks in advance! 


Blu-Ray/DVD may be majestic, but it also has more copy protection than any other format around, and playing it on your computer with media players can be difficult to impossible. Here's how to rip your BD/DVD movies for glorious HD movies with lossless mkv format for using anywhere you want. 

To achieve your goal, I did many free trials, and then I choose to use is Pavtube ByteCopy, which runs as the the top of the list of the best Blu-ray rippers in quick decrypting the protected BD/DVD discs within a few clicks. Best of all, it can handle the latest Blu-ray/DVD and is capable of backup Blu-ray/DVD to lossless MKV preserving all the multiple audio and subtitle tracks as well as chapter markers and in this way, I can freely watch BRD and DVD on PC/TV/Media Players. 

Mac version is available here: Pavtube ByteCopy for Mac; well support Mac Mavericks! Now I will show you how to lossless backup your Blu-ray to/DVD to lossless mkv format on Win and Mac. 

(Good News! Pavtube Release a New Site - multipelife.com with Product Migration and Name Change. To thanks for your continued support, we are holding a 'New Site Special'. You can get 30% off ByteCopy on Windows/Mac platform) 

How to backup Blu-ray/DVD to lossless mkv format on Win/Mac 

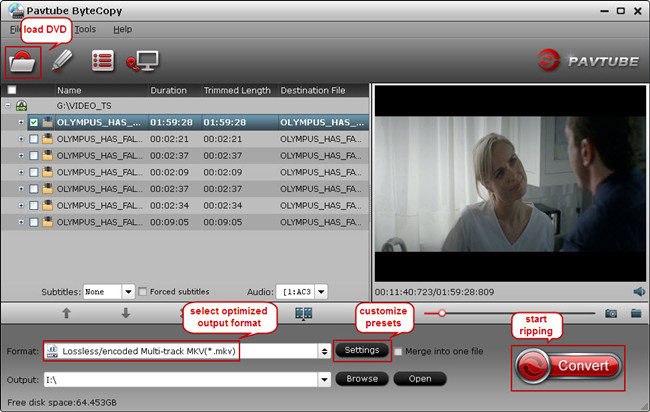
Step 1. Launch Pavtube ByteCopy, click "Load files(s)" to import inserted Blu-ray/DVD disc, ISO/IFO files, and BD folder. 

 
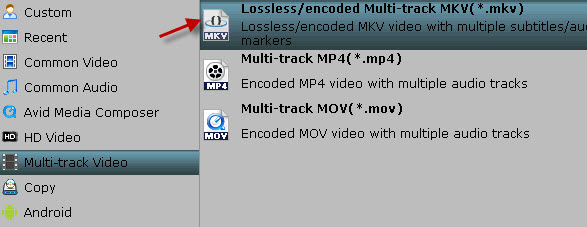
Step 2. Choose “Multi-track Video >Lossless/encoded Multi-track MKV(*.mkv)" in “Format” drop-down list as the lossless preset. 


Step 3. Adjust video/Audio settings. 

Click "Settings" to enter Multi-track video profile window; switch to "Video" and find the "Encode" box which is unchecked by default, so if you want a lossless MKV copy, do not touch it. 

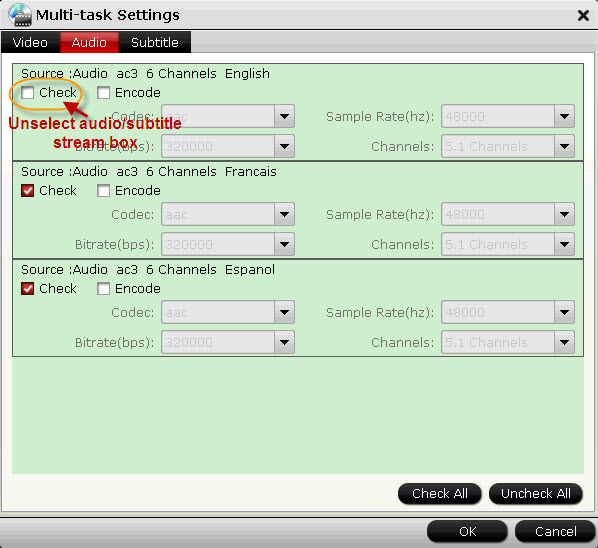
The switch to "Audio", check wanted audio track; so does the "Subtitles". 


Step 4. Start Conversion. 

Start backing up Blu-ray/DVD movie to lossless MKV format, all the chapter markers will be save and Pavtube ByteCopy will take the rest. After the conversion, click “Open” to quick find converted videos. 

Simply copy the output MKV file to your them via for PC/TV/Media Player freely playback. 

Tips: 

1. Not all media player can support M2TS and MKV with multiple streams. You are recommended to try powerful Free VLC Player if you haven’t found a suitable one. And the chapter mark selection can be supported as well.


2. You may be confused about the other two options under "Multi-track Video" catalogue: Muti-track MP4(*.mp4)and Multi-track MOV(*.mov). They are used to transcode BD/DVD to .mp4 and .mov output files. The point is that they support saving encoded multiple audio tracks. So you could enjoy it in your iPhone 5S/5C, iPad Air, Apple TV 3 and more portable devices. 

3. Directly Copy will provide you another way to lossless output. It will provide you a 100% backup in original format without extracts. If you do not want to output mkv files or your player cannot play mkv files, directly copy is the best choice for you. It will save 100% intact .M2TS main movie from original BD disc, and allow all. subtitle and audio tracks preservation.


4. Surprise! Welcome to Money Saving Software Bundles to find big special sale on much software bundled with ByteCopy, like ByteCopy + Video Converter Ultimate, ByteCopy + DVD Creator, ByteCopy + VidPie, ByteCopy +MXF MultiMixer etc. And it will help tosave up to $35.1. Now go to find the preferable one and get special price.

Pavtube Blu-ray Ripper Upgraded to Decrypt Blu-ray MKB61

Hot news for Blu-ray collectors!! Are you still upset that you can't rip your new bought Spectre?007,The Martian,The Revenant?cause these new Blu-rays now have been encrypted with more complex encryption mechanism?MKB61? Now, you are saved by Pavtube in that Pavtube Studio has upgraded his main 3 Blu-ray ripping tools to 4.8.6.7 version to support the new Blu-ray MKB61.


Usually, you perhaps know that Blu-ray is protected by AACS, BD+,UOP,DRM, HDCP, BD-ROM, Region codes, etc. This encryption prevents people from copying, ripping and converting their legally bought Blu-rays even they just rip it for personal use. Normal Blu-ray ripping applications on the market can rip AACS, BD+ schedule but no other difficult encryption mechanism. Even powerful as MakeMKV, supports only Blu-ray encryption up to v60, not including MKB61.
This time, Pavtube upgraded his three top-ranked Blu-ray Ripper BDMagic, ByteCopy, Video Converter Ultimate?to the newest 4.8.6.7 version supporting to decrypt new Blu-ray encrypted with AACS, BD+,Region codes, HDCP up to MKB61.Now, let's learn the upgrade and the main features of each Blu-ray ripping tool.

What's new?

1.support latest Blu-ray MKB61.
2.fix some bugs.

Key features of ByteCopy

- 1:1 backup BD/DVD with original video structure.
- Main title copy BD/DVD with smaller size.
- Copy BD/DVD to MKV?with lossless quality.
- Convert BD/DVD to MP4/MOV/AVI with multiple subtitle/audio streaming.
More functions of ByteCopy is in the review.

Key features of BDMagic

- Full copy and directly copy Blu-ray and DVD
- Convert Blu-ray/DVD to SD/HD MP4, MKV, AVI, etc to NAS, External Hard Drive, Media Server, etc.
- Convert 4K Blu-ray?to H.265/HEVC 4K MP4/MKV
- Rip Blu-ray preserving AC3, AAC, DTS audio in stereo, 5.1, 7.1 sound.
More functions of BDMagic is in the review.

Key features of Video Converter Ultimate

- Decrypt Blu-ray and DVD to virtually any SD/HD video
- Convert 4K Blu-ray to SD/HD MP4, WMV, MOV, QuickTime, ProRes for editing in NLE.
- Copy Blu-ray/DVD to M3U8 for HTTP live streaming
- Convert, shrink, compress Blu-ray, DVD to YouTube, FaceBook, Vimeo, Instagram, Google Plus, etc.
More functions of Video Converter Ultimate is in the review.

The Blu-rays you can Decrypt:

You can use Pavtube Blu-ray Ripper to decrypt some new released Blu-ray including: The Revenant, The Martian, Hannibal TV Series, Game of Throne?(1-6), Spectre 007, Zootopia, Harry Potter, Independence Day, The Divergent Series: Allegiant, The Walk, Avatar, House of Cards, Bridge of Spies, Mad Max: Fury Road, Room, Spotlight, X-Men, The Family Fang, Ben Hur, Roots, Code of Honor, Now You See, Finding Dory, Arch Angels, Shchedrin: The Secret Life of Pets, Sherlock, Ghost Rider / Hellboy, The Da Vinci Code,Pete's Dragon, Ice Age: Strong and Proud, etc.
What's more, Pavtube Studio is holding on Summer Vacation Promotion. Buy Blu-ray Ripper in this period, you may get some surprise:
In addition, Pavtube Studio also upgraded his Video DVD Converter Ultimate to support users to rip any new released commercial DVD discs to MP4, MOV, MKV, 3GP for using on iPad Pro, iPhone 6S, Galaxy S7/S7 Edge, HTC 10, Nexus 6p, Xperia Z6, etc.

Tuesday, July 5, 2016

Ripping 3D Blu-ray for Viewing on Freefly VR via iPhone

Virtual Reality is getting more and more prevalent so cheaper VR Headset than the most popular Samsung Gear VR mushrooms, like Freely VR. Moreover, in the review of Freely VR at Reddit, someone said that Freely VR is more comfortable to wear than the Gear VR (lighter). If you want to purchase a 3D Glasses, what about a Freely VR? Freely VR is compatible with iPhone, even the new iPhone 6 Plus. So here, the article shows how to watch 3D Blu-ray on Freely VR via iPhone since 3D Blu-ray is still the biggest 3D course nowadays. 


For 3D Glasses, 3D SBS MP4 is the most compatible format, including Freely VR. So you can choose to rip 3D Blu-ray to 3D MP4 for Freely VR via iPhone. To reach the goal, a Blu-ray Ripper is needed. 

Pavtube Video Converter Ultimate is a good Blu-ray Ripper that deserves you to choose. It can rip and commercial and region-locked 3D Blu-ray to 3D MP4/MKV for Freely VR, Gear VR, GOODO VROculus Rift DK2. It also allows users to adjust 3D depth and video/audio parameters. 

Free download and install 
  

Other Download: 
- Pavtube old official address: http://www.pavtube.cn/blu-ray-video-converter-ultimate/ 
- Cnet Download: http://download.cnet.com/Pavtube-Video-Converter-Ultimate/3000-2194_4-75938564.html 

How to rip 3D Blu-ray to 3D MP4 for viewing on Freely VR via iPhone? 

Step 1: Load 3D Blu-ray movie 

Download the 3D Blu-ray Ripper(Mac version) on PC. Insert your 3D Blu-ray movie to disc drive, and click “Load Disc” button on the interface to load 3D Blu-ray to the app. It also support importing 3D Blu-ray ISO and Blu-ray folder. 


Step 2: Select the right format. 

Hit the format bar, navigate to “ 3D Video ” > “ MP4 Side-by-Side 3D Video (*.mp4)” as the target format. 


Tip 1: Click “Settings” and you can change the parameters like resolution, frame rate, encoder and bit rate for video, and sample rate, channel, encoder and bit rate for audio and save it as your own profile. 1920×1080 compressed side-by-side 3D should be resampled to a lower resolution, like 1920×540. And keep audio in AAC or MP3. 

Tip 2: Since 5.7" appears to be the point for view cut-off in Freely VR, if your 3D Blu-ray movies has black edge, you can click “Edit” to crop the black area. 

Step 3: Get the conversion started 

Set the output folder by hitting “Output”. Then click the red “Convert” to get the process started. 

Now, transfer the 3D MP4 file to your iPhone. Connect your iPhone with Freely VR, Put Freely VR on. Enjoy! 

Related articles 

Thursday, May 12, 2016

Best XMedia Recode Mac Alternative

It's All About XMedia Recode 

XMedia Recode is a universal media converter, which integrates most popular audio or video formats. It convert nearly all popular audio and video format including WMV, MP3, Matroska, MP4, 3GP, and more, and unprotected DVDs or DVD files to any format. 

Pros 

Easy to use, fast, and can do massive batch conversions 

Cons 

Simply put: the output files don't work. I converted about 700 .wav files into .flac files, and around 30-40% of them now skip, don't load properly, or don't load at all. Each m4p file opened caused the program to crash. 

XMedia Recode will be the program you've been looking for when it comes to video conversion on any format whatsoever. However, if you just switched to Mac, you will find there is no Mac version of XMedia Recode. Don't worry, without free XMedia Recode for Mac, you can use alternative to XMedia Recode for file conversion. This article introduces a smart XMedia Recode for Mac replacement to manage file conversion on Mac OS X (El Capitan included) for you. 


The Finest XMedia Recode Mac Alternative 

There are different XMedia Recode Mac alternatives out on the market. But it is advisable to use only the finest of them all- iFastime Video Converter Ultimate for Mac which is capable of making sure that all formats be converted. With it, you can convert videos to media players, iPad, Galaxy Tab, iTunes, QuickTime, iMovie, FCP, Avid Media Composer and more without quality loss to meet your different needs. It's easy to use; you just need to add video files, choose an output profile, fiddle with the settings, and convert the video. Read review to learn more functions

Highlight Features: 

A friendly user interface. 
It supports numerous file including H.265 files. 
It can rip protected Blu-ray and DVD movies. 
It has the extra tool for editing video, cropping video, trimming video, and adjusting effects. 
It enables adding subtitle file. 
Even has a feature of merging several videos into one file. 

Now start the video conversion task on Mac OS X El Capitan. 

Hot Search: 2016 top 3 Video Converters Review2016 top 5 Video Converter for Mac OS Xtop 5 Free Video Converter Software for Macbest MP4 encoder for Mac OS X (El Capitan Included)

Free Download iFastime Video Converter Ultimate for Win/
Mac: 


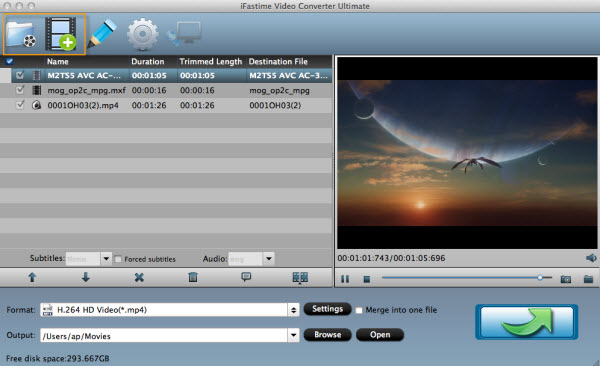
One: Run this professional on Mac OS X El Capitan video converter and then import your video files via "Add video" button. Or simply drag & drop the files into the program.


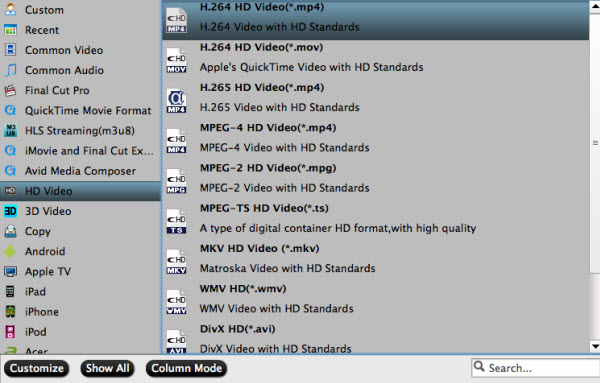
Two: Click on "Format" bar to select output format. Here you can choose to a lot of outputs including H.264 mp4, .mov, m4v for playing.


Tip: You can also check the "Settings" box , and set video codec, video size, Bitrate, frame rate to get a decent video.

Three: Finally, you just need to tap the "Start conversion" button start the Mac video conversion.

When the converting process ends, you can open output folder to play or edit the converted videos in players or NLEs with the best quality on Mac OS X El Capitan.

[i]Have more questions about XMedia Recode Mac Alternative review, please feel free to contact us>> or leave a message at Facebook.
 

More Topics: