Thursday, October 13, 2016

Convert Panasonic HC-WX970 4K Videos to Windows/Mac

Summary:Owning Panasonic HC-WX970 4K cameras to enjoy 4K videos at home? But do you know how to bring WX970 4K camera videos to Windows/Mac for playing.


The WX970 4K cameras have won a lot of attractions from videographers in that it delivers 4K videos with hand-held design. If you plan to get one, it will be enjoyable for you to have attractive 4K videos. However, a few issues may occur while playing, editing, uploading and sharing Panasonic WX970 4K footages in usual player, authoring software and website. This article aims to give you some tips and tricks for WX970 4K videos workflow on Windows/Mac. Please move on and find something which benefit to you. 

To spread some superb masterpiece to the world, you must be eager to know how to bring 4K videos which are recorded by your Panasonic WX970 4K camcorders to Windows/Mac for various entertainments. The most effective way to solve WX970 4K video playing, editing, uploading and sharing issues is to convert 4K clips to different objects friendly format using Pavtube 4K Video Converter. It also has Mac version. With Panasonic WX970 4K Video Converter, you can convert any 4K video clips to NLEs including FCP X/7/6, iMovie/FCE,Adobe Premiere Pro, Sony Vegas, Avid Media Composer and so on for editing. And any 4K footages to players like QuickTime for playing, websites like YouTube/Vimeo for uploading and sharing are all realizable. 


How to import Panasonic WX970 4K videos to Windows/Mac? 

Step 1: Install and launch the 4K Video Converter, click “Add video” button to import Panasonic WX970 4K files to the converter, or directly drag and drop the 4K videos to it. 


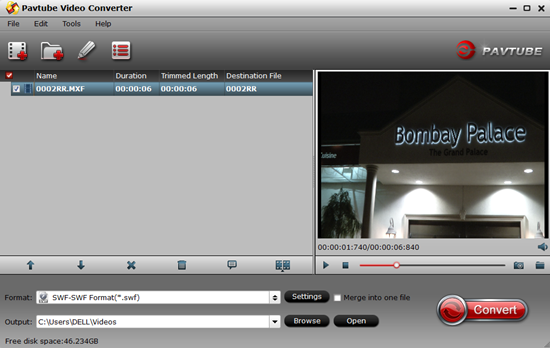
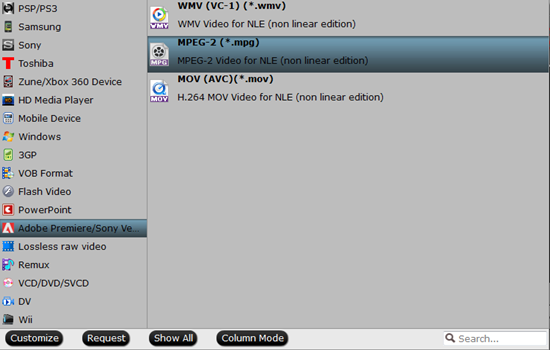
Step 2: Open the “Format” button on the left of the preview window, drop down the list and choose the output format according to your different devices and programs. For example, if you want to edit WX970 4K videos in Sony Vegas Pro 13, you can choose “Adobe Premiere/Sony Vegas>>MPEG-2 (*.mpg)” as output format. Besides, you can also choose WMV (VC-1) (*.wmv) if you want to get a relatively smaller output file. 


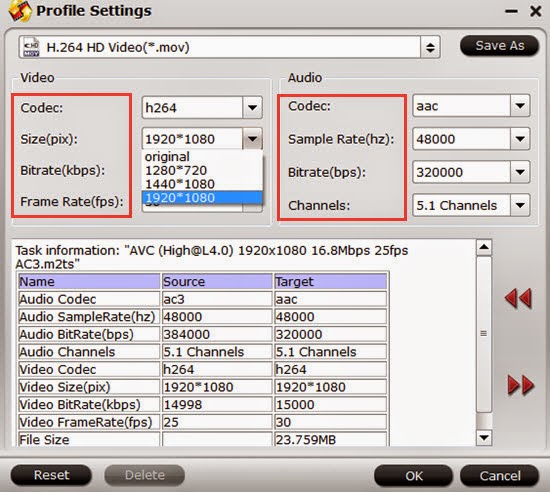
Step 3: If you want, you can go to the “Settings” panel to customize proper video/audio parameters including video size, bitrate, frame rate and more. 


Step 4: Click the “Convert” button to start converting Panasonic WX970 4K clips. After the conversion, click “Open” button to get the output videos. Create a project and start playing, editing, uploading and sharing. 

Conclusion: Are you clear about how to bring Panasonic WX970 4K videos to Windows/Mac for enjoyment? Also, you can burn the converted videos to CDs for preserving. Good news for you! There are money-saving bundles and deals. Go ahead and have a look. 

Related Articles: 

Source: http://pc-mac-compatibility-issues.blogspot.com/2015/03/bring-wx970-4k-to-windows-81-or-yosemite.html

Monday, October 10, 2016

Convert Canon XC15 4K to 1080p for easier playback and editing on Mac

Summary:If you are in need of compressing and converting Canon XC15 4K to 1080P/720P, no matter what the purpose is, you can find the best answer here. 

The need of downscaling 4K resolution videos from Canon XC15 happens quite often to many of us, for example to import Canon XC15 4K videos to FCP X, edit 4K footage in Premiere Elements, open 4K files in VLC or QuickTime player, watch 4K movies on iPhone 7, Galaxy Note 7, iPad Pro, etc. 


How to solve Canon XC15 4K UHD incompatibility issues 

It probably goes without saying that 4K Ultra HD video delivers superior viewing experience compared with 1080p video. However, most mobiles and players fail to play 4K UHD videos. Plus, the large file size of 4K videos and the video format would be the problem for 4K video playback. Thus, compressing 4K 4096x2160 or 3840x2160 to HD 1080P/720P with a proper 4K converter is a must-have option. 

Top Best Canon XC15 4K Video Converter Tool 

To get the work done, Pavtube HD Video Converter for Mac is believed to compress Canon XC15 4K to 1080p HD. Just like the way it is dealing with 4K to 1080p HD videos, it is surely in the support of converting Canon XC15 4K 4K UHD videos in any formats faultlessly in a flash. Besides, this powerful 4K video converter also can upscale 1080p to 4K easily. 

Besides, It provides hundreds of output format presets for Canon XC15 4K videos, such as DNxHD for Avid MC, MPEG-2 for Premiere Pro, MP4, WMV, AVI for any mobile or PC video players, MKV for Samsung Smart TV, Sony Bravia TV, Panasonic Viera TV, 4K/LED/LCD TV and more formats for better editing, playing, and sharing. This Ultra HD Video Converter is also available to customize the output resolutions to any size (4K, 2K, 1080p, 720p) the users want. For those who want to convert/downscale 4K videos on Windows (Windows 10 included), please turn to Pavtube HD Video Converter. Here is an easy-to-follow tutorial and to downsize your 4K footage to 1080p/720p video effortlessly. 

Hot search: Canon XC15 4K to Premiere Pro CC ǀ Canon XC15 4K & FCP X ǀ Canon XC15 4K to Windows Movie Maker, Sony Vegas Pro 

Free download the Canon XC15 4K to 1080p compressor 


Other Download:

How to Downscale Canon XC15 4K to 1080p with only 3 clicks on Mac? 

Step 1. Import Canon XC15 4K files 

Click "Add video" and load your Canon XC15 4K videos. This program supports batch conversion, so you can add multiple files into it at a time. 


Step 2. Choose any formats 

Click the "Format" drop down list to select a proper video foramt as you want. Since this video converter also provides optimal profiles for kinds of editing programs (FCP/iMovie/Premiere Pro etc) /media devices/iPhone/iPad/Apple TV/PSP/PS3/PS4/TV etc. 


Step 3. Adjust Canon XC15 4K Video Resolution to 1080p 

Click "Settings" button and adjust the Canon 4K video size to 1920*1080 for downscaling ultra HD Canon XC15 4K to 1080p/720p. You can also adjust Canon XC15 4K video and audio settings, including codec, aspect ratio, bit rate, frame rate, sample rate, and audio channel.


Tips: Edit the Canon 4K videos (Optional)

By clicking "Edit selected task" button, you can trim, crop the video, or add watermark, adjust effect, attaching subtitles for pre-editing your video files. 

  • Trim – Choose to reserve the part you need. Just choose the chapter which you need to trim, to set "start time" or "end time", type the portion which you want to save.
  • Crop – Remove black edges of your video or just get the scale of this video you want.
  • Effect – Adjust the effects by adjusting the parameters.
  • Audio Editor – You can replace/remove original audio, and set audio fade in/out effects.
  • Subtitle – You can add *.srt or *.ass/*.ssa subtitles to the video as hard subtitles.
Step 4. Start 4K to 1080p Conversion

At last, hit "Convert" button to start downscaling 4K to 1080p. It would take several minutes due to the file size. You can set "Shutdown converter after conversion" to do your other work. After the conversion, click Open to locate the generated 1080p/720p video.

Related Articles: 

Source: http://mediaconverting.blogspot.com/2016/09/downscale-canon-xc15-4k-to-1080p.html

Saturday, October 8, 2016

Canon 5D Mark IV 4K/HD Videos to Youtube/Vimeo/Instagram

Upload Canon 5D Mark IV 4K/HD Videos to Youtube/Vimeo/Instagram. The Canon 5D Mark IV is the world's most universally useful DSLR. It is competitive for both sports and action as well as for wedding, nature, portrait, landscape and product photography. With it, you can easily record 4096×2160 Digital Cinema Initiative 4K video or HD videos. After recording, you can upload the HD/4K video to some websites like
YouTube/Vimeo/Instagram etc for sharing with the world. But sometimes you will failed. Why? 

Though Youtube/Vimeo/Instagram now support 4K video uploading, but they all have some limitations, here we take Youtube as an example: 


Youtube has some limitations like video size, time, codec, format etc, Vimeo and Instagram are same with it. Canon 5D Mark IV recording 4K Video is MOV format, HD Video is MP4 or MOV format. MP4 and MOV are all complicated formats which have different codecs. Some of them are not supported by Youtube/Vimeo/Instagram. And the 4K high resolution is not friendly with Youtube/Vimeo/Instagram. 

So we provide you a solution for cannot upload Canon 5D Mark IV 4K/HD Videos to Youtube/Vimeo/Instagram successfully. Pavtube Video Converter (Pavtube Video Converter for Mac) is a professional 4K/HD video converter to settle the matter at one go. It supports you to convert 4K video to MP4, MOV, FLV, WebM, 3GP etc., and compress 4K UHD video to 4K of 3840x2160 pixel or 4K to 1080P/720P as well easily. Meanwhile, it will not take too much of your time since it delivers a super fast speed for video conversion. Besides, it also can convert Canon 5D Mark IV 4K/HD video to popular editor like FCP, Avid Media Composer, iMovie, Premiere Pro, Sony Vegas Pro/Movie Studio etc supported formats for smooth editing. 

Hot search: SD/HD/4K Video for uploading to Instagram ǀ DJI Phantom 3/4 videos to YouTube ǀ MP4 to YouTube ǀ H.265 to YouTube/Vimeo ǀ MP4 to Instagram 

Free download the converter for Youtube/Vimeo/Instagram: 


Other Download: 
- Pavtube old official address: http://www.pavtube.com/video_converter/ 
- Cnet Download: http://download.cnet.com/Pavtube-Video-Converter/3000-2194_4-75734821.html 
- Softonic Download: http://pavtube-video-converter.en.softonic.com/ 

How to Adjust Canon 5D Mark IV 4K/HD Videos to Youtube/Vimeo/Instagram for uploading? 

Step 1: Import Canon 5D Mark IV 4K/HD files 

Install and launch the 4K file converter. Then you can add the Canon 5D Mark IV 4K/HD videos to the program by clicking Add button or directly drag and drop. 


Step 2: Select output format 

Click Format bar to select an output format. To share your 4K movies on YouTube, .mov, .mpeg4, .avi, .3gp format from Common Video are all the proper formats. 


Tip: Adjust the video, audio settings 

After several attempts, we get know Youtube's maximum 4K bitrate is 45Mbps and it doesn't work with 60fps 4k video well. You can set the video frame rate like 24fps. If you don't want to spend long time uploading a 4k video to YouTube, you can downsize your 4K to 1080p if you need. 


Step 4: Edit/Split your Canon 5D Mark IV 4K/HD video 

Click Edit button and you can trim, crop or adjust the video with the built-in video editor to get the very part and effect of the movie you want. 

Tip: If the video clips you've trimmed are still longer than 15 minutes, you can choose to split the 4K/HD movie into smaller parts so as to share on YouTube without limit. Click the Split icon in the main interface, and you can cut your files according to time length and file size. 

Step 5: Start the conversion 

Finally, click Convert to start the Canon 5D Mark IV 4K/HD to Youtube/Vimeo/Instagram conversion. When the conversion ends, you can tap the Open button to locate the converted files and then upload the Canon 5D Mark IV 4K/HD video to Youtube/Vimeo/Instagram simply. 

Related articles 
Source:http://mediaconverting.blogspot.com/2016/09/upload-canon-5d-mark-iv-video-to-youtube.html

Tuesday, October 4, 2016

Blade Chroma 4K in FCP X with ProRes codec natively on Mac

The Blade Chroma 4K is a relatively compact camera drone that easily breaks down for travel. Includes an all-in-one controller with first-person-view screen and camera controls and can also be used with Yuneec’s ulracompact Wizard controller. This is the Ready-to-Fly(RTF)version of the Chroma Camera Drone from Blade, which includes the ST-10+ transmitter/personal ground station combination. It incorporates the CGO3-GB, a 3-axis ginbal-stabilized able to capture 4K video, 1080p video at up to 120 fps, and shoots photos at 12-megapixels. Photos can be captured in JPEG or DNG RAW and it is possible to snap photos while recording video. 

When you wanna import Blade Chroma 4K to Final Cut Pro X for further editing, you will probably got some issues like program crashed, black viewer screen, no audio track… So, what’s the right workflow for Blade Chroma 4K videos in Final Cut Pro X? Any suggestion? Yes, just read on to get the solution for importing and editing Blade Chroma 4K in FCP X. 

What you need to do is change Blade Chroma 4K to the ProRes codec which is the best codec for FCP X. Actually, it’s not as difficult as you imagine. What’s need is a just a common video converter like Pavtube HD Video Converter for Mac - The program works as the best Mac 4K to FCP X Video Converter. It helps you fast transcode Blade Chroma 4K footage to ProRes with fast encoding speed and without quality loss. What’s more, it’s the optimal tool for transcoding GoPro, Sony, Canon, Nikon, Panasonic, etc camera or camcorder videos to kinds of NLE programs Avid Media Composer, Adobe Premier Pro, DaVinci Resolve Lite, FCE and more. For Windows user, please turn to Pavtube HD Video Converter. Just download it and follow the simple guide to achieve your goal. 

Hot search: Canon C100 Mark II AVCHD to FCP X * Panasonic DMC-G7 4K MP4 to FCP X * Sony HDR-CX440 XAVC S to FCP X * Samsung NX500 4K H.265 in FCP 6/7 


Other Download: 

Start converting Blade Chroma 4K to ProRes codec for ediitng with FCP X 

Step 1. Click “Add video” button to choose Blade Chroma 4K video files from your hard drive for converting. Or directly drag the Blade Chroma 4K videos you want to convert to the left item bar. 


Step 2: Click the “Format” bar to get the drop-down menu and you can get “Final Cut Pro>>Apple ProRes codec”, including ProRes 422, ProRes 422 (HQ), ProRes 422 (LT), ProRes 422 (Proxy) and ProRes 4444. Choose the proper one you want. Here, we suggest you to choose Apple ProRes 422 .mov as the best output format. 


Step 3: Now, click “Convert” and let it go. The Blade Chroma 4K to FCP X Converter for Mac supports batch conversion. So if you have lots of Blade Chroma 4K videos to convert, check “Shut down computer after conversion” and you can go away without keeping an eye on it. 

Conclusion: Once the conversion process shows in 100%, click “Open” to get the output videos. Then import them to FCP X. Create a project and start editing Blade Chroma 4K videos in FCP X with light speed. 

Read More: 

Source:http://digitalmediasolution.altervista.org/blog/edit-blade-chroma-4k-in-fcp-x/

Thursday, September 29, 2016

Editting Canon EOS C700 4K ProRes to Instagram/Youtube/Vimeo with smoothly

Summary:The ways Canon EOS C700 4K ProRes videos be uploaded to Canon EOS C700 4K ProRes to Instagram/Youtube/Vimeo? 

Though some websites support 4K video uploading, uploading Canon EOS C700 4K ProRes to Instagram/Youtube/Vimeo is not that easy. After countless failure, you may wonder, why on earth can’t my Canon EOS C700 4K ProRes videos be uploaded to Canon EOS C700 4K ProRes to Instagram/Youtube/Vimeo? 

To begin with, you need to figure out what 4K Instagram/Youtube/Vimeo video settings are. In fact, there are three basic factors that will decide whether your uploading is going to be successful or not: video file formats, size, and frame rate. Instagram/Youtube/Vimeo now accepts some video formats to be uploaded, including MOV, MP4, AVI, WMV, FLV, 3GP, MPEGPS and WebM etc but no ProRes. And videos should not be longer than Instagram/Youtube/Vimeo specified minutes. 

Now most 4K videos are Canon EOS C700 4K ProRes videos which are not supported by Instagram/Youtube/Vimeo, therefore, if you want to upload it to Instagram/Youtube/Vimeo, firstly you need to convert it to supported formats. In the following parts, I am going to introduce to you how to carry out the converting exactly with the best 4K ProRes video converter - Pavtube Video Converter

Main Features of Pavtube Video Converter:
  • Convert Canon EOS C700 4K ProRes to Instagram/Youtube/Vimeo best format/codec like H.264 MP4.
  • Convert Canon EOS C700 4K ProRes to any popular format including MP4, AVI, MKV, H.265, MOV, WMV, MPEG-2 etc.
  • Convert Canon EOS C700 4K ProRes to editor format like DaVinci Resolve, FCP, FCE, Premiere Pro, Avid Media Composer, Windows Movie Maker, Sony Vegas Pro etc.
  • Downsacle 4K ProRes to 1080p ProRes for more usages.
  • Basic Canon EOS C700 4K ProRes video editing functions: split, merge, trim, crop, add watermark, adjust video effect, edit audio and insert subtitles.
  • Perfectly compatible with Windows 10, Windows 8.1, Windows 8, Windows 7, Windows XP.
  

Mac version - Pavtube Video Converter for Mac 

How to Convert Canon EOS C700 4K ProRes to Instagram/Youtube/Vimeo format? 

Step 1. Download, install and launch Aiseesoft Total Video Converter on your computer. On the main interface of the program, click Add File on the toolbar above, and load the source video to it. (If your video is in your camcorder or external storage card, transfer it to your computer first.) 


Step 2. Click the drop-down list of Format, choose .mp4 from Common Video for YouTube, Instagram and Vimeo. 


Tip. If the video size is too large, click Settings besides Profile. Set the Parameters to adjust the video size. You could also choose options on the toolbar, give your video some editing as you like. 


Step 3. Tap the “Convert” button to start the Canon EOS C700 4K ProRes to Instagram/Youtube/Vimeo conversion. 

Free download the best Canon EOS C700 4K ProRes converter: 


Other Download: 
- Pavtube old official address: http://www.pavtube.com/video_converter/ 
- Cnet Download: http://download.cnet.com/Pavtube-Video-Converter/3000-2194_4-75734821.html 
- Softonic Download: http://pavtube-video-converter.en.softonic.com/ 

Related Articles: 

Tuesday, September 27, 2016

Convert DJI Inspire’s 4K video to 4K TV

Summary: 4K TVs were definitely a hot gift—and now that you’ve had time to get it set up, it’s time to really get into the 4K viewing experience. 

“Please share what 4K TV model you guys are using to display your 4K footage (via USB drive). I just purchased a 2015 Vizio 4K TV, but it doesn’t support .mov of any kind or 4k MP4 video from by DJI Inspire 4. Both of which are pretty standard formats I thought. The only video i’ve been able to play is 1080p MP4 video. So just to recap…it doesn’t recoginze .mov at all and it plays 1080p MP4 but not 4K MP4. I get a “video format not supported” error message when trying to play MP4 4K.” 

“I have a Samsung 55 inch curved 4k TV. This thing blows me away. Anyway there is no USB 3.0 which is disappointing, only 2.0. How I play back 4k video from the my DJI Inspire 4.” 

Most 4K TVs do not support 4k video over USB/SD port input. You should check the manual for your TV first, it lists the supported containers, codecs and frame rates available to be played back over the USB port. 

If your TV only goes up to 1080p/60, so you’d better going to have to convert your files to 1080p/60 or some variation. 

If there is no USB 3.0, only 2.0, which is disappointing. 

If your TV has a HDMI port, then you could copy all of your videos into a slim large external harddrive or your laptop(with HDMI). Then plug that into the TVs HDMI port and play directly. That will get around USB stuff. 

Solution for Playing DJI Inspire 4K Videos on your 4K Ultra/HD TV? 

Don’t worry. Every 4K TV is making its best effort to let you enjoy the benefit of 4K resolution on their Ultra HD TVs. Generally speaking, whatever the TV brand you owned(Samsung, Panasonic, Sony, LG, Vizio…), it always support the world wide H.264 MP4 format, just reformat the MOV files from your DJI Inspire into H.264 MP4 format, it recommended to transcode all the video in same folder together, in order to avoid the incomplete videos when playback. 

All the videos in the same H.264 MP4 codec should have no problems after streaming to the 4K TV. Some 4K TVs are set currently on the market to include a high efficiency video codec (HEVC) also known as H.265 for streaming UHD content via the Smart TV interface. You can transcode the DJI Phantom 4 4K MOV/MP4 into the H.265 (HEVC) codec to get a best visual experience. 

How to Convert DJI Inspire’s 4K Videos for 4K TV? 


Here, in order to convert DJI Inspire’s 4K video to the common H.264 MP4 or H.265 (HEVC) codec video format. You can have a try - Pavtube Video Converter, which is a real All Formats to 4K TV Converter. It could convert DJI Inspire’s 4K Videos for 4K TV with common H.264 MP4 or H.265 (HEVC) codec video format, if your TV is Samsung, Panasonic, Sony, LG, it has the preset format for them. (read review) 

It is compatible with Windows 10, Windows 8.1, Windows 8, Windows 7, Windows XP. 

Mac version - Pavtube Video Converter for Mac, which is compatible with macOS Sierra, Mac OS X 10.11 El Capitan, Mac OS X 10.10 Yosemite, 10.9 Mavericks, 10.8 Mountain Lion, 10.7 Lion, 10.6 Snow Leopard, 10.5 Leopard. 

Now download the best 4K video converter for 4K TV 

Windows download How to Convert DJI Inspires 4K video to 4K TV?windows buy How to Convert DJI Inspires 4K video to 4K TV? 

Free download and install 


Other Download: 
- Pavtube old official address: http://www.pavtube.cn/blu-ray-video-converter-ultimate/ 
- Cnet Download: http://download.cnet.com/Pavtube-Video-Converter-Ultimate/3000-2194_4-75938564.html

How to Convert DJI Inspire’s 4K video to 4K TV best format on Windows? 

Step 1. Add videos 

Install and run the 4K video converter on your computer, then click “Add Video” button to browse and load your rvideos which you’ve transferred to your Windows PC. 

load h265 to itune How to Convert DJI Inspires 4K video to 4K TV?

load h265 to itune How to Convert DJI Inspires 4K video to 4K TV?

Step 2. Click “Format” bar, and select .mp4 from “Common video” or “HD video”, or select the format from “TV”.

convert blu ray dvd sd hd video to h.264 mp4 How to Convert DJI Inspires 4K video to 4K TV? 

convert blu ray dvd sd hd video to h.264 mp4 How to Convert DJI Inspires 4K video to 4K TV?

Output samsung tv preset file format How to Convert DJI Inspires 4K video to 4K TV? 

Tips: The default settings may not satisfy you, and you can click the “Settings” button to change the settings by yourself including video resolution, bit rate, audio sample rate, audio channel etc. for full screen playback smoothly. Or keep no changes, which is also a good choice.

Step 3
. Click the “Convert” button on the main interface and the software will start to convert DJI Inspire’s 4K video to 4K TV friendly video formats immediately. When the conversion finishes, click “Open” to find the converted video files. Then you can effortless transfer the video files to 4K TV for playback on the go.

Read More: 

Source:http://digitalmediasolution.altervista.org/blog/play-dji-inspire-4k-on-4k-tv/ 

Monday, September 19, 2016

Backup Blu-ray movies to PS4 H.264 With easily

Rip Blu-ray to PS4 with friendly video format. It worked! And it is the best way to liberate myself from endless annoying predicament. 


There’s no doubt that no matter children or adults are fond of PS4 game. So every since a new blu-ray from this giant makes its first appearance in blu-ray store, its movie fans will grab it by whatever means. In fact, such hard-won blu-ray movie shall be treasured perpetually instead of scratch or damage. An effective way to avoid such tragedy is to rip blu-ray to your hard drive for watching on TV player. 

Movie lovers may be delighted because the next-gen of the Sony PS4, has added blu-ray functionality to make it a snap to play blu-ray on PS4. Can PS4 play blu-rays. Disappointedly, gamers are recently shocked to find the PS4 won't play blu-ray anymore. Below are the constant occasions regarding to the PS4 blu-ray playback errors: 
Part 1: Problem of 'PS4 Won't Play Blu-ray ResolvedWhen I click on the movie it "load" into it, PS4 just stays at a black screen? I've tried this with Blu-ray 's movies and freeze my ps4 right after clicking on them. Is this a firmware issue? Like with the 1.50 update or could this be hardware? 

  • - My PS4 suddenly ejects disc on its own when I am playing a game. I have no clue why this is happening. Help plz
  • - How do I fix the problem on my ps4 . It says "unrecognized disc " when i put in a game. Any suggestions ?
  • Until now, there are many PS4 blu-ray playback/disc reading issues from PlayStation4 Support and forum. Here are the common solutions to "PS4 not playing blu-ray" problem suggested by users:
  • Try to eject the stuck disc manually, clean it and reboot your PS4.
  • Someone suggested to turn off the PS4 internet connection and the movies will play.
  • Someone gives the direction of updating your PS4 to the newest version 1.52 and then try again.
  • Pull out the hdmi cord and plugging it back in when the screen stays black.
  • Rip blu-ray movie to PS4 readable video format using a PS4 blu-ray ripper to play blu-ray on PS4 without inserting disc anymore.
Part 2: PS4™ Supported disc formatsInsert the disc, and then select the content from the content area. Your PS4™system must enable the disc playback feature over the Internet, one time only, before you can play any BDs or DVDs. After this feature is enabled, your PS4™ system doesn't have to connect to the Internet to play BDs or DVDs. 
  • Blu-ray Disc BD-ROM*1
  • BD-R/RE (BDAV, BDMV)
  • DVD DVD-ROM
  • DVD-R/RW*2 (video mode, VR mode*3)
  • DVD+R/RW*2
    1. Hybrid discs are supported.

    2. AVCHD is supported.

    3. CPRM is supported.
  • Playback of the following types of discs is not supported. CD
  • BD-RE ver.1.0
  • BD-R/RE XL
  • DVDs that have not been finalised
  • Do not use the following discs. Doing so may damage your system. 8 cm discs
  • Non-circular discs, such as discs in the shape of a card, star, or heart
  • Discs that are cracked or deformed, or discs that have been repaired
  • A DualDisc features one side that conforms to the DVD standard, and the other side with audio only. The audio-only side cannot be played on your PS4™ system.
  • For continuous playback of copyright-protected BDs, the encryption key for AACS (Advanced Access Content System) might need to be renewed. The encryption key is automatically renewed when your PS4™ system is connected to the Internet.
  • Some discs may not be playable due to scratches, dust, the quality of recording, or the characteristics of the recording device.
  • In rare instances, DVDs, BDs and other media may not play properly on your PS4™ system. This is primarily due to variations in the manufacturing process or encoding of the software.
If you are the one to dig out the easiest yet most efficient solution to play Blu-ray movies on PS4 without any trouble, here you come to the right place. The solution to get Blu-ray movies PS4 problem worked out with the help of a professional blu-ray ripper - Pavtube ByteCopy It is a professional blu-ray movies to PS4 ripping program that lets you copy and rip both homemade and commercial blu-rays to MOV, MP4, FLV, AVI, MPEG4, H264, WMV, etc with high quality and fast speed. About 200+ preset profiles available for Apple, Android, Sony, Microsoft and Google devices make blu-rays playback pretty easier than ever. Therefore, you can directly rip blu-rays to PS4, PS3, Xbox One, iPhone 6s/SE/6s Plus, iPad Air 2/mini 4, iPad Pro, Samsung Galaxy S7/Note 7, HTC One M9, Kindle Fire HD, as well as other new phones and tablets even released in 2016. Reviews 

Free download and install: 


Other Download: 
- Pavtube old official address: http://www.pavtube.cn/bytecopy/ 
- Cnet Download: http://download.cnet.com/Pavtube-ByteCopy/3000-7970_4-76158512.html 
Part 3:How to Rip blu-ray movies on PS4 with Lossless Quality Step 1. Run blu-ray to PS4 converter and load blu-ray file 

Free download and run this trust-worthy blu-ray to PS4 ripper on your Mac, import the blu-ray movie you'd like to rip by clicking "blu-ray Disc" button. Or simply load blu-ray folder and ISO image by clicking the relative button on the main interface. You can also get its windows version to tackle the PS4 won't play blu-ray' problem. 


Step 2. Select output format 

From the pop-up small window, you can choose "PSP/PS4" --> "to PS4 Video" and choose PS4 H.264 or MPEG4 as the output video format. Click the "Done" to return to the main interface. 
 

Tips: the stunning "Edit" feature lets you crop the video size to better suit your PS4's screen, trim the video segment, add watermark and external subtitle as you want. 

Step 3. Select output folder 

Specify output folder on your computer to save the output files. Click the button to choose the path where you want to save the output files in. 

Step 4. Start converting Blu-ray to PS4 

With the above steps been finished, click the "Converter" button to start Blu-ray to PS4 conversion on your computer. 

When the Blu-ray to PS4 MP4 ripping finished, you can freely transfer Blu-ray movie to PS4 and watch movie on PS4 anytime and anywhere you like, without being bothered by asking yourself the without any hassle. 

Related Articles: 

Source:http://movie-tips-review.blogspot.com/2016/08/blu-ray-to-ps4-h264-lossless.html